Air King 6000 Handbuch für Garantie, Wartung und Fehlersuche - Seite 3
Blättern Sie online oder laden Sie pdf Handbuch für Garantie, Wartung und Fehlersuche für Befeuchten Air King 6000 herunter. Air King 6000 14 Seiten. Flow-through furnace humidifier
Auch für Air King 6000: Handbuch zur Fehlersuche (13 seiten), Installations- und Betriebsanleitung (20 seiten)
4. The inlet filter is located inside the black orifice fitting. Using a
pointy object (i.e. nail), remove the inlet.
5. The filter should be fairly clean and free of depree,
6. Replace or clean the inlet filter if required. If punctured or
damaged, replace before operating the humidifier. Remember
this filter protects the orifice fitting and solenoid valve.
7. Reconnect the water supply.
8. Reconnect the bypass tube.
9. Turn the power and water to the humidifier back on. Check
for and repair any leaks.
10. Turn on your furnace.
A
CHECKING WATER FLOW TO THE HUMIDIFIER
DISTRIBUTION TRAY (REFER TO FIGURES 3 A, B, C)
The amount of water flowing to the distribution tray directly
affects the output of the humidifier. The humidifier has a built in
restrictor which will ensure efficient use of water while
maintaining maximum output. In the average home the amount
of water flowing out of the flexible water tube (supplying water to
the distribution tray) should be between 300 ml – 600 ml (10 fl
oz – 20 fl oz, US) in approx. 3 to 5 minutes. If necessary and you
want to check the amount of water flowing to the humidifier's
evaporator pad follow the steps below. If you find that the
amount of water flowing is not enough you should check that the
self pierce needle valve is fully open and water is flowing freely
to the humidifier (disconnect the water supply from the
humidifier and allow the water to flow into a bucket – it should
be a relatively heavy stream), Check that there is no blockage
within the unit (ie the inlet water filter or the orifice connector.).
1. Get a 300 ml to 600 ml (10 oz – 20 oz) container (old pop or
water bottle) and a watch, clock or stop watch and a water
bucket.
2. Remove the front cover of the humidifier, it is held in place via
a plastic thumb screw.
3. Get the humidifier to cycle ON, - you can do this by getting
your furnace to go into heating mode and blowing hot air.
4. Once the Water starts to flow remove the flexible water supply
tube from the distribution tray, it is push fit into the nozzle on
the top of the distribution tray.
5. Allow the water from the water supply tube to flow into the
300 – 600 ml container and time how long it takes to fill the
container. Any overflow or spillage run into a bucket.
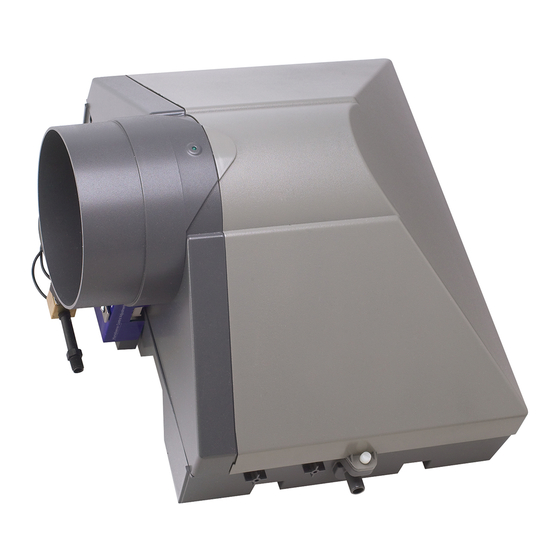
Model 5000/6000 Flow Through Humidifiers
Figure 2.
B
C
6. After the test is complete firmly replace the flexible water
supply tube into the nozzle on the top of the distribution tray.
7. Replace the front and secure with thumb screw.
8. Check for and repair any leaks.
A
REPLACING A SOLENOID VALVE OR AN ORIFICE
CONNECTOR (REFER TO FIGURES 4 A, B, C)
At some point it may become necessary to replace or check the
solenoid valve and or the orifice fitting. Follow the steps below to
complete this operation.
1. Turn off the power to the humidifier, turn off the water supply
to the humidifier, Turn off your furnace.
2. Remove the bypass tube from the side of the humidifier.
3. Remove the front cover from the humidifier (secured in place
with a thumb screw).
4. Remove the flexible black water supply tube from the top of
the distribution tray.
5. Feed the flexible black water supply tube through the
humidifier side.
6. Using a wrench disconnect the water supply to the solenoid
valve.
7. Depending on your installation in order to get better access it
may be a good idea to remove the side from the humidifier,
this is done by removing the 2 screws on the inside of the unit
which hold the side in place. However you should be able to
complete this replacement without removing the side.
8. Remove the 2 solenoid valve wires from their terminals and
using a screw driver remove the 2 screws which hold the
solenoid valve in place.
9. Remove the solenoid valve from the humidifier's side – If
replacing a solenoid valve, replace the orifice fitting and water
inlet filter at the same time.
10. If replacing the orifice fitting only securely fix the solenoid
valve in place (place gently in a vise or hold with a wrench)
and using a wrench remove the orifice fitting from the valve.
11. Before installing the new orifice fitting ensure the threads are
clean on the solenoid valve.
12. When installing the new orifice fitting ensure you use Teflon
tape (white plumber's tape) on the threads of the new fitting.
13. When replacing the orifice fitting replace the inlet water filter
at the same time.
Figure 3.
B
C
3