Alvin Heritage HAE660 Instrucciones de montaje y uso
Navegue en línea o descargue pdf Instrucciones de montaje y uso para Herramientas Alvin Heritage HAE660. Alvin Heritage HAE660 2 páginas. Aluminum watercolor easel
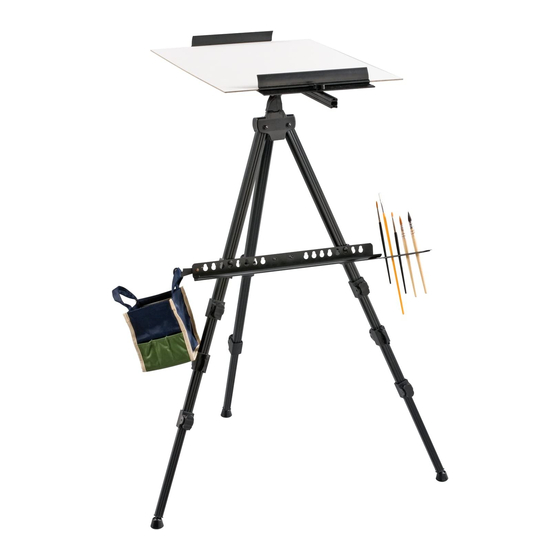
Parts Included:
A
Easel Body
B
Center Bar
C
Pivot Head
D
Extension Bar
E
Canvas Tray
F
Top End Bracket (6")
G
Bottom End Bracket (10")
H
Nylon Storage Bag
J
Bolt and Nut for
securing Pivot Head
K
T-Bolts for securing
End Brackets (2 pcs.)
L
Screw knobs for securing
End Brackets (2 pcs.)
M
Thumbscrews for securing
Center and Extension Bars (4 pcs.)
1
2
Aluminum Watercolor Easel
Assembly and Use Instructions
A
B
D
E
F
To Assemble:
Secure Center Bar
1
Position pivot head ( C ) in the middle of center bar ( B ). Insert thumbscrews ( M ) and tighten gently.
Attach Pivot Head
2
Use bolt and nut ( J ) to connect pivot head to easel body. Tighten firmly.
Extend Legs
3
Open easel body ( A ) and extend legs to desired length. Press levers to lock and unlock.
Attach End Brackets to Center Bar
4
Slide T-bolt ( K ) into center bar track, place end bracket ( F or G ) over bolt, attach screw knob ( L )
and tighten gently.
Attach Extension Bar to Center Bar ( optional )
5
The extension bar is only needed for panels and canvas between 25" and 36".
Slide extension bar ( D ) into center bar, insert thumbscrews from below and tighten gently.
Attach Canvas Tray
6
Align support posts with tray holes that are equidistant from center, and snap into place by
pushing down gently.
3
C
H
G
4
5
For model HAE660
J
M
L
K
6