ASL INTERCOM PS 630 사용자 설명서 - 페이지 4
{카테고리_이름} ASL INTERCOM PS 630에 대한 사용자 설명서을 온라인으로 검색하거나 PDF를 다운로드하세요. ASL INTERCOM PS 630 11 페이지. Six channel speaker station
ASL INTERCOM PS 630에 대해서도 마찬가지입니다: 사용자 설명서 (15 페이지)
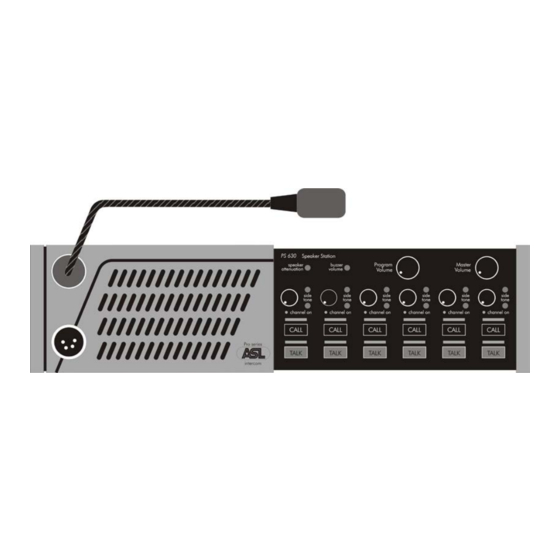
1
LISTEN LEVEL control knobs
To preset the listen level for each intercom
channel. By turning the knob fully counter
clockwise, the channel is switched off.
See #17 for receiving a Call signal whilst the
channel is switched off
2
TALK buttons
These buttons allow talking to each channel
separately or to several channels simultaneously.
If a TALK button is activated, its green LED is lit.
Momentary switching:
If a TALK button is pushed and held, the
microphone signal is sent to the referring intercom
channel until the button is released.
Latched switching:
If a TALK button is pushed shortly, it is
electronically latched and the microphone signal
is sent to the referring intercom channel. If
pushed again, the Talk button switches off.
Mic Mute when latched on:
After on an intercom channel a so-called Mic Mute
signal has been received from a PRO Series
master station or power supply the connection
between microphone and the referring intercom
channel is interrupted. By pushing the TALK
button, the connection is restored and one can
talk to the intercom channel again.
3
CALL buttons
To activate the call system, for each channel
separately. By a momentary push a call signal is
sent to all stations connected to the referring
intercom channel and all Call LEDs start flashing.
Pushing and holding the CALL button for 2
seconds activates the call buzzer (if not muted by
a Buzzer Mute signal received from a PRO Series
master station or separate power supply).
PAGE 4
User Manual PS 630 / October 2013 © ASL Intercom
BV
4
MASTER VOLUME knob
This knob is a master volume control of the listen
levels of the 6 intercom channels (see also #1),
for both the speaker and the headset.
5
PGM VOLUME knob
To adjust the volume of the Program audio, both
for the speaker and the headset. Depending on
the setting of internal jumpers (see #18), the
master volume knob functions as a master control
for both PGM and intercom volume.
6
SIDE TONE LEVEL trimmers
With these trimmers (one for each channel) the
level of your voice in your own loudspeaker or
headset is adjusted.
7
SIDE TONE HI trimmers
With these trimmers (one for each channel) the
rejection in the high frequency range is adjusted.
Trimmers #6 and #7 also minimize the speaker
feeding back into the gooseneck microphone (unit
feedback).
Adjustment procedure for both side tone
trimmers, for each channel separately:
•
set trimmer in start position : fully
clockwise
•
switch off the microphones of all
connected (speaker-) stations
•
Connect a headset to this PS 630
•
push the TALK button of the channel of
which the side tone is supposed to be
adjusted
•
turn up the listen volume of the PS 630.
•
speak into the headset microphone.
•
adjust the listen level (your own voice) by
turning the side tone trimmer.
The trimmer operating area is between fully
clockwise and minimum level.
For optimum result, repeat the side tone
adjustment procedure with trimmers #6 and #7
a few times.
Adjusting side tones does not affect the level of
your voice as it is heard by other stations.