Autonics BWML Series 빠른 시작 매뉴얼 - 페이지 3
{카테고리_이름} Autonics BWML Series에 대한 빠른 시작 매뉴얼을 온라인으로 검색하거나 PDF를 다운로드하세요. Autonics BWML Series 5 페이지. Line-deam mapping sensors
Specifications
Model
BWML
Sensing method
Diffuse reflective type
Beam pattern
Line-beam type
Light source
Infrared LED (850 nm modulated light)
Sensing distance
95 mm ± 10 mm
Sensing target
Transparent or opaque glass plate
CH ordering
Forward (bottom = 1 CH) / Backward (top = 1 CH)
orientation
(parameter setting)
01)
Sensing CH
4 to 62 CH
01)
Sensing target pitch
20 mm to ordered specification
01)
Response time
≤ 120 ms
Operation mode
Light ON / Dark ON (parameter setting)
01)
Background sensing mode, installation guide mode, sensing level
Function
setting, output option, self-diagnosis
Output indicator (red), stability indicator (green),
Indicator
status indicator (green, yellow, red)
Approval
ᜢ ᜣ
02)
Weight (packaged)
≈3.64 kg (≈ 4.8 kg) (based on BWML82-20CLL)
01) T his product is order made.
02) P lease refer to the website for KC certification model.
Power supply
24 VDCᜡ (ripple P-P: ≤ 10 %)
Current consumption
≤ 1.0 A
Reverse power protection circuit, output short overcurrent
Protection circuit
protection circuit
Insulation resistance
≥ 20 MΩ (500 VDCᜡ megger)
The square wave noise by the noise simulator
Noise immunity
(voltage: 500 V, period: 10 ms, pulse width: 1 us)
Between all power input terminals and F.G. terminal
: 500 VACᜠ 50 / 60 Hz for 1 min
Between communication input terminals and F.G. terminal
Dielectric strength
: 1,000 VACᜠ 50 / 60 Hz for 1 min
Between power input terminals and communication input
terminals: 1,000 VACᜠ 50 / 60 Hz for 1 min
1.5 mm double amplitude at frequency of 10 to 55 Hz (for 1 min) in
Vibration
each X, Y, Z direction for 2 hours
Shock
210 m/s² (≈ 21 G) in each X, Y, Z direction for 3 times
Ambient temperature
15 to 35 ℃, storage: -10 to 50 ℃ (no freezing or condensation)
Ambient humidity
35 to 55 %, storage: 35 to 85 % (no freezing or condensation)
Protection rating
IP40 (IEC standard)
Material
Case: AL, sensing part and Indicator part: PMMA
Communication Interface
■ CC-Link
Control output
CC-Link
Version
CC-Link Ver 1.1 / CC-Link Ver 2.0
Association approval
Type of station
Remote Device Station
Extended cyclic
CC-Link Ver 1.1: - / CC-Link Ver 2.0: 1 time (single)
Number of occupied
1 station 32-point module, 2 station 64-point module
stations
Transmission speed
156 kbps / 625 kbps / 2.5 Mbps / 5 Mbps / 10 Mbps
Max. number of
42-unit
connection
01)
Number of I/O points 1 station: 32-point (I/O allocation), 2 station: 64-point (I/O allocation)
01) The number of connectable units = 16 × A + 54 × B + 88 × C ≤ 2304
- A: remote I/O station, max. 64 units
- B: remote device station, max. 42 units
- C: local, intelligent station, max. 26 units
CC-Link Baud Rate and Address Setting
• For CC-Link setting, communication speed of PLC Master and BWML should be the
same.
• Address is available from 1 to 64 and it should not be duplicated.
• When changing CC-Link setting, turn OFF the power of this unit and re-supply the
power.
Setting
Setting range
0: 156 kbps, 1: 625 kbps, 2: 2.5 Mbps
B RATE
Baud rate
3: 5 Mbps, 4: 10 Mbps, 5 to F: not used
0: master, 1 to 64: settable address, 65 to 99: not used
×10, ×1 Address of unit
E.g.) To set 12 as address, set ×10 to 1 and ×1 to 2.
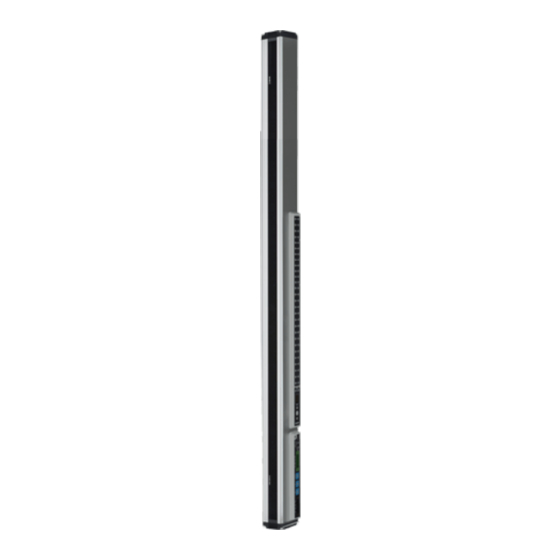
Unit Descriptions
2
1
1
Output indicator (red)
2
Stability indicator (green)
3
3
Status indicator (green, yellow, red)
4
4
Status display
5
Mode setting key
5
1
2
USB port:
This port is only for firmware upgrade, run mode change,
1
and A/S. Do not use this port for the another purpose, or the
3
product can malfunction.
Comm. status indicator:
2
It displays the communication status through LED.
4
3
Power cable connector
Comm. speed setting switch (B RATE):
4
You can set CC-Link communication speed.
5
Comm. address setting switch:
5
You can set CC-Link address. (×10: 10
6
CC-Link comm. connector
6
Installation and Adjustment
• If there is disturbing light (fluorescent light) near the product, install the product
vertically away from the disturbing light (fluorescent light).
• Use the product only for sensing the glass over the 6.5 generation.
If the product is used for sensing the glass under the 6.5 generation, the product can
malfunction.
01)
I nstall the product on the right side of the
sensing target with the bracket.
02)
A djust the height of the product to the place
where the first glass of the full cassette is aligned
with the installation guide line.
03)
S upply the power.
04) E nter to the background sensing mode to
detect background. If any background object
is detected, reinstall the product, changing the
installation angle.
05)
F inish installation, when all channels are turned
on after placing full cassette.
06) I f all channels are not turned on, enter to the
installation guide mode and adjust the product
up and down. Return to the run mode and finish
installation, when all channels are turned on.
Mode Switching Method
→
[▼] 3 sec
→
[SET] 3 sec
RUN
→
Sensing level setting
[▲, ▼]
→
[SET]
02)
01) E ntering to the installation guide mode and pressing [SET] key starts teaching, and the product returns to the
run mode after teaching completed.
02) When the status display is 0, press [SET] key to return to the run mode.
, ×1: 10
1
Installation
guide line
Background
[▼] 3 sec
sensing mode
Installation
[SET] 3 sec
guide mode
01)
[▲, ▼]
Output option
[▲+▼] 5 sec
)
0
→
→
RUN
→
→