AlphaVision 003609 빠른 참조 매뉴얼 - 페이지 5
{카테고리_이름} AlphaVision 003609에 대한 빠른 참조 매뉴얼을 온라인으로 검색하거나 PDF를 다운로드하세요. AlphaVision 003609 12 페이지.
Preparations
Before installing make sure the following components are present:
Alphatronics AlphaVision NG or XL security alarm system with RS-485 bus
12VDC power supply available from the alarm system (via the RS-485).
Router or switch with a free LAN connection
Working Internet connection
Computer / laptop with Internet Explorer 6 or higher
or compatible browser.
Network cable and optional cross-over network cable for programming
#
Note: Internet Explorer 5.0 (or lower) is not supported!
Before installing make sure the following information is known:
The IP address and registration port of the RC-4001 IP or RX-5000/8000 receiver in
the central station including the subscriber number.
The IP address, subnet mask and (local) Gateway that must be programmed into the
AlphaVision IP (+ GPRS) when not using DHCP configuration in the Ethernet settings.
Mounting
1. The AlphaVision IP alarm transceiver (art. code. 003609) is delivered as a plug-on
board and can be mounted on top of the AlphaVision NG main board using the
delivered mounting studs. Connect the supplied flat cable between the AlphaVision IP
transceiver and the AlphaVision NG mainboard. The AlphaVision is now connected to
the RS-485 bus of the control panel. The AlphaVision IP receives it power supply
through the RS-485 bus.
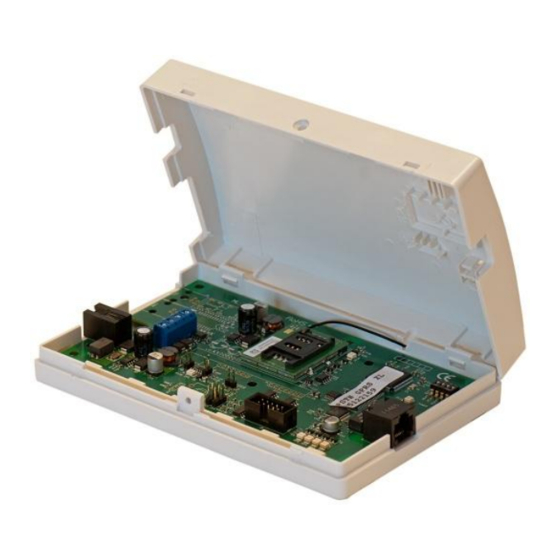
2. The AlphaVision IP + GPRS alarm transceiver (art. Code. 003614) is delivered in a
synthetic casing. It is advised to place the AlphaVision IP + GPRS alarm transceiver in
the enclosure of the AlphaVision NG or XL control panel. If the enclosure of the control
panel is a metal casing the casing must be equipped with a proper grounding. Connect
the AlphaVision IP + GPRS alarm transceiver to the RS-485 bus connection of the
Alphatronics control panel using the 4 blue terminals (+, A, B, 0).
3. Then connect a network cable between the AlphaVision IP (+ GPRS) and the router,
the transceiver can now be accessed via the internal network. Use the free Device
Discovery Tool (see www.alphatronics.nl) to detect Alphatronics IP devices on the
network.
4. It is also possible to connect directly to the PSTN-2-IP (GPRS) using a Cross-over
network cable (art. code. 003620) between the LAN port of the laptop and the PSTN-2-
IP (GPRS). Ensure that the laptop has a fixed IP address in the same range
(192.168.0.xx) as the PSTN-2-IP (GPRS). Set dipswitches 2 * and 3 ** to ON.
*
dipswitch 2 to ON ensures that it is always possible be log-in to the web server with Username "admin" and no
Password needs to be entered. Also, the IP address of the AlphaVision IP (+ GPRS) is temporarily set to
192.168.0.48 (http port 80). Dipswitch 2 can remain OFF if the Username, Password and the IP address of the
PSTN 2 IP (GPRS) is known
**
dipswitch 3 to ON (default) ensures that the programming can be accessed / modified.
If dipswitch 3 is set to OFF then the webpage of the AlphaVision IP (+ GPRS) is completely blocked and it is
not possible to get into the programming.
AlphaVision IP & IP + GPRS Quick reference
.
#
,Mozilla FireFox, Google Chrome
Rev.1.0
01-11-2012
Page. 5