Great Lakes MINISTAR S Руководство по эксплуатации - Страница 5
Просмотреть онлайн или скачать pdf Руководство по эксплуатации для Стоматологическое оборудование Great Lakes MINISTAR S. Great Lakes MINISTAR S 13 страниц.
Также для Great Lakes MINISTAR S: Поиск и устранение неисправностей и советы по изготовлению (2 страниц)
C
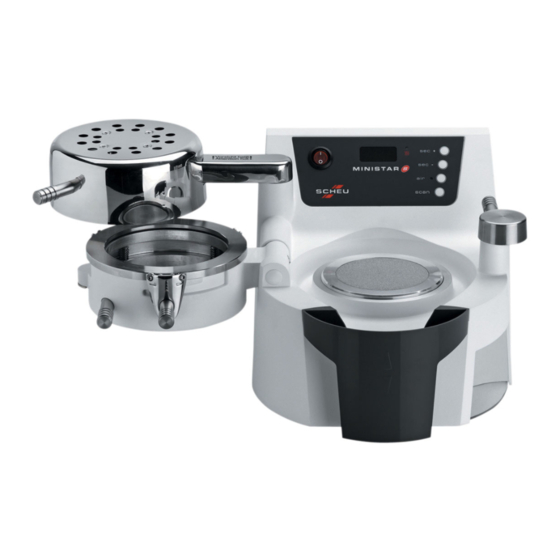
4. With pellets provided, fill cup (D) half full with pellets.
5. Pour remaining pellets in the pellet drawer (E) and
clip it onto the front of the MiniSTAR S table.
Working pressure of 4 bar (60 psi) is pre-set in the machine. Confirm or
adjust MiniSTAR S air pressure by first turning on the main air source (A).
Release the locking cap on the regulator by pulling it outward (B). Set the
pressure by turning the regulator dial on the back of the machine clock-
wise to increase the pressure, counterclockwise to decrease (C).
Identify the proper pressure by the gauge. Once pressure is set, lock
regulator by pushing the cap in towards the machine. Maximum
pressure is approximately 4 bar, or only what the main line is capable
of supplying.
Reminder:
This may cause the MiniSTAR S to malfunction while pressure is in the chamber.
wear safety glasses when using this machine and during all fabrication procedures.
5
B
A
D
D
E
E
Do Not use material thicker than 5mm within the clamping mechanism.
Initial Setup and Use
1. Plug the electrical cord in the back of the MiniSTAR S (A)
into a three-prong 110v outlet. The fuses are located in the
back of the machine above the electrical connection (B)
(Miniature Fuse: 2x10A LAZY) .
2. Connect the MiniSTAR S to the air source using the high-
pressure hose. Slip one end of the hose onto the air valve
(C) of the MiniSTAR S, and slip the other end over the air
pressure line. Secure each end in place with a hose clamp.
Note:
Route the electrical cord and pressure
hose away from the heating element.
3. Secure the clamping frame to the pressure chamber by
referencing the clamp handle at a 4-5 o'clock position over
the chamber. Slip the clips of the clamping frame into the
grooves on the outside of the chamber and slide the
clamping handle to the left
6. Place platform on inner lip of the pellet cup, with the
pellet level half full.
cup is clear of pellets.
A
arrow).
(blue
Make sure the inner lip of the
B
- /+
C
Always