HighSecLabs Mini-Matrix SX42HU-3 Посібник з швидкого налаштування - Сторінка 7
Переглянути онлайн або завантажити pdf Посібник з швидкого налаштування для Перемикач HighSecLabs Mini-Matrix SX42HU-3. HighSecLabs Mini-Matrix SX42HU-3 20 сторінок. 2/4/8 ports high security mini-matrix kvm switches
Також для HighSecLabs Mini-Matrix SX42HU-3: Посібник зі швидкого встановлення (2 сторінок), Посібник зі швидкого встановлення (2 сторінок), Посібник зі швидкого встановлення (2 сторінок)
SEC TIONS
Table of Contents
oPERATIoN
Operating the Mini-Matrix
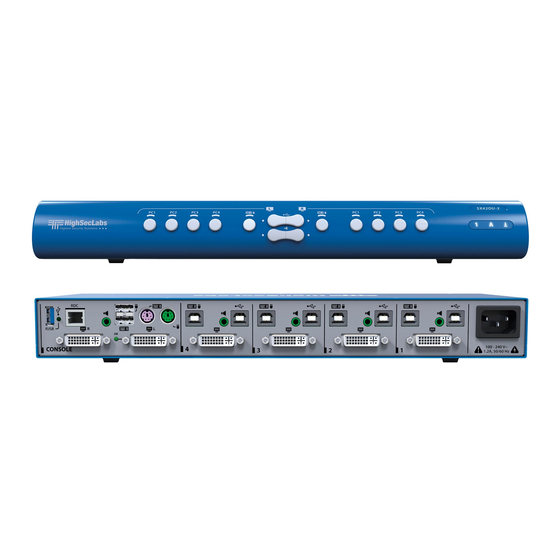
Step 1 – Display & Control Options
Display & Control options define which source to display and control
on each screen. Source selection is done through the source selection
buttons on the front panel or via the DCU (dedicated control unit) port.
Primary Source
Selection Panel
• Use the Source Selection Panels to choose which source to display on each
screen.
• The left panel controls which source to display on the Primary display while
the right panel controls the secondary display.
• for example, as seen in the illustration, when #1 is selected on the Primary
Panel and #3 is selected on the Secondary panel, the selected sources will be
presented accordingly.
• A source can be duplicated, by selecting its number on both panels.
• By default, Mouse, Keyboard, Audio and fUSB peripherals follow the display
association.
• Independently switch the Video / USB / Audio / Keyboard & Mouse ports
between computers
• Use the front-panel push buttons to independently switch the Video / USB
/ Audio / Keyboard & Mouse ports between the primary and secondary
computers.
HSL Mini-Matrix Quick Setup Guide
1
Secondary Source
Selection Panel
2
• Useful for various scenarios, for instance:
– When a USB smart card reader must remain mapped to a certain
computer while the keyboard, video, mouse and audio are switched
to another computer.
– When a user has to listen to audio originating from one computer while
working on another computer.
• Additional options are described ahead under the advanced presets section.
PC #1
Screen Border
Mouse Cursor Path
Mouse Cable
Display Cable
Keyboard Cable
Controlled PC Screens
3
Monitor 1
Monitor 2
PC #3
PC #1
PC #2
PC #3
PC #4
Keyboard & Mouse
6