Aerobin 200 Litre Aerobin Informationen zum Unterricht - Seite 2
Blättern Sie online oder laden Sie pdf Informationen zum Unterricht für Rasen- und Gartengeräte Aerobin 200 Litre Aerobin herunter. Aerobin 200 Litre Aerobin 2 Seiten. Compost
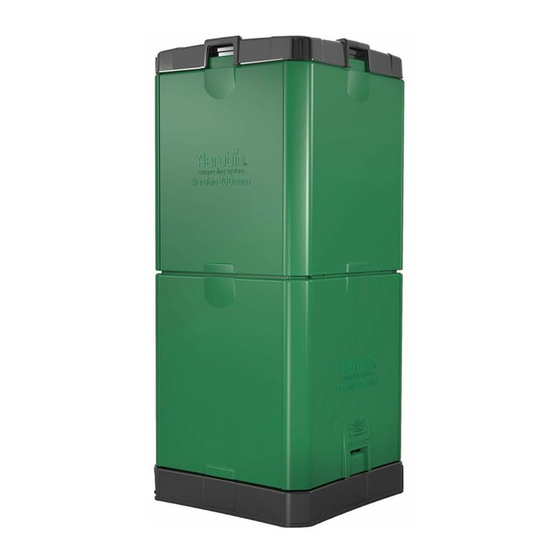
3-Sided Panel (Large) (2)
(Without 'Orange' Corner
Inserts fitted)
Removable Side
Access Door (2)
(Common Bottom only)
Outlet for removing
Not showing via the image is the Aeration
Organic Liquid Fertiliser (See Below)
"WHEN FIRST INSTALLING YOUR AEROBIN POSITION IT ON A VERY FIRM AND LEVEL
FOUNDATION OR SURFACE – NOT DIRECTLY ONTO GARDEN SOIL OR LAWN
OFF CONDITION
ON CONDITION
1
assembLY InstructIons
200 LItre aerobIn
Black Lid (1)
Top Fixed Side Panel (Small) (2)
(Common Top only)
3-Sided Panel (Large) (2)
(With 'Orange' Corner Inserts fitted)
Base Insert
STEP 1.
"Black Base (1)
> Remove all components from
carton and check off against
and Black Base Plate – not illustrated
assembled Aerobin image
in this image (1)"
and component titles – see
opposite page
> Fit Black Base Insert into Black
Base – ensure that the Insert
sit flush around its parameter
into the Base recess
Lung – comprising Aeration Pipe (2) &
Aeration Cone (2) and Base Insert
> Fit lower level 3-Sided Panels
to Base – these have the
'Orange' corner inserts –
ensure engaged properly to
Base (pull upward)
ProbLem soLvInG
LEACHATE
Dilute liquid Leachate 20 parts
Water to 1 part Leachate (20:1)
3-Sided Panel (Large)
(Without 'Orange' Corner
Inserts fitted)
Aeration Pipe
3-Sided Panel (Large)
(With 'Orange' corner
inserts fitted)
STEP 2.
STEP 3.
> Insert Aeration Pipe into Base – tap
> Place one of the remaining
down until Pipe bottoms in Base
3-Sided Panels (Large) across the
> Press lower Aeration Cone onto the
corners of the lower level 3-Sided
Aeration Pipe – tap down until the
Panels – push down to lock –
Cone bottoms on the Pipe
ensure engaged properly (pull
> Press second Aeration Pipe onto the
upward) – repeat steps with last
remaining 3-Sided Panel
top of the lower Aeration Cone – tap
down until the Pipe bottoms on the
> The opening below the top
Cone
level 3-Sided Panel is where the
'Removable Side Access Door' will
> Press the second Aeration Cone
be fitted
onto the top of the second Aeration
Pipe – repeat earlier step
PROBLEM
WHEN TOO WET:
1.
Compost not heating up.
2.
Not decomposing.
3.
Bad smells.
WHEN TOO DRY:
Not decomposing
INSECTS:
Attracts insects, millipedes, slugs
2
Top Fixed Side Panel (Small )
(Common Top only)
Side Panel Hooks
Grip
Handles
STEP 4.
STEP 5.
> Slide the Top Fixed Side Panels
> Place the Lid on the top of the Aerobin®
into place
> Slide the two Removeable Side Access Doors into
> Lock them into the 3-Sided Panel
position by sliding the top in first, position the door
(Large) by the hooks provided
and slide back down (5mm) until a click is heard or
felt, to lock
> Ensure all Panels are flush with
each other
> If the door can be pulled straight out without lifting
first, the door is NOT locked into position
Congratulations you are now ready to use your
Aerobin® ! - but before you start ensure that
the Aerobin is positioned on a very firm foundation
SOLUTION
Take out the material from the Aerobin® and put it back in, layering with brown (dry) material. Newspaper (scrunched
up or shredded) and pea straw are counted as brown and will help. If large leaves or green garden matter is not
decomposing, shred into smaller pieces.
Take out the material from the Aerobin® and start the process again, being careful to layer even amounts of brown (dry)
and green (wet) materials. If the compost is too dry, it may become water repellent and very hard to re-wet. Avoid putting
dry materials in the bin unless moistened or mixed with high moisture-containing materials such as kitchen scraps.
It is normal to have small flies, insects and other invertebrates in the Aerobin® ; they are part of the decomposing
process. If small flies are annoying, cover with shredded paper, grass clippings or use pyrethrum spray.
3