Bose Companion 3 Series II Service-Handbuch - Seite 4

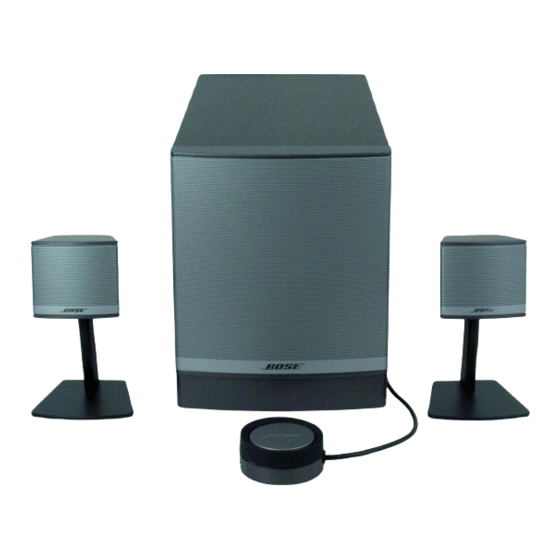
Blättern Sie online oder laden Sie pdf Service-Handbuch für Verstärken Bose Companion 3 Series II herunter. Bose Companion 3 Series II 16 Seiten. Multimedia speaker system
Auch für Bose Companion 3 Series II: Benutzerhandbuch (40 seiten), Benutzerhandbuch (40 seiten), Benutzerhandbuch (22 seiten), Benutzerhandbuch (10 seiten), Benutzerhandbuch (20 seiten), Benutzerhandbuch (26 seiten), Handbuch zur Schnelleinrichtung (2 seiten), Handbuch zur Schnelleinrichtung (2 seiten), Detaillierte Montageanleitung (2 seiten), Installationshandbuch (20 seiten), Spezifikationen (6 seiten), Broschüre & Specs (4 seiten), Benutzerhandbuch (19 seiten), Service-Handbuch (36 seiten)

Bose Companion 3 Series II Service-Handbuch

DISASSEMBLY PROCEDURES

FreeSpace
®
3B Acoustimass
Procedures
Note: Refer to figure 5 for the following
procedures:
1. Grille and Logo Removal
1.1 Use force to pull out the logo (18), then
gently pull the grille (17) away from the baffle
(1). Be careful not to mark the surface of the
grille or the enclosure.
2. Woofer Assembly Removal
2.1 Use a cross-head screwdriver to remove
the 10 screws (10) that secure the rear
cover (3) to the enclosure (2). Gently turn
over the rear cover (3) to allow access to the
woofer assembly (5).
2.2 Remove 4 screws (9) of the woofer
assembly and 3 screws of the transformer
access cover (6). Lift out the transformer
access cover with the transformer (7)
attached to allow access to the crossover
PCB (19).
2.3 Make a note of the wiring configuration
and unplug the four wires of the woofer
assembly from the crossover PCB.
2.4 Lift the woofer assembly out of the
enclosure.
3. Transformer Kit Removal
3.1 Perform step 2.1.
3.2 Remove the 3 screws of the transformer
access cover (6) and lift out the transformer
kit (6, 7, 8) from the mounting hole.
3.3 Make a note of the wiring configuration
and unplug all the wires from the trans-
former.
Re-assembly Note: Make sure the gap for
the transformer wires through the enclosure
is airtight.
®
Bass Module
FreeSpace
1. Grille Assembly Removal
2. Twiddler
4
®
3F Satellite Procedures
Note: Refer to figure 6 for the following
procedures.
1.1 Gently pull the grille assembly (4) away
from the enclosure (8). Be careful not to
mark the surface of the grille or the enclo-
sure.
TM
Assembly Removal
2.1 Perform procedure 1.
2.2 Using a cross-head screwdriver, remove
the four screws (1) that secure the baffle
plate (9) to the enclosure (8).
2.3 Unplug the two wires from the driver (2).
Re-assembly Note: Be sure to observe
polarity when reconnecting the wires. Red
for "+" and black for "-".