3onedata IES206-2GF-P Handbuch zur Schnellinstallation - Seite 2
Blättern Sie online oder laden Sie pdf Handbuch zur Schnellinstallation für Schalter 3onedata IES206-2GF-P herunter. 3onedata IES206-2GF-P 3 Seiten. Unmanaged industrial ethernet switch
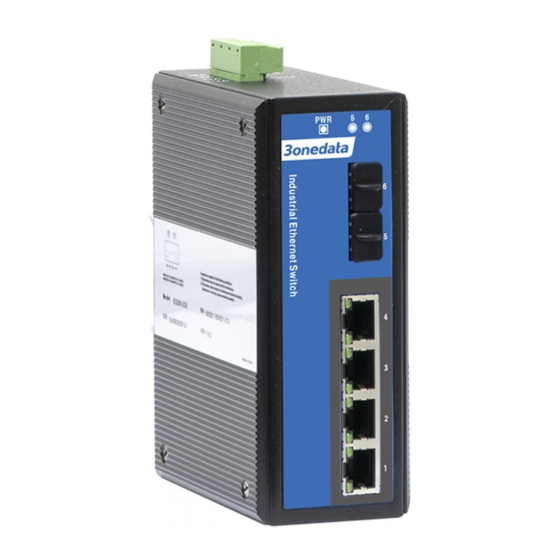
Model III: Front view and Side view
1.
Grounding screw
2.
DC power input terminal block
3.
Location hole for wall mounting
4.
DIN-Rail mounting kit
5.
Device power status indicator PWR
6.
Gigabit Ethernet SFP port status indicator
7.
1000Base-SFP Gigabit Ethernet SFP slot
8.
10/100Base-T(X) 100M Ethernet copper port with
indicator
【Mounting Dimension】
Unit: mm
Model I and Model II
Model III
Attention before mounting:
Don't place or install the device in area near water or
moist, keep the relative humidity of the device
surrounding between 5%~95% without condensation.
Before power on, first confirm the supported power
supply specification to avoid over-voltage damaging the
device.
The device surface temperature is high after running;
please don't directly contact to avoid scalding.
【DIN-Rail Mounting】
For convenient usage in industrial environments, the product
adopts 35mm DIN-Rail mounting, mounting steps as below:
Step 1
Check whether the DIN-Rail mounting kit that
comes with the device is installed firmly.
Step 2
Insert the bottom of DIN-Rail mounting kit (one side
with spring support) into DIN-Rail, and then insert
the top into DIN-Rail.
Tips:
Insert a little to the bottom, lift upward and then insert
to the top.
Step 3
Check and confirm the product is firmly installed on
DIN-Rail, and then mounting ends.
【Disassembling DIN-Rail】
Step 1
Power off the device.
Step 2
After lift the device upward slightly, first shift out the
top of DIN-Rail mounting kit, and then shift out the
bottom of DIN-Rail, disassembling ends.
Attention before powering on:
Power ON operation: first connect power line to the
connection terminal of device power supply, and then
power on.
Power OFF operation: first unpin the power plug, and
then remove the power line, please note the operation
order above.
【Power Supply Connection】
Model I: DC power supply