HIKVISION DS-8100-S Series Schnellstart-Handbuch - Seite 5
Blättern Sie online oder laden Sie pdf Schnellstart-Handbuch für DVR HIKVISION DS-8100-S Series herunter. HIKVISION DS-8100-S Series 6 Seiten.
Auch für HIKVISION DS-8100-S Series: Installationshandbuch (4 seiten), Schnellstart-Handbuch (6 seiten), Installationshandbuch (4 seiten), Schnellstart-Handbuch (7 seiten)
Quick Start Guide
DS-8100-S Series DVR
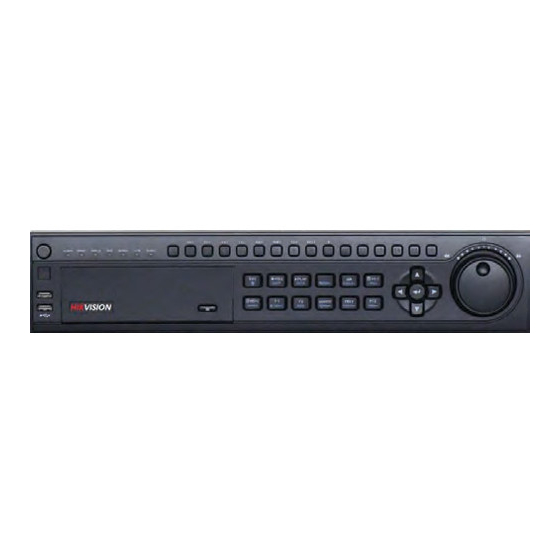
Using the Front Panel Controls
Figure 4. DVR Front Panel Controls
The controls on the front panel include:
1. Power Button: Powers DVR on/off.
2. IR Receiver: Receiver for IR remote.
3. USB Ports: Universal Serial Bus (USB) ports for additional devices such as USB mouse and USB Hard Disk
Drive (HDD).
4. Status Indicators: Status indicators for different features of the DVR.
• Alarm: Alarm indicator turns red when a sensor alarm is detected.
• Ready: Ready indicator turns blue when DVR is functioning properly.
• Status: Status indicator turns blue when DVR is controlled by an IR remote. Indicator turns red when
controlled by a keyboard and purple when IR remote and keyboard is used at the same time.
• HDD: HDD indicator blinks red when data is being read from or written to HDD.
• Modem: Reserved
• TX/RX: Network indictor blinks blue when network connection is functioning properly.
• Guard: Guard indicator turns blue when the device is armed, off when the device is unarmed. The arm/disarm
state can be initiated by pressing and holding on the ESC button for more than 3 seconds in Preview mode.
5. Alphanumeric Buttons: Alphanumeric buttons used in various menus of the DVR. Some uses include:
• Switching to the corresponding channel in Preview or PTZ Control mode.
• Inputting numbers and characters in Edit mode.
6. Control Buttons:
• ESC Button: The ESC button is used to escape to the previous menu and to arm/disarm the DVR in Preview
mode.
• REC/SHOT Button: The REC/SHOT button is used to enter the Quick Schedule Configuration interface. If
used when controlling a PTZ, pressing the REC/SHOT button and then a Numeric button will call a PTZ preset.
• PLAY/AUTO Button: The PLAY/AUTO button is used to enter the Playback menu. It is also used to turn