Garden Lights 6009011 Handbuch - Seite 4
Blättern Sie online oder laden Sie pdf Handbuch für Zubehör Garden Lights 6009011 herunter. Garden Lights 6009011 4 Seiten. Timer + light sensor
Auch für Garden Lights 6009011: Handbuch (12 seiten)

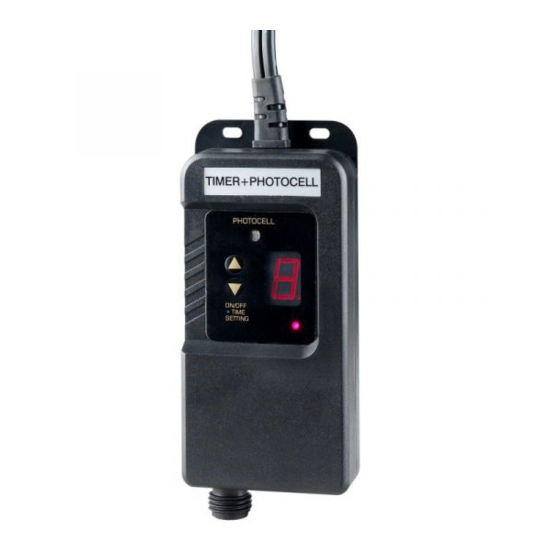
INSTALLING TIMER AND TRANSFORMER (See Photo's TF0401 to TF0507).
1. Cable to transformer.
2. Cable from the timer to the lights.
3. Power indicator
4. Display
5. Photo-cell
6. Up/Down Switch Setting
CHECK !
-
This is a photo-timer switch which has been designed to be connected to 12 Volt Transformers. This
timer can be used for low voltage outdoor lighting.
-
This timer can be installed in- and outdoor uncovered. When you install the timer indoor you must
take care that the timer can respond on dusk and dawn influences!
-
This timer works at a temperature between -20°C and 50°C.
-
Maximum Wattage to be connected to the timer is 150 Watt.
CONNECTION OF TIMER AND MAIN CABLE TO THE TRANSFORMER
-
Connect the cable with the lights to the photo timer switch (TF0501 + TF0502 + TF0503+ TF0504).
-
This timer should be screwed to the wall with the cable to be connected to the transformer (TF0507)
pointing up.
-
Connect the input cable of the photo timer switch to the transformer (TF0401+TF0403+TF0405).
-
Insert the plug of the transformer into the electric outlet.
OPERATION PROCEDURES:
After installation, the power indicator is on.
Timer switch is on, lights always burn.
Auto: From Dusk to Dawn automatically.
Timer automatically switches on at Dusk. Timer will be switched on during the time
mentioned on the display (1-9)
With certain installation the lights should work now. If not, check the following things:
-
Connections between the main cable and the wire from the lamp.
-
Check the lamps.
-
When no single light is working, check the transformer and/or timer and let a specialist measure them
both.
FUSE
This timer is secured against short circuiting.
Replacing Fuse:
-
Remove the rubber tips from the bottom case and remove the screws by turning (TF0506).
-
Replace the old fuse (250V - 15A) and place a new fuse.
UK
AV TIMER OCH TRANSFORMATOR (se bilder TF 0401 till TF 0207)
INSTALLATION
1. Sladd till transformator
2. Sladd från timern till armaturerna
3. Strömindikator
4. Display
5. Fotocell
6. Strömställare / ljusrelä
-
Denna timer är avsedd att kopplas till en 12 volts transformator. Timern kan användas till
utomhusbelysning med lågspänning.
-
Timern kan både installeras inomhus och utomhus utan att övertäckas. Observera att om du installerat
timern inomhus så känner fotocellen av om det är mörkt eller ljust i rummet. Detta innebär att
belysningen kommer att tändas utomhus när det är mörkt inomhus och släckas utomhus om det är
ljust inomhus.
-
Timern fungerar vid temperaturer mellan -20C och 50C.
-
Max 150 Watt.
KOPPLING AV TIMER OCH HUVUDKABEL TILL TRANSFORMATORN
-
Koppla kabeln från lamporna till ljusrelät (TF0501 + TF0502 + TF0503 + TF0504)
-
Denna timer bör skruvas fast på väggen med kabeln till transformatorn pekandes uppåt.
-
Koppla kabeln från timern till transformatorn (TF0401+TF0403+TF0405)
-
Sätt i kontakten ifrån transformatorn i ett el uttag.
FUNKTION:
Efter installationen är strömindikatorn på.
När displayen visar "0" betyder det att lamporna lyser permanent.
När displayen visar "A" betyder det att fotocellen kommer att regera på ljus och mörker.
Siffrorna 1-9 visar antal timmar som lamporna skall lysa om man ställt in timern på Läge
"A".
Om något inte fungerar efter installationen kan man kontrollera följande:
-
Koppling mellan huvudkabeln och sladdarna från lamporna.
-
Kontrollera lamporna
-
När singellamporna inte fungerar bör man be en elektriker kontrollera transformatorn eller timern.
Säkring
Denna timer är säkrad mot kortslutning
Byte av säkring:
-
Avlägsna gummifötterna och skruva upp (T0506).
-
Ersätt den gamla säkringen (250V 15A).
SE
