MSI R7770 PoweR Edition Benutzerhandbuch
Blättern Sie online oder laden Sie pdf Benutzerhandbuch für Videokarte MSI R7770 PoweR Edition herunter. MSI R7770 PoweR Edition 1 Seiten. Graphics card
Headquarters
Part NO: G52-V2712X3
Part NO: G52-V2712X3
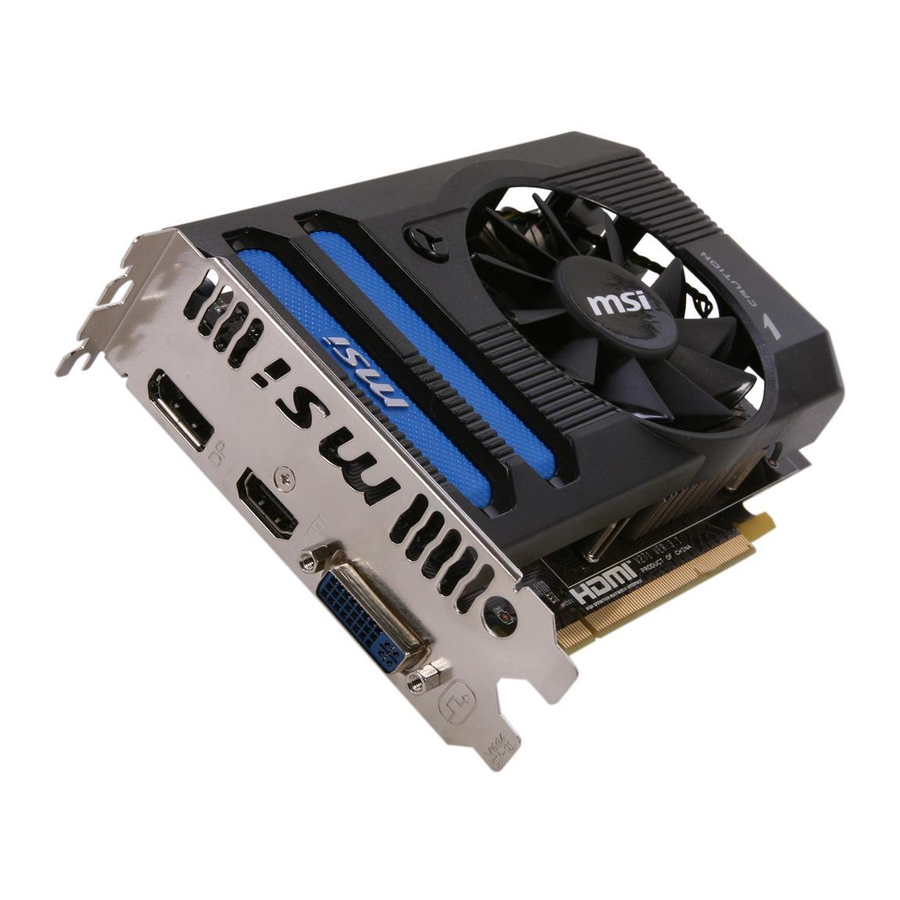
Overview
Overview
Power Connector
Fan Connector
Fan Connector
1G GDDR5 memory
AMD Radeon HD7770 series
PCI Express Interface
CrossFire Interface
Display Port
HDMI Port
DVI-I Port
- HDMI supported
- HDCP supported
- Dual-link DVI output supported
The VGA card shown here is for reference only, and may vary from the actual card.
For further information, please visit MSI website at www.msi.com
GRAPHICS CARD
GRAPHICS CARD
R7770
R7770
PoweR Edition
PoWER Edition
Functions
Functions
LIVE UPDATE 5
MSI Live Update 5 offers users with brand-new update service experience, which can significantly save your
time while searching files. Live Update 5 is capable to automatically analyze and list drivers, BIOS, and
utilities you need. With the easy-to-use updating approaches, you can increase the performance of your
system easily and quickly. Follow the instructions below, with a few mouse clicks, you can acquire the
related files for the system updating.
1. Insert the driver disk into the optical
device drive, and start the Setup program.
2. Click the Utility tab on the setup screen.
3. Click the MSI Live Update 5.
Follow the on-screen nstructions to
complete the installation.
4. Launch MSI Live Update utility to proceed
the updating function.
WARNING!!
DO NOT touch the cooling
system since it may produce a
certain heat while processing
tasks.
Under the European Union ("EU") Directive on Waste Electrical and Electronic
Equipment, Directive 2002/96/EC, which takes effect on August 13, 2005,
CAUTION!!
products of "electrical and electronic equipment" cannot be discarded as
Do not force the GPU cooler
municipal waste anymore and manufacturers of covered electronic equipment
against the fragile GPU to avoid
will be obligated to take back such products at the end of their useful life.
damage to the GPU.
* All trademarks used in this manual are the sole property of their respective owners.
Getting Started
Getting Started
∙ AMD Eyefinity multi-display technology
- up to 6 displays supported with DisplayPort 1.2 Multi-Stream Transport.
- Independent resolutions, refresh, rates, color controls, and video overlays.
- Display grouping: Combine multiple displays to behave like a single large display.
∙ AMD App Acceleration
- OpenCL 1.2 Support
- Microsoft C++ AMP
- DirectCompute 11
- Double Precision Floating Point
- AMD HD Media Accelerator
∙ AMD HD3D technology
- Stereoscopic 3D display/glasses support
- Blu-ray 3D support
- Stereoscopic 3D gaming
- 3
party Stereoscopic 3D middleware software support.
rd
∙ Cutting-edge integrated display support
- DisplayPort 1.2
- 3GHz HDMI 1.4a with Stereoscopic 3D Frame Packing Format, Deep Color, xvYCC wide gamut support,
and high bit-rate audio
- Dual-link DVI with HDCP, max resolution: 2560x1600
- VGA, max resolution: 2048x1536
∙ Integrated HD audio controller
- Output protected high bit rate 7.1 channel surround sound over HDMI with no additional cables required.
- Support AC-3, AAC, Dolby TrueHD and DTS Master Audio formats.
∙ AMD PowerTune Technology
- Intelligent TDP management technology
- Dynamic colockspeed/performance enhancement for games.
∙ AMD Catalyst
graphics and HD Video configuration software
TM
- Software support for Windows 7, Windows Vista, and Windows XP
- AMD Catalyst
TM
Center - AMD Catalyst
TM
software application and user interface for setup, configuration,
and accessing features of AMD Radeon products
- Unified Graphics display driver - AMD Catalyst
TM
software enabling other PC programs and devices to use
advanced graphics, video, and features of AMD Radeon
TM
products.
∙ AMD PowerPlay
power management technology
TM
- Automatic power management with low power idle states
∙ AMD CrossFire
TM
multi-GPU technology
- Dual GPU scaling
∙ AMD ZeroCore Power technology
- Ultra-low idle power when the system's display is off.
- Secondary GPUs in an AMD CrossFire
technology configuration power down when unneeded
TM
- Efficient low power mode for desktop work
Quick Installation
Quick Installation
Enabling HDMI Output
Follow the steps below to enable HDMI Output function:
1. Find the DVI-to-HDMI adapter that comes with the package,
if provided. Consult your dealer to purchase the adapter if
it is not provided.
2. Attach the DVI-to-HDMI adapter to the DVI connector.
3. Ensure that the adapter is firmly installed.
Software
To install the driver of the VGA card to your
computer, please follow the steps below:
1. Turn on the computer.
2. Insert the driver disk into the optical device drive.
The AUTORUN program will start the Setup
program, and show the setup screen as shown
on the right.
3. Click the Driver tag, and follow the on-screen
instructions to complete the installation.
4. Once the installation is completed, restart the
computer as instructed.
Tip: If, on your computer, the AUTORUN program does not execute automatically, please 1) enable the
optical device drive auto-detect function from the Control Panel; or 2) find and run the setup.exe file manually
from the driver disk.
Quick Installation
Quick Installation
Hardware
Follow the instructions below to install the VGA card:
1. Remove the computer case.
3. Put the card directly over the expansion slot and
press one end of the card into the slot first.
2. Locate the expansion slot on your mainboard.
Gently but firmly press the other end until the card is
Warning: Inserting the VGA card into a wrong
fully seated in the slot.
slot may damage your card (refer to your
mainboard manual for further Information).
4. Secure the card with a bracket screw.
5. Attach the power cable of the power supply with
recommended wattage to the VGA card, if necessary.
6. Install all other cards and devices and connect all the
cables, and then re-install the computer case.
7. Connect the monitor. Now, you are ready to install
the driver and software on your computer.
Installing the VGA card...
Attaching the power cable...
Connecting the monitor...
Getting Started
Getting Started
Unpacking
Please check out the following items to make sure that you get the complete product:
∙ VGA card
∙ Driver disk, documentation, and accessories, if provided.
Consult the dealer immediately if the package is not completed.
System Requirements
To install the VGA card, your computer system needs to meet the following requirements:
∙ PCI Express
®
based PC is requird with X16 lane granphics slot available on the motherboard.
∙ 500 Watt or greater power supply with one 75W 6-pin PCI Express power connector recommended.
∙ Certified power supplies are recommended.
Refer to http://support.amd.com/us/certified/power-supplies/Pages/listing.aspx for a list of Certified products.
∙ Minimum 200MB of available hard disk space.
∙ Minimum 1GB of system memory.
∙ CD-ROM / DVD drive / Blu-ray
TM
drive is required for driver installation.
∙ The operation of AMD CrossFire
TM
technology in dual mode requires a second AMD Radeon
TM
HD 7700
graphics card and an AMD CrossFire
TM
Ready motherboard.
∙ Visit MSI website for further information of operating system support.
Card Features
∙ GCN Architecture
∙ PCI Express 3.0 x16 bus interface
∙ Microsoft DirectX
®
11 Support
- 9
th
generation programmable hardware tessellation units
- Shader Model 5.0
- DirectCompute 11
- Accelerated multi-threading
- HDR textrue compression
- Order-independent transparency
∙ OpenGL 4.2 support
∙ Image quality enhancement technology
- Up to 24x multi-sample and super-sample anti-aliasing modes
- Adaptive anti-aliasing
- Morphological Anti-Aliasing (MLAA)
- DirectX
®
10/11 Super-Sample Anti-Aliasing (SSAA)
- 16x angle independent anisotropic texture filtering
- 128-bit floating point HDR rendering