Custom Crimp D100P SERIES Benutzerhandbuch - Seite 4
Blättern Sie online oder laden Sie pdf Benutzerhandbuch für Crimpwerkzeug Custom Crimp D100P SERIES herunter. Custom Crimp D100P SERIES 13 Seiten. Hydraulic hose crimper
Auch für Custom Crimp D100P SERIES: Benutzerhandbuch (12 seiten)
D100 SERIES QUICK START GUIDE
TO ASSURE ACCURATE CRIMP DIAMETERS FOLLOW THESE STEPS
BEFORE YOU USE THE CRIMPER FOR THE FIRST TIME
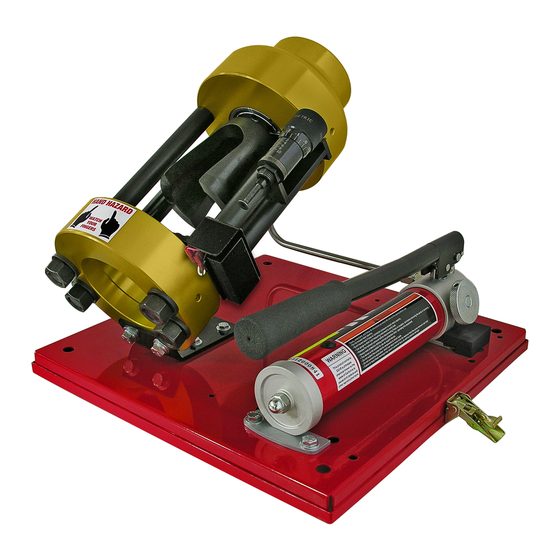
• Position the crimper on a sturdy surface in a will lighted area
• Check crimper calibration prior to initial operation
• Seat the Pressure Plate (fl at plate) in the base of the crimper
• Place any D100 series die set on top of the Pressure Plate making certain
that the die set is fi rmly seated against the Pressure Plate.
• Place the Compression Ring on top of the die
set in the order shown and slide the pusher onto
the ram.
• Set the Micro-crimp adjuster
as follows:
Standard Micrometer: "100"
"DC" Micrometer: "95"
Metric Micrometer: "0"
• Bring the Pusher into contact
with the Compression Ring and
continue to apply force until the
die set is fully closed and the
white line is fl ush with the surface
of the micro crimp adjuster as
shown.
• Note that for the D101S series, the electric switch
will shut off the power source at the point at which
the die set is fully closed and the pump starts to
build pressure.
• If the white line is not just visible as shown or the
pump does not shut off at the point where the die
set is fully closed, the crimper must be recalibrated.
See calibration instructions.
Page
4