Bosch Maxx 4 Manual de instrucciones original - Página 6
Navegue en línea o descargue pdf Manual de instrucciones original para Lavadora Bosch Maxx 4. Bosch Maxx 4 7 páginas. Cordless drill/driver
OBJ_BUCH-149-004.book Page 12 Monday, April 4, 2011 10:30 AM
12 | English
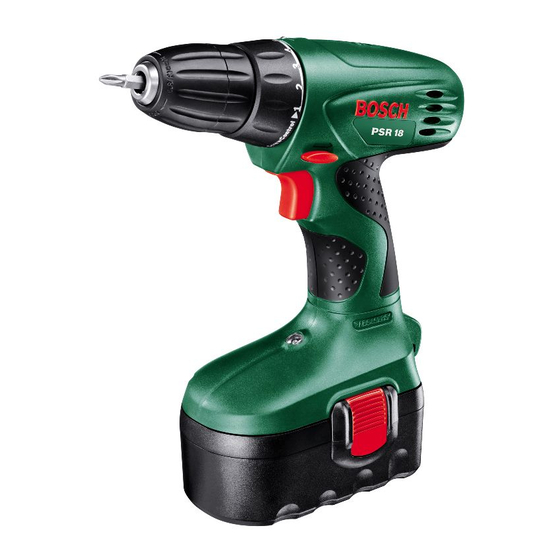
Hold the rear sleeve 3 of the keyless chuck 1 tight and turn the
front sleeve 2 in rotation direction
serted. Insert the tool.
Hold the rear sleeve 3 of the keyless chuck 1 tight and firmly
tighten the front sleeve 2 by hand in rotation direction
til the locking action (click) is heard. The drill chuck is locked
automatically.
The locking is released again to remove the tool when the
front sleeve 2 is turned in the opposite direction.
Replacing the Drill Chuck
For machines without spindle lock, the drill chuck must be re-
placed through an authorized after-sales service agent for
Bosch power tools.
The drill chuck must be tightened with a tightening
torque of approx. 30–35 Nm.
Dust/Chip Extraction
Dusts from materials such as lead-containing coatings,
some wood types, minerals and metal can be harmful to
one's health. Touching or breathing-in the dusts can cause
allergic reactions and/or lead to respiratory infections of
the user or bystanders.
Certain dusts, such as oak or beech dust, are considered
as carcinogenic, especially in connection with wood-treat-
ment additives (chromate, wood preservative). Materials
containing asbestos may only be worked by specialists.
– Provide for good ventilation of the working place.
– It is recommended to wear a P2 filter-class respirator.
Observe the relevant regulations in your country for the
materials to be worked.
Prevent dust accumulation at the workplace. Dusts can
easily ignite.
Operation
Starting Operation
Inserting the Battery
Use only original Bosch O-pack batteries with the volt-
age given on the type plate of your machine. The use of
other batteries can lead to injuries and danger of fire.
Set the rotational direction switch 11 to the centre position in
order to avoid unintentional starting. Insert the charged bat-
tery 9 into the handle so that it can be felt to engage and faces
flush against the handle.
Reversing the Rotational Direction (see figure B)
The rotational direction switch 11 is used to reverse the rota-
tional direction of the machine. However, this is not possible
with the On/Off switch 12 actuated.
Right Rotation: For drilling and driving in screws, push the
rotational direction switch 11 left to the stop.
The indicator for right rotation 5 lights up when the
On/Off switch 12 is actuated.
Left Rotation: For loosening or unscrewing screws, push the
rotational direction switch 11 right to the stop.
2 609 140 790 | (4.4.11)
, until the tool can be in-
Setting the Torque
The required torque can be preselected in 10 steps with the
, un-
torque preselection ring 4. With the correct setting, the insert
tool is stopped as soon as the screw is screwed flush into the
material or when the set torque is reached.
Select a higher setting when driving out screws, or set to the
symbol "Drilling".
Switching On and Off
To start the machine, press the On/Off switch 12 and keep it
pressed.
The power light 10 lights up when the On/Off switch 12 is
halfway or fully depressed, and enables illumination of the
screwing location in unfavourable light conditions.
To switch off the machine, release the On/Off switch 12.
Adjusting the Speed
The speed of the switched on power tool can be variably adjust-
ed, depending on how far the On/Off switch 12 is pressed.
Light pressure on the On/Off switch 12 results in a low rota-
tional speed. Further pressure on the switch results in an in-
crease in speed.
Run-on Brake
When the On/Off switch 12 is released, the chuck brakes to a
stop, thus preventing the run-on of the tool.
When driving in screws, wait until the screw is screwed in
flush with the material and then release the On/Off switch 12.
By doing so, the head of the screw does not penetrate into the
material.
Working Advice
Apply the power tool to the screw only when it is
switched off. Rotating tool inserts can slip off.
After longer periods of working at low speed, allow the ma-
chine to cool down by running it for approx. 3 minutes at max-
imum speed with no load.
For drilling in metal, use only perfectly sharpened HSS drill
bits (HSS=high-speed steel). The appropriate quality is guar-
anteed by the Bosch accessories program.
Before screwing larger, longer screws into hard materials, it is
advisable to predrill a pilot hole with the core diameter of the
thread to approx.
Maintenance and Service
Maintenance and Cleaning
Before any work on the machine (e. g., maintenance,
tool change, etc.) as well as during transport and stor-
age, set the rotational direction switch to the centre
position. Unintentional actuation of the On/Off switch can
lead to injuries.
The indicator for left rotation 6 lights up when the
On/Off switch 12 is actuated.
Drilling
The safety clutch is deactivated in the "Drill-
ing" position.
2
/
of the screw length.
3
Bosch Power Tools