DRIFT HD Manual del usuario - Página 7
Navegue en línea o descargue pdf Manual del usuario para Cámaras de acción DRIFT HD. DRIFT HD 19 páginas.
También para DRIFT HD: Manual del usuario (17 páginas)
preparing for use
a) baTTeRy insTallaTion
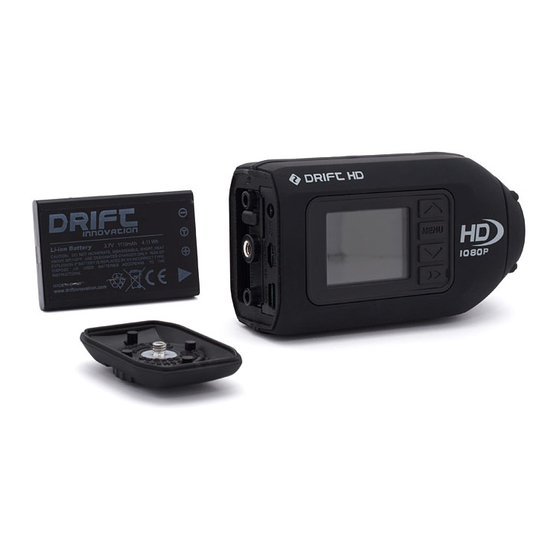
installing the Camera battery
1. Please unscrew the rear hatch of the camera (anti-clockwise movement).
2. Holding the camera with the LCD screen facing down, insert the battery with the
label facing upwards and the arrow pointing into the slot. Once gently pushed in all
the way, the battery will lock into place.
3. Screw the rear hatch of the camera (clockwise movement) back to its original
position.
4. To remove the battery if needed, push down the lever holding the battery in place.
The battery is spring loaded, and will slide out promptly.
Changing the Remote Control battery
The remote control is supplied with a battery already installed, and is ready to use out
of the box. If the remote stops working, this battery can be replaced.
1. Using a small screwdriver, remove the four screws fixing the remote control battery
cover.
2. Carefully remove the battery and replace it (model CR2032, presented as a coin).
3. Replace the remote control battery cover and the four screws.
b) PoWeRinG on & ChaRGinG
Turning the Camera on
Press the SELECT button. The LCD screen will turn on and the LED will turn green. The
LCD screen will show the Drift logo, and the camera will enter Live Preview mode.
Turning the Camera off
To turn the camera off, press and hold the SELECT button for 3 seconds.
Note: The camera can be set to turn off automatically in order to conserve battery
power (page 19).
Charging the battery
The Drift HD comes with a rechargeable Lithium-Ion battery which can be charged
with the included USB cable. Socket-to-USB adaptors can be used as well.
1. Ensure the battery is in the camera and the unit is powered off.
2. Insert the smaller end of the USB cable into the USB mini slot inside the camera.
3. Attach the other end of the USB cable to a USB port in your computer, or to a USB
power adapter (not included).
4. If charging via a computer, the LED will turn blue and the screen will go black. If
charging via a USB power adapter or a USB cigarette lighter adapter, the camera will
switch on.
5. To charge the camera, press and hold the SELECT button for 3 seconds. The screen
will turn off and the LED will turn blue, to indicate charging is in progress.
Note: Remove the battery if the camera
is not going to be used for an extended
period of time.
Note: Take care not to damage the
waterproof seal when replacing the
remote battery.
Note: The camera will switch on
automatically when it is connected to an
external power source.
11
Autogood products «130»
6. Once the camera is fully charged, the LED will turn off. Remove the USB cable and
close the rear hatch. It takes around 2½ hours to be battery to be fully charged.
Note: If the LED is does not turn blue, the battery is not charging. Please follow the
above instructions carefully to ensure that the LED turns blue and the battery does
actually charge.
Note: When charging the camera with a USB cable via a Mac, you may get an error
message about an incorrectly removed external device. This is not a problem and can
be safely ignored.
Note: The battery needs to be fully charged before its first use.
battery life
At a temperature of 25°C (77 F), with all power-saving features switched off, with the
LCD switched on and the camera recording continuously, the battery will last for
about 3 hours on a full charge.
In very cold conditions like -5°C (23 F), with all power-saving features switched off,
the LCD switched on and the camera recording continuously, the battery will last for
about 2.5 hours on a full charge.
Note: Please see the Conserving Battery Life section on page 19 for details on how to
make the battery last longer.
using an external power supply
The Drift HD can be powered by an external power supply such as a USB power
adapter, a battery kit or a cigarette lighter adapter. We do recommend you to power
off your camera before plugging your camera to any external power supply.
Note: Plugging an external power supply into the camera does not recharge the
battery unless you put the camera into charging mode (page 11). The battery will not
charge when the camera is switched on.
If the external power is cut off during recording (e.g. if the cigarette lighter adapter
comes loose), the camera will immediately start drawing power from the rechargeable
battery instead and continue recording, protecting your footage from file corruption.
Note: This feature will only work if the battery is charged. If using your camera with
an external power supply, we recommend charging the battery beforehand to ensure
your files are protected.
C) CaMeRa lens RoTaTion
A unique feature of the Drift HD is the rotating camera lens. In order to maximise your
mounting options, the lens can rotate through a total of 300°, allowing for an upright
image from even the most awkward positions.
Rotating the lens
Whilst holding the camera body in one hand, use your index finger and thumb of your
other hand to grab the camera lens firmly. Twist the camera lens to the desired angle.
! When the low battery warning appears,
please recharge the battery. If the battery
runs out while recording video, the data
on the card may become corrupted. In
most situations, the camera will close the
video file and power off automatically,
but we cannot guarantee that the
footage on the card will not be lost
during an abrupt interruption of power.
! The camera lens cannot be rotated
through 360° – it can only be rotated
through a range of 300°. At either end of
this range, there is a hard stop. Do not
force the camera rotation past this point,
as you risk damaging the components. If
excess resistance is experienced, double-
check that you have not reached the
camera rotation stop.
! The camera is weatherproof and this
is not affected by the rotation of the
camera lens. However, do not rotate the
lens while the camera is wet or covered
in mud, as this may force liquid into the
body of the camera and damage the
components.
12