DUR-line SF 2500 Pro Manual - Página 2
Navegue en línea o descargue pdf Manual para Accesorios para cámaras DUR-line SF 2500 Pro. DUR-line SF 2500 Pro 2 páginas. Satfinder
1 Prepare the satellite dish
Step 1: Determine the angle of the
satellites
It is necessary to know the approximate
position on the horizon in order to quickly
align the antenna to the correct satellites.
For this purpose, either use
the easy online calculator at
www.durline.de/tools/satcalc.html
or scan the following QR code.
Or:
Reference directions for the most com-
mon private and public broadcasters,
such as Sky, can be found in the above
table (ASTRA 19.2° East).
Angle calculator
Step 2: Roughly positioning the
satellite dish
You now need to align the antenna towards the
direction in the sky where the satellite is
expected.
Elevation angle: Using the antenna
scale (back part)
Azimuth angle: align by compass
(E.g. smartphone/Satfinder)
The dishes on neighbouring roofs
i
should serve as a guide.
Rules of thumb:
1. Satellites that can be received in Europe are found in the South. The southern point corresponds
to 180° (E.g. use mobile compass).
Turn in a easterly direction (to the left) or a westerly direction (to the right) from this point. Astra 19.2° E
is located a few degrees to the east, so you therefore need to turn to the left (see Graphic 1).
2. It is also necessary to ensure that the antenna is adjusted to align with the correct elevation angle.
Please ensure that no obstacles mask the view of the satellite. A clear view is absolutely essential
(see Graphic 2).
1. For Astra 19.2°:
turn slightly to the left
Astra
South
19.2°
12:00 midday
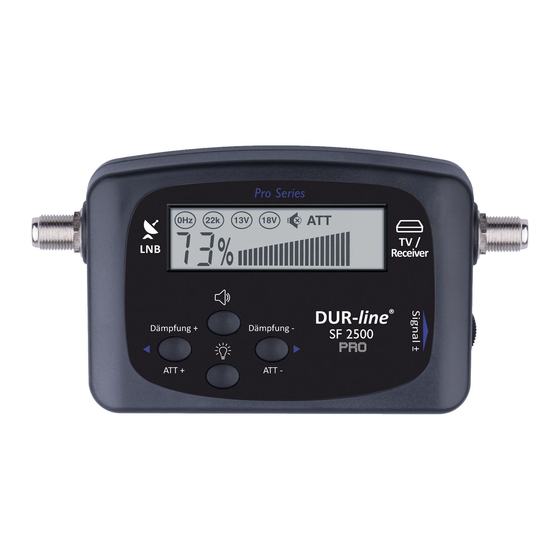
2 Start operating the Satfinder
LNB
i
Use Satfinder only close to the LNB.
Reduce LNB background noise
carefully attenuate to 10%
-->
turn
100%
LNB
Background
noise
0%
3 Adjust the satellite dish more precisely
Antenna roughly aligned as described in step 1?
Satellite finder adjusted as described in step 2.4?
3.1 Turn the satellite dish CAREFULLY right and left –
observe signal strength bar or buzzer volume
If the antenna is roughly aligned, the signal strength bar in the display goes up.
The aim is to find the point with the max. signal level, but not to reach a certain numerical value (such as 99%).
3.2 Press the "Attenuation +" or "Attenuation -" button, and carefully turn the adjustment
wheel (right) to keep the signal level bar in the middle (approx. 50%).
->Thus, there remains enough "leeway in the display" when adjusting to identify whether the
reception is getting better or worse.
If the display reaches approx. 99%, attenuate slightly again (button/wheel) and adjust more
precisely.
4 Check the TV picture and remove the Satfinder
4.1 Check the picture of a number of channels on your TV (if necessary, start a channel search)
It is most likely that the satellite dish is aligned towards a different satellite, if no channels or the
i
wrong channels are received. Some satellites are in close proximity to each other.
Check the Azimuth angle and adjust again.
4.2 Switch off the receiver/power supply
Firstly, separate the receiver from the mains to avoid short circuiting.
4.3 Fasten the satellite dish crosswise and remove the satellite finder from the signal path.
Finally, connect the supply cable to the LNB - job completed!
2. Obstruction max. half as high as distance
from the antenna
Antenna
from above
Receiver
-->
Threshold value
10%
adjust
Attenuation
Keep signal level
at 50%
SENSITIVE
in addition
Use
+/- buttons
(3 stages)
ASTRA 19.2° East
Azimuth
Germany region:
angle:
North-west (Dortmund)
165°
North-east (Berlin)
173°
South-west (Stuttgart)
167°
South-east (Munich)
170°
Satellite positions in Europe
1
Elevation:
approx. 30°
Astra 19,2
= approx. 30°
max. 5 m
10 m
2.1 Connect the Satfinder with the LNB
Use the coaxial cable that was included with
the product – connect the "LNB" connector
to the LNB output.
2.2 Connect the receiver/power supply
(receiver is off)
Connect the (receiver) supply cable to the
connector that is labelled "Receiver"
2.3 Switch on the receiver/power supply
The receiver now supplies the power
to the satellite finder – the satellite finder
starts.
The satellite finder potentially displays a reading,
i
often 99% or 0% Turn the adjustment wheel.
2.4 Attenuate the LNB background noise
Depending on the LNB type and background
interference radiation, the satellite finder may
already display a reading even though a satellite
is not being located.
Before beginning the alignment, you must
attenuate the interference radiation/back-
ground noise.
To do this, turn the lateral adjustment wheel or
press "Attenuation" buttons (ATT-), until you
find the threshold value and then adjust the
level to approx. 10%.
Now the satellite finder is ready to display
the satellite signals correctly.
Keep the signal level display region
i
at approx 50% by reducing or increasing the
attenuation.
An increase or decrease in the level can thus
be identified.
If attenuation is activated,
"ATT" appears on the display.
The adjustment wheel is very sensitive.
i
In addition, use the "Attenuation +/-"
buttons.
3.3 Optimally align the antenna by
gentle turning and tilting
The antenna is optimally aligned
when the signal strength cannot
be increased anymore.
It is often possible to somewhat increase the
quality by turning the LNB in its retaining
clamp in small increments, known as skew
optimisation (not necessary for Astra 19.2°).
Elevation
LNB tilt
angle:
angle (skew):
30°
-2°
30°
-2°
33°
-2°
34°
-0°
2
Azimut:
Astra 19,2
= approx. 170°
Obstruction