4M MONEY BANK ROBOT Manual de instrucciones
Navegue en línea o descargue pdf Manual de instrucciones para Juguete 4M MONEY BANK ROBOT. 4M MONEY BANK ROBOT 2 páginas.
3422_prelime draft_10_OP.pdf
1
20/8/2019
6:08 PM
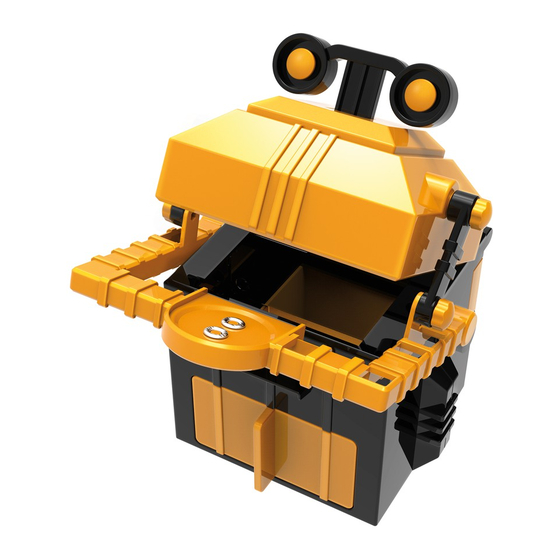
F. HOW IT WORKS
The battery is connected to the motor through the terminals on the arm. Because the terminals are not touching each other, the circuit is
broken so no electricity flows. When you put a coin on the terminals the circuit is completed by the metal of the coin. The motor switches
on, operating the mechanism that lifts the arm. As soon as the coin slides off the terminals the circuit is broken again and the motor
stops.
G. TROUBLESHOOTING
If the motor does not run:
• check that you have a fresh battery and that the battery is inserted into the battery holder the correct way round
• check that you have made the correct connections at the terminal blocks (see section D, steps 4, 5 and 9)
• check that the bare metal of all the wires is in contact with the metal terminals
• check if the coin is touching both metal eyelets, slightly press the coin to check if the motor is turning.
H. FUN FACTS
• Your Money Bank Robot is a type of moneybox called a mechanical bank.
• Mechanical banks were very popular in Victorian times. They were fun moneyboxes that encouraged children to save their money.
• The Money Box Museum in Amsterdam in the Netherlands has a collection of more than 12,000 moneyboxes.
• It's rare to find a very old money box because they had no holes in bottom and so had to be smashed to get the money out.
• Moneyboxes were originally called 'piggy banks' because hundreds of years ago jars used for storing money were made from type of
orange-coloured clay called pygg.
• Many piggy banks are now shaped like pigs.
• Coins are made from metals. Normally the metals are mixed together to make materials called alloys that are more hardwearing than
the individual metals on their own.
• All metals are good conductors of electricity. That means that electricity flows through them easily.
C
M
Y
CM
MY
CY
CMY
K
QUESTIONS & COMMENTS
We treasure you as a customer and your satisfaction with this product is important to us. In case you have any comments or questions, or you find any parts
of this kit missing or defective, please do not hesitate to contact our distributor in your country, whose address is printed on the package. You are also
welcome to contact our marketing support team at Email: [email protected], Fax (852) 25911566, Tel (852) 28936241, Web site: WWW.4M-IND.COM
©2019 4M INDUSTRIAL DEVELOPMENT LIMITED. ALL RIGHTS RESERVED.
MONEY BANK
ROBOT
A. SAFETY MESSAGES
1. Adult assistance and supervision are required at all times.
2. This kit is intended for children over 8 years of age.
3. This kit and its finished product contain small parts which may cause choking if misused. Keep away from children under 3 years old.
4. To prevent possible short circuits, never touch the contacts inside the battery case with any metal objects.
5. Only install the battery after you have assembled the product. Adult supervision is required.
B. USE OF BATTERY
1. Requires one 1.5 V AA battery (not included).
2. For best results, always use a fresh battery.
3. Make sure you insert the battery in the correct polarity.
4. Remove the battery from the kit when not in use.
5. Replace an exhausted battery straight away to avoid possible damage to the kit.
6. Rechargeable battery must be removed from the kit before recharging.
7. Rechargeable battery must be recharged under adult supervision.
8. Make sure that the supply terminals in the battery case are not short circuited.
9. Do not attempt to recharge non-rechargeable battery.
C. CONTENTS
Part A: Rear body x 1, Part B: Front body x 1, Part C: Lid x 1, Part D: Eye holder x 1, Part E: Links x 2, Part F: Coin arm x 1, Part G:
Coin drawer x 1, Part H: Battery compartment cover x 1, Part I: Motor compartment cover x 1, Part J: Motor x 1, Part K: Wires x 2, Part
L: Eyes x 2, Part M: terminal caps x 9, Part N: screws x 7. Also required but not included with this kit: a small crosshead screwdriver, a
1.5-volt AA battery.
D. ASSEMBLY
1. Slot the motor (part J) into the rear body (part A).
2. Put the motor compartment cover (part I) in place and secure with two screws (part N). Make sure that the two wires from the motor
come out through the two slots on the rear body.
WARNING:
PLEASE SCAN THE QR CODE FOR VIEWING MULTI-LANGUAGE INSTRUCTIONS.
CHOKING HAZARD - Small parts.
Not for Children under 3 years.
TO PARENTS: PLEASE READ THROUGH THESE
INSTRUCTIONS BEFORE PROVIDING
GUIDANCE TO YOUR CHILDREN.