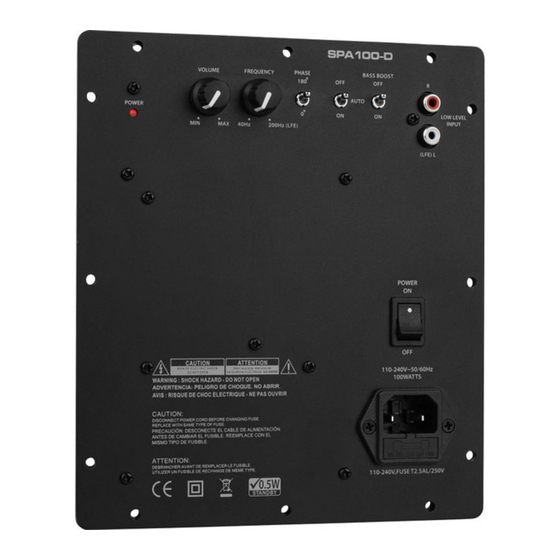
DaytonAudio SPA100-D Manual del usuario - Página 3
Navegue en línea o descargue pdf Manual del usuario para Amplificador DaytonAudio SPA100-D. DaytonAudio SPA100-D 4 páginas. 100 watt class-d subwoofer plate amplifier

INPUT/OUTPUT CONNECTIONS:
1. Power Input:
This unit features an IEC type power jack. This allows the user to change the power cord depending on the country and voltage
used. The IEC jack also houses an integrated fuse holder that contains the AC line fuse. The unit is set at the factory for 115/120VAC
operation. It is supplied with a 4 A, 250V fuse and USA type power cord. In most 230/240VAC applications a separate power cord
and 2A, 250V fuse will be required (not included).
2. Low-Level Inputs (Left/Right):
RCA style jacks that will accept standard line level inputs from a pre-amp level source. They will accept a stereo signal and internally
combine it into mono. Both left and right input jacks must be connected to the source in order to drive the amplifier to full output.
Note: If using a LFE output from a preamp or receiver connect it to the Left (mono) input.
3. Output Lead for Subwoofer Driver:
This rear mounted output lead connects the amplifier to the subwoofer driver. The output lead is roughly 20" long and is color coded.
The red and black wires each include an insulated .250" disconnect. These connectors can be easily removed if your driver requires
another size or type of connector. Be sure to observe proper polarity when connecting the amplifier to your subwoofer driver (red =
positive, black = negative).
CONTROLS/INDICATORS:
4. Power/Clipping LED:
This LED indicator will display the current status of the amplifier. When the amplifier is on the LED will glow blue. When the amplifier
is in stand-by the LED will be red. As the output signal increases to the onset of clipping the LED will flash red, this indicates that
the clip limiting circuitry is activated.
5. Volume (Gain):
This control will match the amplifier's input sensitivity to the output of the pre-amp source. If the source output has a variable con-
trol, we recommend that the user spend a moment or two determining the best balance between the two controls. When a balance
is found between low noise, linear level control, and sufficient level to drive the amp to the required output, the gain knob can be
considered the "volume control" for the subwoofer system.
6. Frequency (Low-pass crossover):
This control is used to establish the highest frequency that the subwoofer will reproduce and has a range between 40 to 200 Hz with
a slope of 18 dB per octave. If you are using the system for music and your main speakers have good bass capability, you could
set the control to a fairly low value at 40, 60, or even 100 Hz. If the main speakers are smaller or do not have much bass output,
set the control higher. Experiment with the amount of "overlap" that you will experience when all speakers are playing in the same
range. This can be helpful when integrating the subwoofer with the rest of the system and with the room. Note: When using a pre-
amp or home theatre receiver with a LFE (Low Frequency Effects) output the internal low-pass filter circuitry should be bypassed
by turning the frequency control to maximum (200 Hz). The pre-amp or home theater receiver should be used to control the low
pass crossover frequency.
7. Phase:
This two-position switch helps to compensate for differences in the acoustical and electrical characteristics between the subwoofer
and the main speakers. The relative locations of speakers in the system can cause significant disturbances in speaker interaction
due to time delay issues, or the destructive phase interferences that can occur at certain frequencies. The use of this switch in
conjunction with altering the location of the subwoofer can have a dramatic effect on system integration. The 0° setting would be
considered the normal or default setting, but be sure to experiment during system set-up.
8. Auto Turn On/Off:
When the "Auto" position is selected, the amp is in stand-by mode until an input signal of about 10 millivolts or greater is detected.
The amp will go back to standby mode 15-18 minutes after the input signal stops. In the "Off" position the amplifier is in stand-by
mode. In the "On" position the amplifier is always on.
9. Bass Boost:
This allows the user to add a 6 dB boost to the response centered at 35 Hz. This bass boost is generally used to extend the low
end response of designs with decreased output below 45 Hz. Bass boost is most commonly used on sealed and low tuned vented/
passive radiator designs. Note: Use caution when using bass boost. With low excursion drivers or designs tuned higher than 35 Hz
the bass boost can sometimes push a driver beyond its excursion limits.
10. Main Power Switch:
Main power disconnect. In the "Off" position the amplifier is off. In the "On" position the amplifier will be either on or in stand-by (de-
pending on the position of the Auto Turn On/Off switch). If you will not be using the subwoofer for a long period of time then switch
this to the "Off" position so the amplifier will not use any power.
(3)
