Garmin fenix Manual del usuario - Página 10
Navegue en línea o descargue pdf Manual del usuario para Ver Garmin fenix. Garmin fenix 22 páginas. Turn on smart watch of 2022 - go wiki
También para Garmin fenix: Manual del usuario (18 páginas), Manual de introducción (4 páginas), Manual de inicio rápido (18 páginas), Faq (5 páginas), Cómo hacerlo (8 páginas)
Altimeter and Barometer
The device contains an internal altimeter and barometer.
• On Demand sensor data
• Always On sensor data
• Altimeter settings
(page
• Altimeter and barometric readings
Calibrating the Barometric Altimeter
Your device was already calibrated at the factory, and the
device uses automatic calibration at your GPS starting point by
default. You can manually calibrate the barometric altimeter if
you know the correct elevation or the correct sea level pressure.
1
Select the Orange key.
2
Select Setup > Sensors > Altimeter.
3
Select an option:
• Select Auto Cal. > At Start to calibrate automatically from
your GPS starting point.
• Select Auto Cal. > Continuous to calibrate automatically
with periodic GPS calibration updates.
• Select Calibrate to enter the current elevation or sea-
level pressure.
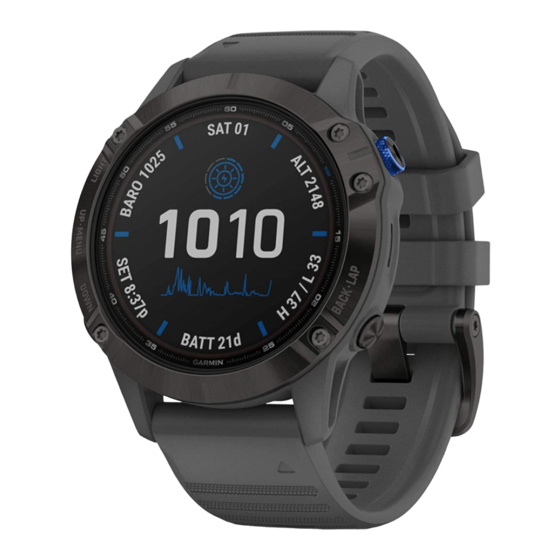
Tracking Weather Changes Overnight
You can use your device to track changes in barometric
pressure over time. Increases in barometric pressure usually
indicate good weather, and decreases in barometric pressure
usually indicate bad weather.
1
Select the Orange key.
2
Select Setup > Sensors > Mode > Always On.
3
Select
repeatedly to return to the time of day page.
4
Select
repeatedly until the barometric data page appears.
The current barometric pressure appears in large numbers,
and the range of previous readings for the graph shown
appears in small numbers at the bottom of the page.
5
Compare the current reading with earlier readings to see if
the barometric pressure is increasing or decreasing.
Marking and Starting Navigation to a Man
Overboard Location
You can save a man overboard (MOB) location, and
automatically start navigation back to it. You can customize the
hold function of the
or
quickly
(page
8).
1
Select the Orange key.
2
Select GPS Tools > MOB > Start.
The map page opens showing the route to the MOB location.
3
Navigate using the compass
Geocaches
A geocache is like a hidden treasure. Geocaching is when you
hunt for hidden treasures using GPS coordinates posted online
by those hiding the geocache.
Downloading Geocaches
1
Connect your device to a computer using the USB cable.
2
Go to www.opencaching.com.
3
If necessary, create an account.
4
Sign in.
5
Follow the on-screen instructions to find and download
geocaches to your device.
6
(page
1)
(page
2)
9)
(page
15)
key to access the MOB function
(page
5) or map
(page
Navigating to a Geocache
Before you can navigate to a geocache, you must go to
www.opencaching.com, and download a geocache to your
device.
Navigating to a geocache is like navigating to any other
location.
• See the navigation section
• Go to the profiles section
geocaching.
• Go to the geocache settings
device settings.
• Go to the data pages section
data fields.
Logging the Attempt
After you have attempted to find a geocache, you can log your
results.
1
Select the Orange key.
2
Select GPS Tools > Geocaches > Log Attempt.
3
Select Found, Did Not Find, or Unattempted.
4
Select an option:
• To begin navigation to a geocache nearest you, select
Find Next.
• To end the logging, select Done.
chirp™
A chirp is a small Garmin accessory that is programmed and left
in a geocache. You can use your device to find a chirp in a
geocache. For more information about the chirp, see the chirp
Owner's Manual at www.garmin.com.
Finding a Geocache with a chirp
1
Select the Orange key.
2
Select Setup > Geocaches > chirp > On.
3
Hold
.
4
Select Start GPS.
5
Wait while the device locates satellites.
6
Select the Orange key.
7
Select GPS Tools > Geocaches.
8
Select a geocache, and select chirp to show chirp details
while you are navigating.
9
Select Go, and navigate to the geocache
When you are within 32.9 ft. (10 m) of the geocache that
contains a chirp, a message appears.
5).
Clock
Setting the Alarm
1
Select the Orange key.
2
Select Clock > Alarm Clock > Add Alarm.
3
Use the Orange key,
4
Select Tone, Vibration, or Tone & Vib..
5
Select Once, Daily, or Weekdays.
Starting the Countdown Timer
1
Select the Orange key.
2
Select Clock > Timer.
3
Select the Orange key,
(page
5) for more information.
(page
2) to create a profile for
(page
10) to customize your
(page
8) to customize your
(page
Applications
, and
to set the time.
, and
to set the time.
3).
Geocaches