Aquatec OCEAN VIP Commode Manual de instrucciones - Página 6
Navegue en línea o descargue pdf Manual de instrucciones para Silla de ruedas Aquatec OCEAN VIP Commode. Aquatec OCEAN VIP Commode 10 páginas. Commode
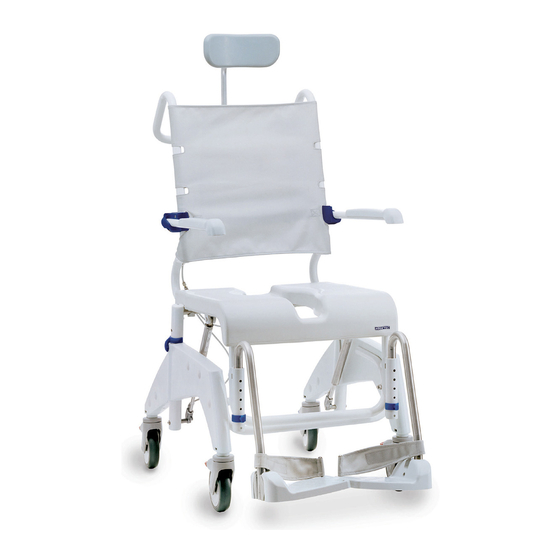
5.1
Assembling the commode
5.1.1
Inserting and moving the clips
1.
Pull the two clips for height adjustment (10, fig. 2)
from the inside of the seat frame and insert into
the side section from the outside until both lugs (6,
fig. 8) enclose the seat frame tube (2, fig. 8).
2.
Remove both clips for the footrests (7, fig. 2) from
the plastic bag and insert into the guide (8, fig. 6)
of the seat frame (9, fig. 6) until both lugs enclose
the guide.
5.1.2
Fitting the backrest
1.
Lock all casters using the red foot pedals. To do
this, push down the red foot pedal for the casters.
Important!
When folded up, the armrests must face for-
ward.
2.
Push the backrest (1, fig. 3) from behind onto the
pin on the seat frame (3, fig. 3) until the collar of
the backrest touches the seat frame tube.
Important!
Tighten the screws using the Allen key sup-
plied.
3.
Tighten the backrest on the left and right sides
using two screws on each side (2, fig. 3).
5.1.3
Attaching the removable handle and cable
ties
Important!
Feed the wire (1, fig. 4) for activating the pneu-
matic springs through the gap between the
backrest cover and the belt locks.
1.
Unscrew the two cross slotted cheese head
screws (4, fig. 4) from the removable handle (2,
fig. 4) and remove the lower part of the fastening
clamp (5, fig. 4).
2.
Guide the removable handle upwards through the
gap between the backrest cover and the belt locks
(6, fig. 4).
3.
Place the removable handle with the top part of
the fastening clamp onto the handle of the back-
rest so that the hand lever (3, fig. 4) points to the
right.
4.
Fix the removable handle to the tubular frame
using the bottom part of the fastening clamp and
the two cross slotted cheese head screws. Tight-
en the screws lightly.
5.
Align the removable handle as shown in fig. 4.
6.
Tighten the two cross slotted cheese head
screws.
12
7.
Fix the wire. To do this, place a cable tie (5, fig. 2
or 2, fig. 5) around the tubular frame (1, fig. 5) and
the wire (3, fig. 5) on the left and right side of the
lower curve of the backrest frame and tighten.
8.
Shorten the projecting ends of the cable ties.
5.1.4
Fitting the footrests
Important!
The assembly procedure is the same for the
right and the left footrests.
Push the footrest (1, fig. 6) and the footplate (4, fig. 6)
inwards into the guide (8, fig. 6) on the seat frame (9,
fig. 6) until the groove (2, fig. 6) catches the pin on the
clip (7, fig. 6). The footrests can no longer be turned to
the sides.
5.1.5
Fitting the headrests
Important!
●
To adapt it to the user, the grab handle can
be fitted with the curve facing the front or
the back.
●
The headrest pad (10, fig. 7) can be re-
moved and replaced by other pad shapes
(optional). To remove it, loosen the retain-
ing bolts (9, fig 7).
1.
Use the star handle to insert the screw (6, fig. 7) a
little into the bracket (7, fig. 7).
2.
Push the bracket with the screw onto the handle
of the backrest (5, fig. 7) from behind in such a
way that the screw engages in the hole of the
backrest's handle.
3.
Insert the plate (4, fig. 7) into the bracket from the
front in such a way that both lugs of the plate face
down and up and the curved plate side touches
the handle of the backrest.
Important!
On inserting the retainer, the curved side of the
plate must rest entirely on the handle of the
backrest.
4.
Push the grab handle (3, fig. 7) from above into
the recesses of the bracket.
5.
Use the star handle to tighten the screw (6, fig. 7)
until the grab handle is fixed.
6.
Push the pad (10, fig. 7) and the pad holder (2,
fig. 7) into the holder on the grab handle (8, fig. 7).
7.
Use the star handle to tighten the upper screw (1,
fig. 7) until the pad holder is fixed.
EN