MSI RX1650GT-TD256E Manual rápido del usuario - Página 2
Navegue en línea o descargue pdf Manual rápido del usuario para Tarjeta de vídeo MSI RX1650GT-TD256E. MSI RX1650GT-TD256E 2 páginas. Rx1650gt series
O
verview
1
512MB DDR3 memory or
256MB DDR3 memory or
128MB DDR3 memory
ATI Radeon X1650GT
PCI Express interface
TV_Out Connector
D-Sub Port
DVI Port
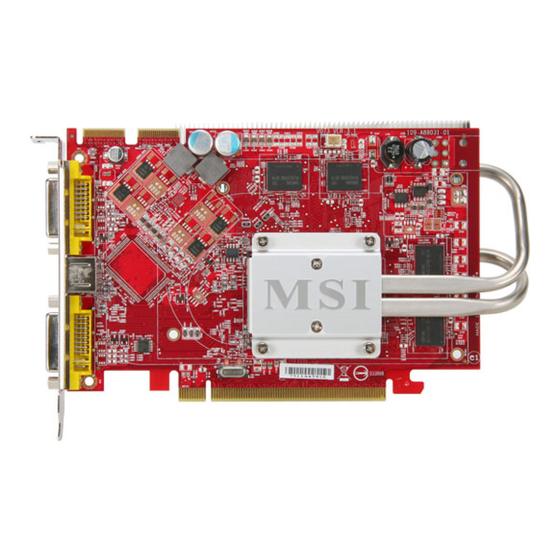
Note: The VGA card shown here may vary from the actual card.
For further information, please visit MSI website at www.msi.com.tw
G
etting Started
2
Unpacking
Please check out the following items to make sure that you get the complete product:
VGA card
Disk: Drivers, documentation, and applications
Consult your dealer immediately if anything is missing or damaged.
System Requirements
To install the VGA card, your computer system needs to meet the following requirements:
Intel Pentium III (and above), AMD K7 (and above), or compatible with expansion slot
R
TM
R
R
128MB of system memory
Installation software requires CD-ROM drive
Operation System Support: visit MSI website for further information
Power supply of 350 (and up) watt is highly recommended for system stability
Card Features
For reference only
Shader Technology
Support for Microsoft DirectX 9.0 programmable vertex and pixel shaders in hardware.
R
R
Shader Model 3.0 vertex and pixel shader support:
- Full speed 32-bit floating point processing.
- High dynamic range rendering with floating point blending and anti-aliasing support.
- High performance dynamic branching and flow control.
Complete feature set also supported in OpenGL 2.0.
R
Anti-Aliasing and Anisotropic Filtering
2x/4x/6x Anti-Aliasing modes:
- Sparse multi-sample algorithm with gamma correction, programmable sample patterns, and
centroid sampling.
- New Adaptive Anti-Aliasing mode.
- Temporal Anti-Aliasing.
2x/4x/8x/16x Anisotropic Filtering modes:
- Up to 128-tap texture filtering.
- Adaptive algorithm with performance and quality options.
- Improved rendering with higher subpixel precision and LOD computation levels.
- New rotational high quality rendering mode.
3Dc+
TM
Advanced Texture Compression
High quality 4:1 compression for normal maps and luminance maps.
Works with any single-channel or two-channel data format.n
G
3
etting Started
New Ring Bus Memory Controller
Programmable arbitration logic maximizes memory efficiency, software upgradeable.
New fully associative texture, color, and Z cache design.
Hierarchical Z-Buffer with Early Z Test.
Lossless Z-Buffer Compression (up to 48:1)
Fast Z-Buffer Clear.
Z Cache optimized for real-time shadow rendering.
Optimized for performance at high display resolutions, up to and including widescreen HDTV.
TM
Avivo
Video and Display Engine
New advanced video capabilities, including high fidelity gamma, color correction and scaling..
Dual independent display controllers that support true 30 bits per pixel throughout the display
pipe.
- Full symmetry on both heads.
- Each display interface supports display resolutions beyond 2560x1600.
Advanced DVI capabilities, including 10-bit, 16-bit HDR output.
YPrPb component output for direct drive of HDTV displays.
Seamless integration of pixel shaders with video in real time.
MPEG1/2/4 decode and encode acceleration:
- DXVA support.
- Hardware motion compensation, iDCT, DCT and color space conversion.
All-format DTV/HDTV decoding.
Adaptive per-pixel de-interlacing and frame rate conversion (temporal filtering).
Q
uick Installation
4
Hardware
Follow the steps
below
to install the VGA card:
1. Remove the computer case.
2. Locate the expansion slot on your mainboard.
Warning: Inserting the VGA card into a wrong
slot may damage your card (refer to your
mainboard manual for more Information).
3. Put the card directly over the
expansion
slot and
press one end of the card into the slot first.
Gently but firmly press the other end until the
card is fully seated in the slot.
4. Secure the card with a bracket screw.
5. Install all other cards and devices and connect
all the cables, and then install the case.
6. Connect the monitor. Now, you are ready to
install the software on your computer.
Software
R
To install the driver of the VGA card to your computer,
please follow the steps below:
1. Turn on the computer.
2. Insert the
CD
into the CD-ROM drive. The Autorun program will start the Setup
I
program, and show the setup screen as follows:
TM
TM
nstalling MSI Live Update 3
Tip : If, on your computer, the
Autorun program does not execute
automatically, please 1) enable the
CD-ROM drive Auto-detect function
from Control Panel; or 2) find and
run the setup.exe file manually from
the CD.
3. Click Ati VGA Drivers. Follow the on-screen instructions to complete the installation.
4. After finishing the installation, restart the computer as instructed.