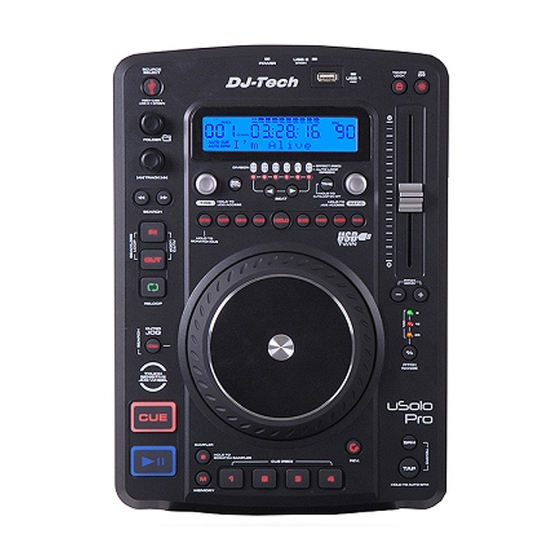
DJ-Tech uSolo Pro Manual del usuario - Página 8
Navegue en línea o descargue pdf Manual del usuario para Reproductor MP3 DJ-Tech uSolo Pro. DJ-Tech uSolo Pro 12 páginas. Professional usb

OPERATION INSTRUCTION
1. SELECTING TRACKS
Select desired track by turning the TRACK SEARCH knob once to move to one higher or lower track or
press and hold the TRACK knob to change tracks continuously at a +10 tracks higher speed. When a new
track is selected during playback, playback begins as soon as the search operation is completed.
2. STARTING PLAYBACK
Press the PLAY/PAUSE button during the pause or cue to start playback. The PLAY indicator lights when
playback starts.
3 PAUSING PLAYBACK
There are two ways to pause playback.
(1) Press the PLAY/PAUSE button during playback to pause at that point and the PLAY/PAUSE button will
flash.
(2) Press the CUE button during playback to return to the previous set cue point.
4. CUEING
"Cueing" is the action of preparing for playback. There are 1 Floating cue (the CUE button) and 4 Hot Cue (the
4 BANK buttons) in this unit.
When the CUE button is pressed, playback returns to the cue point and enters pause mode. When the
PLAY/PAUSE button is pressed during the cue mode, playback starts.
When the BANK buttons are press during playback, it will start playing from the Cue point instantly.
CUE POINT SETTING:
(1) Playback starts from pause (using the jog wheel to set the start point) or skips to a new track during play
or pause. The beginning play point will be set to the cue point. Or
(2) Press the IN button during playback to set the new cue point ("CUE on the fly").
(3) Press MEMORY to activate memory mode and press one of the 4 BANK buttons to set cues.
5. SAMPLER
There are 4 banks of sampler sharing the 4 BANK buttons of the HOT CUE function.
SETTING SAMPLES
Set a CUE point to one of the 4 banks, the sampler will also take sample from that playing time. The sampler
can take maximum of 5 seconds sample and store in the internal memory. (The samples will be erased after
powering off and on).
SETTING SAMPLES LENGTH
The sample length can be set by user (maximum of 5 seconds). When the unit is not in sampler mode, select
an available bank (the button will be flashing). Press IN to set the starting point and press OUT to set the ending
point. This section will be stored in the sampler.
PLAYING SAMPLES
Press the SAMPLER button to activate the sampler function. Press any of the available BANK to play the
sample. TIME knob can be used to adjust the pitch of the sample and RATIO knob can be used to adjust the
volume of the sample. Press and hold the SAMPLER button until LED blinks to enable the Sample scratch
mode; press the button again to cancel this function.
6. STORE AND RECALL THE HOT CUE AND SAMPLES
The HOT CUE and SAMPLES memory can be stored into the USB Device. One database file will be created on
the USB device per folder. For example, if there
databases
for the Cues and Samples.
STORING THE HOT
(1). Created the Cues or Samples you want to store.
(2). Press and hold the MEMORY button for more than 1 second.
(3). "Saving" will be displayed on the LCD and the list of HOT CUE and SAMPLES will be stored into the USB
Device
(4). The database file will be created in the current playing folder. If there is already database file in the folder, it
will be overwritten.
(5).
Only the Cues or Samples in the current playing folder can be stored.
current playing folder when you press the MEMORY button.
CUES
AND SAMPLES
are
100 folders in your USB device, you can store up to 100
7
The database file will be stored in the
