Custom Dynamics CD-LR-06-R Instrucciones de instalación
Navegue en línea o descargue pdf Instrucciones de instalación para Accesorios para automóviles Custom Dynamics CD-LR-06-R. Custom Dynamics CD-LR-06-R 2 páginas. Luggage rack / upright sissy bar led light bar
Part Number: CD-LR-06-R
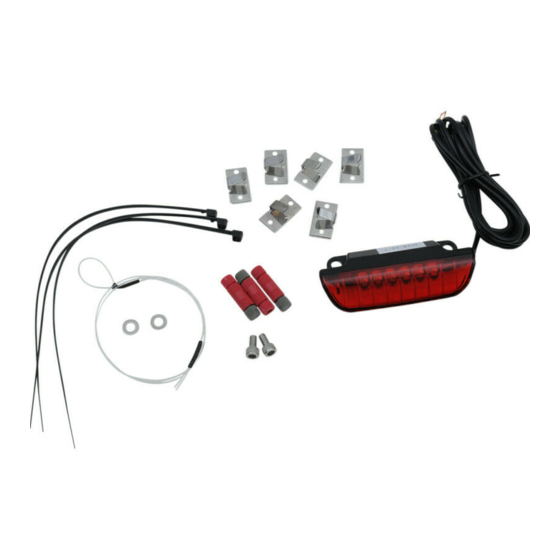
Package Contents:
- LED Light Bar (1)
- Allen Head Bolt with Washer (2)
- Posi-Tap™ Connectors (3)
- Nylon Wire Guide (1)
- Wire Clips (6)
- Tie Wraps (3)
Fitment: Sportster, Dyna, and Softail models
with H-D™ Air Foil Luggage Rack P/N 54290-11,
54291-11 and 2009-2020 Touring models with H-
D™ Air Wing Sissy Bar Upright P/N 52300146 and
52300147.
ATTENTION
Please read all Information below before Installation
Warning:
Disconnect negative battery cable
from battery; refer to owner's manual. Failure
do to so may result in electrical shock, injury,
or fire. Secure negative battery cable away
from positive side of battery and all other posi-
tive voltage sources on vehicle.
Important: Motorcycle should be secured on a
level surface for installation.
Important: This product is designed to be used
specifically with the Harley-Davidson® brand
Air Foil Luggage Rack P/N 54290-11, 54291-11
and 2009-2020 Touring models with H-D™ Air
Wing Sissy Bar Upright P/N 52300146 and
52300147.
Questions? Call us at: 1 (800) 382-1388
Custom Dynamics® Luggage Rack / Upright Sissy Bar
We thank you for purchasing the Custom Dynamics® Luggage Rack / Upright
Sissy Bar LED Light Bar! Our products utilize the latest technology and high
quality components to ensure you the most reliable service. We offer one of
the best warranty programs in the industry and we back our products with
excellent customer support, if you have questions before or during installa-
tion of this product please call Custom Dynamics® at 1(800) 382-1388.
CD-LR-06-S
Installation:
1. Remove motorcycle seat and disconnect the negative battery cable from
the battery. Consult your owners manual if unsure of this process.
2. Remove the luggage rack or sissy bar upright from the motorcycle. Place
the luggage rack or sissy bar upright face down on a clean scratch free
surface.
3. Remove the 2 screws securing the existing light filler panel or light.
4. On Softail, Dyna, and Sportster models you will need to remove the black
plastic plug on the bottom of the left rail.
5. Insert loop end of the provided Nylon Wire Guide through the lower hole
in the left rail and out through the upper rear hole. Allow the straight end
to remain outside the lower hole.
6. Cut the wire pins off and loop approximately 2" of the LED Light Bar wires
through the closed end of the guide wire. Fold wires to secure around
the guide wire to enable threading the wires through the rail tubing. See
Figure 3.
7. Carefully pull the straight end of the guide wire to draw the LED Light Bar
wires through the rail and out the lower hole. Detach the LED Assembly
wires from the guide wire after the wires have been pulled through the
lower hole.
8. Install the LED Light Bar on the luggage rack or upright sissy bar with the
two mounting bolts provided.
9. Re-install the luggage rack or sissy bar on the motorcycle.
LED Light Bar Installation Instructions
M-TH 8:30AM-5:30PM / FR 9:30AM-5:30PM EST
10-2019