Andor Technology iDus 416 Manuel de démarrage rapide - Page 2
Parcourez en ligne ou téléchargez le pdf Manuel de démarrage rapide pour {nom_de_la_catégorie} Andor Technology iDus 416. Andor Technology iDus 416 2 pages.
4
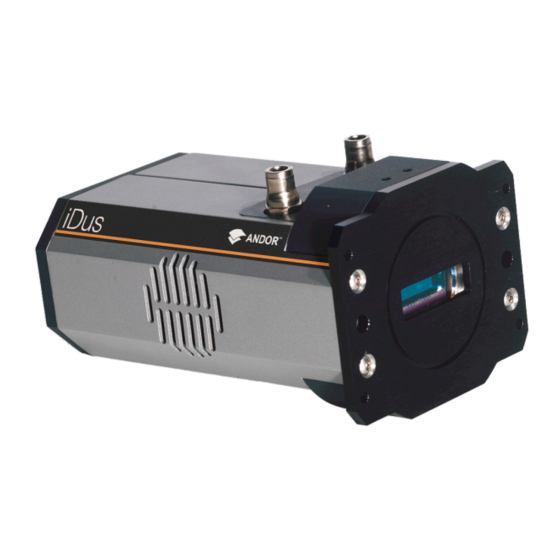
Connecting your Camera to a Spectrograph
Refer also to your Spectrograph User Guide
Attach the iDus 416 to the Spectrograph
1. Carefully remove the protective film from the front face of
the camera.
2. Remove the blanking plate from the Spectrograph
mounting plate.
3. Align the camera to the mounting plate of the
Spectrograph as shown below.
4. Secure the camera to the Spectrograph as shown below,
using the 4 screws provided.
Connect the cables between the iDus 416 and the
Spectrograph
The Spectrograph can be controlled through either the SMB
or I
C (where available) connections. Both options are shown
2
below.
SMB
1. Connect the SMB to BNC cable to the camera SMB
Shutter connection.
2. Connect the other end of the SMB to BNC cable to the
Spectrograph Shutter BNC connection.
I
2
C (e.g. Shamrock 303i)
1. Connect the I
C cable to the I
C connection on the camera.
2
2
2. Connect the other end of the I
2
C cable to the I
2
C connection on the Spectrograph.
3. The SMB to BNC cable is not required.
5
Aligning your Camera to a Spectrograph
Refer also to your Spectrograph User Guide
If you bought an Andor Spectrograph with your iDus 416 it should come ready to use, but occasionally the mounting flange
can become misaligned during shipping. If this has occurred, refer to the camera alignment section in the Spectrograph User
Guide.
If you want to attach your iDus 416 camera to a spectrograph other than one ordered with your camera, refer to the
Spectrograph User Guide for further information on alignment and focusing.
Align the Camera with
the Spectrograph
mounting plate
Secure the camera
using the 4 screws
Attaching the iDus 416 to a Spectrograph
6
Connecting your Camera to the PC and switching it on
Ensure the mains power cable is not inserted before attaching
the PSU to the camera.
1. Insert the power cable from the power supply into the 5-way
DIN power connector at the rear of the camera. Secure in
position using the screw-lock.
2. Insert the mains cable into the camera power supply unit.
3. Connect the USB cable to the camera and an available USB
port on the PC.
Note: the PC is connected to both the Spectrograph and the
camera by USB connections.
4. Ensure the camera and Spectrograph cable connections have
been made as shown in Section 4.
5. Switch on the Spectrograph
6. Start your software.
7. Start acquiring data.
Using Optional Water Cooling
•
Refer to user manual for connection information and guidelines.
•
Always ensure that the temperature of the liquid coolant circulated through the camera head is above the dew
point of the camera ambient.
•
Use of coolant at or below the dew point will result in permanent damage to the camera head, due to formation
of condensation on internal components.
?
Troubleshooting
Camera is not recognized by PC
•
Check that the camera power and USB cable are connected securely and the mains power cable is inserted.
•
Ensure the Spectrograph is powered up before the camera is powered up.
•
Check that the drivers have been installed properly
(Control Panel – System – Hardware – Device Manager – Imaging Devices).
Temperature Trip Alarm sounds (continuous tone)
Should the buzzer sound ensure the following:
Air Cooling
•
Check that the air vents on the camera are not blocked and there is sufficient clearance (90 mm) around the camera
•
The ambient air temperature is not above 30ºC.
•
The fan has not been deactivated (or the speed set too low) in software.
Water Cooling
•
Check that the cooling system is operating correctly
•
NOTE: When using water cooling, always use water that is above the dew point of the ambient environment to prevent
condensation from occurring.
For additional troubleshooting information please refer to the user manual on the CD provided and
for technical information about the iDus 416 go to:
iDus 416 Rear Panel Connections
TTL/Logic SMB Connections
I
C Connection
2
Power
USB Connection
andor.com/iDus
MAN-07800
IDSG 0914 R1