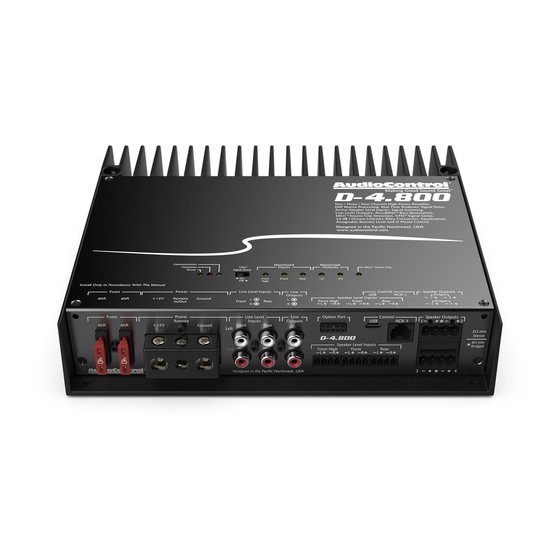
AudioControl D-4.800 Manuel de démarrage rapide - Page 4
Parcourez en ligne ou téléchargez le pdf Manuel de démarrage rapide pour {nom_de_la_catégorie} AudioControl D-4.800. AudioControl D-4.800 18 pages. High power multi channel amplifier with dsp matrix processor
Également pour AudioControl D-4.800 : Manuel de démarrage rapide (17 pages)

Features continued
6. Option Port
-
This port allows you to connect our optional
Bluetooth adapter, so you can stream audio into channels 7 and 8
from your Bluetooth-enabled devices. Or setup and control your
D-6.1200 with the DM Smart app. Further details will be available
when this accessory and others become available.
7. USB Micro
Connector- This connects to your computer's USB A
port to configure the D-4.800 with the control software.
8. Remote Control
Connector- This connects to the optional ACR-
3 remote level control using a standard telephone cord.
9.
Speaker-Level
Output
Terminals
-
These screw terminals
connect with speaker wire to your loudspeakers. Make sure that
the average combined speaker impedance does not dip below 2
Ohms, or 4 Ohms in Bridged
mode.
Outputs 1 and 2 can be com-
bined in Bridge mode to power a single speaker. Use the 1
+
and
2- terminals only. Outputs 3 and 4 can also be combined in bridge
mode, use the 3+ and 4- terminals only.
1 O. Power LED
-
If you have connected your battery power, vehicle
ground, and turn-on lead (or GTO™ signal sensing) correctly, then
this light should be
GREEN
to indicate the power is ON. An inter-
nal blue glow will also emanate from the heatsink area to indicate
that the power is ON. There are times when this blue glow will
flash, such as during power-up, and when the protection circuits
have detected a problem. See the table below.
11. Protection LED
-
The D-6.1200 amplifier has built in diagnostic
codes to tell you exactly what is going wrong should the amplifier
detect a problem. Below is a list of diagnostic codes to help
you.
4
D-4.BOO
If the protection LED should come on, read the red codes quickly
before turning off the system and investigating. Note that the
blue power codes mentioned in the table are for the internal blue
glow from behind the heatsink area, and not the power LED which
is green. If there is problem with the unit, the sensing circuit will
shut
down the unit to protect itself, and this protection
LED
will
come
on.
For example, this might happen if the temperature with-
in the unit is too high. Check there is good ventilation around the
unit, and that the
speaker
wires are not short circuiting, and check
that you are not running too low of a speaker impedance.
Power (Blue) Codes
(These
are the blue LEDs inside
the
unit)
Power Up
0 0 0 0 0 0 0 0 0 0 0 0 0 0 0 0
Reset Boot
0 0 0 0 0 0 0 0 0 0 0 0 0 0 0 0
Protection Activated
0 0 0 0 0 0 0 0 0 0 0 0 0 0 0 0
Protection
(Red) Codes
(This is the red Protection LED on the unit)
1 Short
0 0 0 0 0 0 0 0 0 0 0 0 0 0 0 0
2
Repeated Short
0 0 0 0 0 0 0 0 0 0 0 0 0 0 0 0
3 Under Voltage
0 0 0 0 0 0 0 0 0 0 0 0 0 0 0 0
4 Over Voltage
0 0 0 0 0 0 0 0 0 0 0 0 0 0 0 0
5
DC Offset
0 0 0 0 0 0 0 0 0 0 0 0 0 0 0 0
6
Thermal Heatsink
0 0 0 0 0 0 0 0 0 0 0 0 0 0 0 0
7
Thermal Transformer
0 0 0 0 0 0 0 0 0 0 0 0 0 0 0 0
Quick Start Guide
