Cast CAPROG Instructions pour l'utilisateur - Page 2
Parcourez en ligne ou téléchargez le pdf Instructions pour l'utilisateur pour {nom_de_la_catégorie} Cast CAPROG. Cast CAPROG 2 pages. Hand-held device programmer
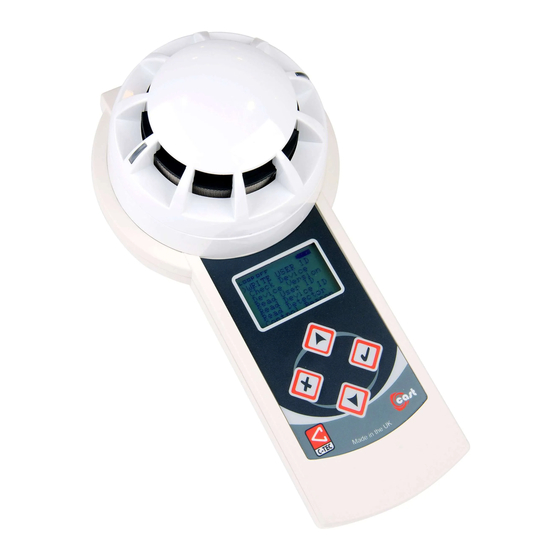
Operation
Keypad Buttons
The keypad buttons are multi-functional, as listed below:
•
Scroll up through menus
UP
•
Increase device address
•
Increase LCD contrast
•
Scroll down through menus
DOWN
•
Decrease device address
•
Decrease LCD contrast
•
Turn Programmer ON
✔
ACCEPT
•
Select a menu / sub-menu
•
Confirm a setting
•
Return to previous menu
RETURN
•
Cancel a setting
Power Up & Turn On
Lift off the battery cover on the back of the Programmer and
insert four 1.5 V, AA, alkaline batteries. Replace the cover.
To turn the Programmer ON, press the ACCEPT button.
The CAST logo is briefly displayed and then the Programmer's
main menu (shown right). Press the DOWN button to view
additional menus.
Manual & Auto Shutdown
To turn the Programmer OFF, select SHUTDOWN
menu (shown right).
If none of the Programmer's buttons are pressed
for 3 minutes it will shut down automatically.
Press the ACCEPT button to power up the
Programmer again.
Battery Check
A battery power indicator is displayed top-right on the Programmer's
LCD. When the battery level is low, this indicator will blink to indicate
the batteries need replacing (shown right).
Note: Always use good quality, long-life batteries. DO NOT use
rechargeable batteries!
2 of 4
Approved Document No. DFU4165000 Rev 3
✔
LOOP OFF
>
ADDRESS
Device Info
Test Device
Settings
Shutdown
LOOP OFF
Address
Device Info
Test Device
Settings
>
SHUTDOWN
CAST Range
Programmer Menus
For the following, ensure the Programmer is switched ON and the CAST device is connected.
Address
This menu sets the address of a device.
Select ADDRESS menu (shown right).
The device's current address is displayed
(`Address:1´ shown in example).
Press the UP / DOWN buttons to set the new
address (`New Add:2´ shown in example).
Press the ACCEPT button to confirm.
Device Info
This menu displays the device's firmware
version, manufacturer and type.
Select DEVICE INFO menu (shown right).
Check Device
This menu checks the operation of
LOOP ON
Address
a device.
Device Info
>
TEST DEVICE
Select TEST DEVICE > CHECK
Settings
Shutdown
DEVICE menu (shown right).
Note, for a detector, activate the
device by either applying heat or
smoke, as appropriate.
The LCD displays the device and
alarm type, then auto resets the
device.
Control VAD
This menu tests the alarm operation of a Visual
Alarm Device (VAD).
Select TEST DEVICE > CONTROL VAD menu (shown
above) and the device's VAD will be activated. Press
the ACCEPT button to toggle the VAD off and on.
Control Sounder
This menu tests the alarm operation of a sounder.
Select TEST DEVICE > CONTROL SOUNDER menu (shown above) and the device's alarm will be
activated. Press the UP / DOWN buttons to change the `Tone Pattern´ (1 to 32 available), then
press the ACCEPT button to scroll through the `Tone´ volume settings (HIGH, LOW, OFF).
Note, these settings are NOT stored in the device; the control panel will use its own settings
to control the sounder.
CAST Range
Approved Document No. DFU4165000 Rev 3
LOOP ON
LOOP ON
>
ADDRESS
Address
Device Info
============
Test Device
Read OK
Settings
Address : 1
Shutdown
New Add : 2
press Accept to
write address
LOOP ON
LOOP ON
Address
Device Info
>
DEVICE INFO
============
Test Device
Read OK
Settings
Ver : xx/xx/xxy
Shutdown
Man : C-TEC
CAST Device
LOOP ON
LOOP ON
>
CHECK DEVICE
Check Device
Control VAD
============
Control Sounder
Loop Running
Event:
Opt/Ht S3 Alarm
LOOP ON
LOOP ON
Check Device
VAD Control
>
CONTROL VAD
============
Control Sounder
VAD On...OK
LOOP ON
LOOP ON
Check Device
Sounder Control
Control VAD
============
>
CONTROL SOUNDER
Command Sent OK
Tone Pattern: 1
Tone: LOW
3 of 4