Grease Guardian D4 Manuel d'installation, d'utilisation et d'entretien - Page 6
Parcourez en ligne ou téléchargez le pdf Manuel d'installation, d'utilisation et d'entretien pour {nom_de_la_catégorie} Grease Guardian D4. Grease Guardian D4 15 pages. Automatic grease removal unit
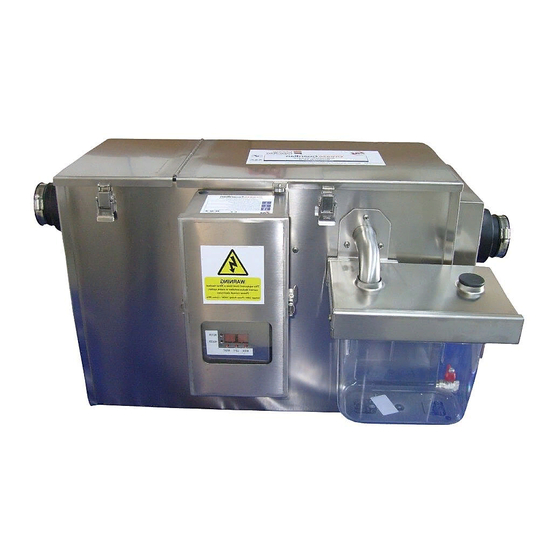
PART 2: PRE START UP CHECKS
1
Ensure unit is positioned on a level surface only and is plumbed in securely.
2
Ensure electrical outlet is waterproof and is fitted with or supported by a
dedicated Residual Current Device or ground fault circuit breaker rated 30mA
Points 3 and 4 below should normally be carried out by your market
representative as part of unit commissioning:
3
Prior to mains switch-on ensure the unit is filled with water to the correct
settlement level which occurs when the inflowing water stabilises at the base of
the skimming wheel.
4
Set the controller time of day and appropriate cycle programme in accordance
with timer setting instructions detailed in this manual. Observe all
maintenance requirements detailed in this manual
HEALTH, SAFETY AND EFFICIENCY
• Never turn unit on before filling
with water as instructed above.
•
Disconnect unit from mains
before accessing any electrical
components
•
Unit will lose efficiency if not
Maintained.
•
The unit is designed to trap and
remove free floating grease oils
and fats only
•
The internal solids strainer
provided protects the unit from
coarse solid food waste build
up. To help ensure the highest
efficiency and reduce finer solid
food-waste please install primary
strainers in sinks and ensure food
waste is scraped to bin before
washing utensils
6
•
Do not use Hazardous detergents
to clean unit
•
Do not install unit externally
unless IP65 weather proof cover
is used
•
Do not connect a macerator or
similar device upstream from the
Grease Guardian
•
Ensure unit is level and installed
flat on the ground or frame where
specified
•
Remove blockages and grease
build up from drains before
installing the Grease Guardian
Grease Guardian Controller
Cycle Programming
Initial Note: if no user adjustments are made a
factory setting from 8am-12pm starts the unit on
a LOW cycle daily. This is adequate for smaller
applications including out of town delis, or small
restaurants of less than 50 people.
Otherwise refer to Appendix 1 at back of this manual
for recommended settings for your application.
After machine switch-on, the home screen appears
displaying the controller software version (in this case
E for Europe and version date ddmmyy). The current
time of day, and factory set cycle mode ARE also
displayed.
To change a cycle first choose from one or more of
the 4 hour programs 08:00-12:00, 12:00-16:00, 16:00-
20:00, and 20:00–00:00, accessed by pressing the OK
and A buttons together. Then advance through the
time slots available by re-pressing A.
Any time-slot can be set to ON/OFF by pressing the B
button. On completion press ESC to return to the
home Screen.
Finally in the home screen press and hold either the +
or - keys for 1 second to fine tune the cycle duration.
The display will indicate the adjustment made from
3 options
- LOW Cycle Mode
- MEDIUM Cycle Mode
- HIGH Cycle Mode
See Appendix 1 for suggested setting for your application
7