Galaxy DX 2547 Manuel du propriétaire - Page 5
Parcourez en ligne ou téléchargez le pdf Manuel du propriétaire pour {nom_de_la_catégorie} Galaxy DX 2547. Galaxy DX 2547 12 pages. Am/ ssb two way citizen band base station transceiver

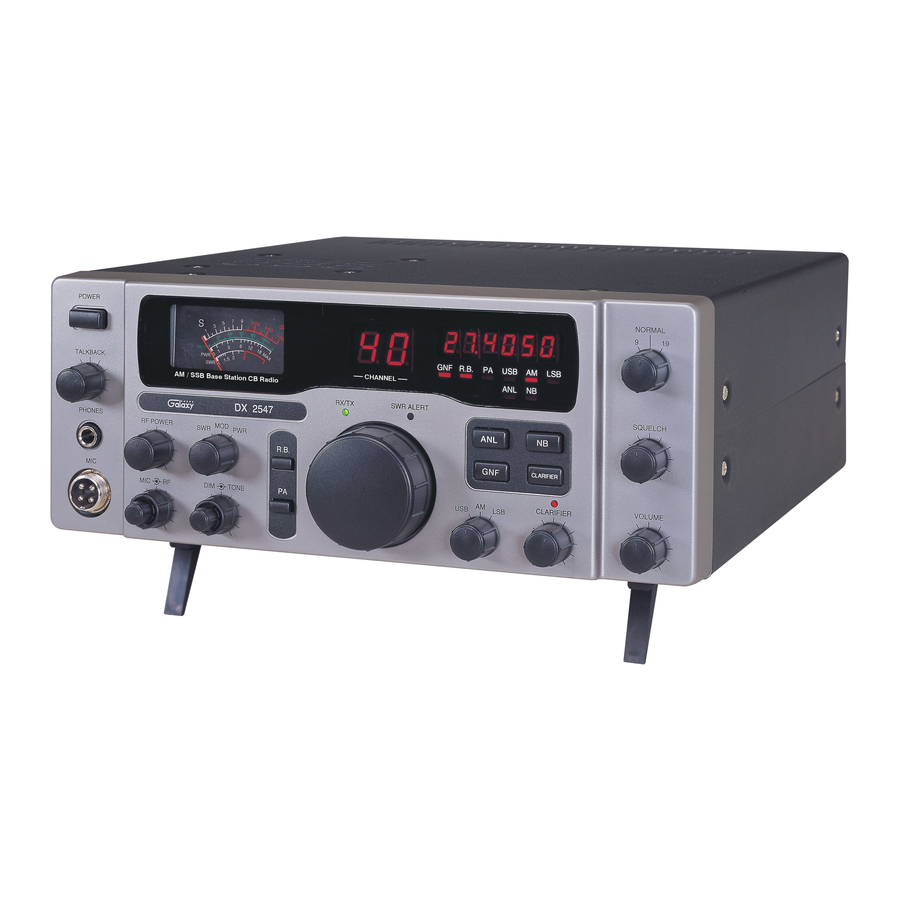
6. SWR/MOD/PWR SWITCH : This switch controls the function of the
meter during the transmit mode. In the "SWR" position, the meter
indicates the Standing Wave Ratio (SWR) of your antenna. There are no
adjustments because the SWR circuit in this radio calibrates itself
automatically. When the switch is in the "MOD" position, the green scale
on the meter indicates your percentage of modulation. It is most accurate
when testing at 4 watts output. This operates in AM only, not in SSB.
When this switch is in "PWR" position, the meter indicates your power
output.
7. DIMMER CONTROL : This knob controls the level of brightness for the
meter lamp and channel display.
8. TONE CONTROL : This control changes tone quality in receive only. In
clockwise rotation, treble is increased and in counter clockwise rotation,
bass is increased.
9. PA/OFF SWITCH : In the "PA" position, your voice will come out of the
speaker that you need to plug in to the "PA.SP" jack on the back of the
radio. The radio does not operate when you are in the "PA" mode.
10. ROGER BEEP SWITCH : In the Roger Beep position, the radio
transmits an audio tone at the end of your transmission to indicates that
transmission has ended. As a courtesy to others, use the Roger Beep only
when necessary.
11. CHANNEL SELECTOR : This control is used to select a desired
transmit and receive channel.
12. ANL/OFF SWITCH : In the "ANL" position, the Automatic Noise
Limiter is activated.
13. MODE SWITCH : This control allows you to select one of the
following operating modes: USB/AM/LSB.
14. GNF/OFF SWITCH : In the "GNF" mode, you are in CB operation but
the Galaxy Noise Filter is engaged. This is a special noise filter that de-
emphasizes audio high frequency response in order to increase the signal-
to-noise ratio of weak signals. While you will notice a dramatic reduction
in the "rushing" sound when this filter is activated, it does not have much
effect on the signal-to-noise of strong signals.
15. CLARIFIER/OFF SWITCH : Pushing this switch turns the Clarifier on
and off.
- 7 -
16. CLARIFIER CONTROL : Allows tuning of the receive frequency
above or below the channel frequency by up to 1.0KHz. Although this
control is intended primarily to tune in SSB signals, it may be used to
optimize AM signals.
17. CLARIFIER LED : This LED lights when the clarifier is on.
18. NB/OFF SWITCH : In the "NB" position, the Noise Blanker is
activated. The Noise Blanker is very effective in eliminating repetitive
impulse noise such as ignition interference.
19. VOLUME CONTROL : Turn clockwise to set the desired listening
level.
20. SQUELCH CONTROL : This switch is used to eliminate background
noise being heard through the receiver which can be disturbing when no
transmission are being heard through the received. To use this feature,
turn the switch fully counterclockwise and then turn clockwise slowly
until the background noise is just eliminated. Further clockwise rotation
will increase the threshold level which a signal must overcome in order to
be heard. Only strong signal will be heard at a maximum clockwise
setting.
21. TALKBACK CONTROL : Turn clockwise to activate Talkback circuit.
Adjust this knob for desired volume of Talkback. This is used to monitor
your own voice. For example, you could use this feature to compare
different microphones.
22. POWER ON/OFF CONTROL : Pushing this switch to apply power to
the unit.
23. FRONT PANEL METER : The Front Panel Meter allows the user to
monitor signal strength, RF output power, SWR level and AM
Modulation level.
24. TX/RX LED : The red LED indicates the unit is in the transmit mode.
The green LED indicates the unit is in the receive mode.
25. CHANNEL DISPLAY : The channel display indicates the current
selected channel.
26. SWR ALERT LED : This LED lights red when your SWR is higher
than about 3:1. This is not an exact indicator of 3:1 SWR, but it is an
indication that you should check your SWR reading.
- 8 -
