Gallien-Krueger PLEX Manuel de démarrage rapide - Page 4
Parcourez en ligne ou téléchargez le pdf Manuel de démarrage rapide pour {nom_de_la_catégorie} Gallien-Krueger PLEX. Gallien-Krueger PLEX 6 pages.

PLEX
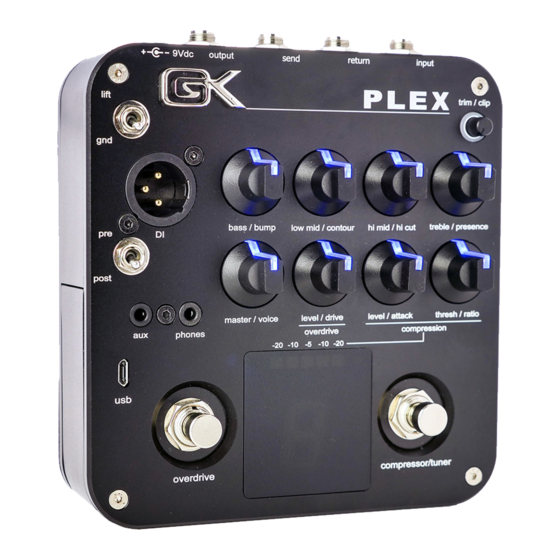
initial settings and connections
1. Set Master/Voice, Level/Drive, Level/Attack and
Level/Ratio controls to the full counter clockwise
position.
2. Set the EQ controls (16 -19) to the 12 o'clock position.
3. Set the Trim knob to the full counter clockwise
position.
4. Attach the instrument to the input jack using a standard
¼" instrument cable.
5. Attach the Output using a ¼" instrument cable, DI
using an XLR mic cable or headphones to the 3.5mm
Phones jack for the desired application.
6. Play the instrument and turn the Trim knob clockwise
until only the notes struck forcefully illuminate the
surrounding Clip ring. If the light flashes more than
occasionally with the trim knob at the full counter
clockwise position, the level control on the instrument
should be lowered.
7. Turn the Master/Voice knob clockwise until the desired
output level is reached.
8. Press the Master/Voice knob to select the overall EQ
voicing of the PLEX.
9. Press the Overdrive footswitch once to activate the
Overdrive function. The Level/Drive knob will be lit blue
once active. Turn the Level/Drive knob clockwise until
the desired volume is reached. Press the knob to select the
drive amount. Once the desired Overdrive settings are
selected, press the Overdrive footswitch once to
disengage the overdrive circuit.
10. Press Compressor/Tuner footswitch once to activate
the Compressor function. The Thresh/Ratio and
Level/Attack knobs will be lit blue once active. Turn the
Level/Attack knob clockwise until the desired volume
level is reached. You can experiment with various
Attack/Release, Threshold and Ratio settings. The 6
segment LED display shows the amount of gain
reduction that is being applied at the various settings.
Once the desired Compression settings are achieved,
press the compressor/tuner footswitch once to disengage
the compressor function.
11. Press Compressor/Tuner footswitch twice quickly to
activate the Tuner function. All knob LEDs will be unlit
to indicate the tuner is active and all output will be muted.
The large numeric display automatically shows the note
being played while the 5 segment display reflects when
the pitch is sharp or flat of the note being displayed. The
# will light to reflect a sharp note (C#, D#, f# etc.). When
only the green center LED is lit the displayed note is in
tune. Once each string has been tuned to the appropriate
pitch, press the Compressor/Tuner button twice quickly
to disengage the tuner and return play mode.
You are now ready to experiment with all of the features
available from the PLEX.
Connecting to Your Computer using USB
1. Connect the PLEX to your computer using a Micro
USB cable.
2. Once your computer detects the PLEX, select it as the
input device within your DAW to record from the PLEX
via USB. If you wish to record, playback and re-amp with
the PLEX, select it as the input and output device.
*Please reference your DAW's user manual for
detailed instructions regarding
assignments as well as required driver and system
latency optimization etc.
PLEX signal routing: The PLEX utilizes one stereo
input and one stereo output via the USB connector. The
Left/Right channels are configured as two independent
mono channels that send/receive audio information at
different points within the PLEX. This provides the user
multiple options during recording, monitoring and
playback when used with digital recording systems.
Select the left input/pan left within you DAW to receive
the Pre signal from PLEX (instrument signal before EQ
and effects processing).
Select the right input/pan right within you DAW to
receive the Post signal (instrument signal after EQ and
effects processing).
Select the left output/pan left within you DAW to stream
audio to the input of Plex for processing.
Select the right output/pan right within your DAW to
stream audio to the output of Plex for monitoring only.
PRE and POST signals from PLEX can be input at the
same time by choosing both the Left and Right signal
within your DAW. *Please note that there is a delay
between PRE and POST channels. We recommend
playing back through either the PRE or POST
channel only, not both simultaneously.
For detailed information regarding connecting PLEX,
routing options, re-amping and more please visit
http://www.gallien-krueger.com/plex-preamp/
USB input/output
