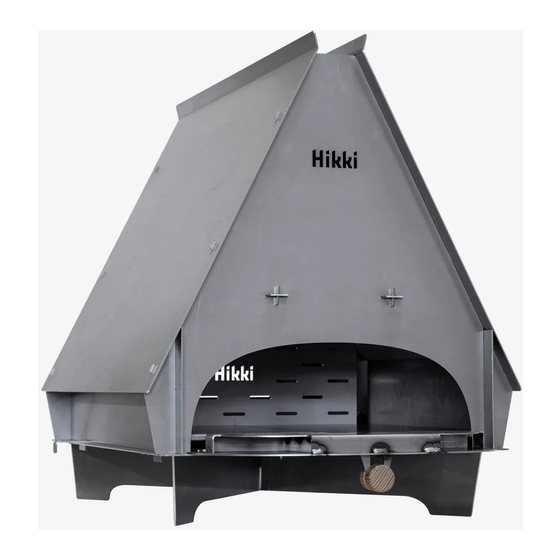
Hikki Gomsle Manuel - Page 3
Parcourez en ligne ou téléchargez le pdf Manuel pour {nom_de_la_catégorie} Hikki Gomsle. Hikki Gomsle 7 pages.
3
Fäst benen mot bottenplattan genom att
skjuta in en kil i respektive långsmalt hål och
lås den genom att bända ut den.
Fasten the
legs to the bottom plate by placing a wedge
in each of the rectangular holes and pry them
open using the supplied tool.
5
Placera mellanväggen med den bockade
delen vänd mot den främre plåten.
Mount the
middle wall with the flanged part pointing
towards to front plate, as the picture shows.
7
Lägg kolrosten på plats ovanför spjället.
Place the coal grate over the sliding hatch.
3
4
Fäst innertaket mot den främre väggen och
fixera delarna genom att knacka ner en kil
i varje hål.
Mount the inner roof against the
front wall. Lock the parts into place by ham-
mering wedges through the protruding lips
from the inner roof.
6
Placera skjutspjälet över hålen i bottenplattan
i den bakre delen av ugnen.
Roughly align the
sliding hatch against the holes in the rear part of
the oven.
8
Montera den bakre väggen mot innertaket
- och hamra in två kilar på samma sätt som
i steg 4.
Mount the back wall against the inner
roof and lock them into place by hammering
wedges in the protruding parts of the
inner roof.
9
Montera sidoväggarna mot fram- och bakväg-
garna. Varje plåt har ett urtag som matchar
skjutspjället.
Mount the side walls to the front
and back wall. Each side wall has a small notch
for the sliding hatch to run through.
11
Lägg takets skjutspjäll på plats. Lägg det med-
följande eldfasta garnet i utrymmet mellan
innertak och sidovägg.
for the inner roof so that the handle matches
the notch. Place the supplied fire rope in
the cavity between the inner roof and
the side walls.
7
13
Lägg i kolskölden. Du kan plocka ur skölden
med hjälp av verktygets hake genom att trä in
den i det rektangulära hålet och lyfta ur den.
Insert the coal shield. You can detach the coal
shield by inserting the small hook at the end of
the tool and lift it up and out of the oven.
10
Fäst sidoväggarna mot bottenplattan genom
att skjuta in en kil i respektive hål och bänd ut
den på samma sätt som med benen och bot-
tenplattan.
plate using the wedges and pry them open in
the same way you mounted the bottom plate
to the legs.
12
Montera yttertaket. OBS om du vill flytta på
Gömsle lyfter du den i bottenplattan, inte i tak-
Place the sliding hatch
plåten. Däremot kan du enkelt lyfta av takplåten
om du vill rengöra den inuti.
roof. Note! If you want to move Gömsle, grab the
bottom plate, not the roof plates. But you can of
course remove the roof plates for cleaning.
14
Lägg i pizzastålen. Du kan höja nivån på
bakytan med det medföljande stativet för en
kraftigare övervärme. Lägg benen i kors, skjut
in låsbrickan och skruva i medföljande skruv &
mutter.
Insert the bake steels. You can use the
extra legs to lift the bake steels and achieve a
more intense top heat. Mount the legs, insert
the lock washer and secure it with the supp-
lied nut and bolt and place it in the oven.
Fasten the side walls to the bottom
Mount the outer
4