Olympus VN-6500 Instructions
Parcourez en ligne ou téléchargez le pdf Instructions pour {nom_de_la_catégorie} Olympus VN-6500. Olympus VN-6500 5 pages. Vn-6000 instructions (english)
Également pour Olympus VN-6500 : Instructions (2 pages)

DIGITAL VOICE RECORDER
VN-6500
VN-6000
VN-5500
VN-5000
INSTRUCTIONS
EN
Thank you for purchasing an Olympus Digital Voice Recorder.
Please read these instructions for information about using the product correctly and safely.
Keep the instructions handy for future reference.
To ensure successful recordings, we recommend that
you test the record function and volume before use.
Shinjuku Monolith, 3-1 Nishi-Shinjuku 2-chome, Shinjyuku-ku, Tokyo 163-0914, Japan. Tel. 03-3340-2111
http://www.olympus.com
3500 Corporate Parkway, P.O. Box 610, Center Valley, PA 18034-0610, U.S.A. Tel. 1-888-553-4448
http://www.olympusamerica.com
(Premises/Goods delivery) Wendenstrasse 14-18, 20097 Hamburg, Germany. Tel. 040-237730
(Letters) Postfach 10 49 08. 20034 Hamburg, Germany.
http://www.olympus-europa.com
Vision House 19 Colonial Way Watford Hertfordshire WD24 4JL. Tel. +44 (0)1923 831000
http://www.olympus.co.uk
Introduction
•
The contents of this document may be changed in the future without advanced
notice. Contact our Customer Support Center for the latest information relating to
product names and model numbers.
•
The utmost care has been taken to ensure the integrity of the contents of this
document. In the unlikely event that a questionable item, error, or omission is
found, please contact our Customer Support Center.
•
Any liability for passive damages or damage of any kind occurred due to data loss
incurred by a defect of the product, repair performed by the third party other
than Olympus or an Olympus authorized service station, or any other reason is
excluded.
h Safe and Proper Usage
Before using your new recorder, read this manual carefully to ensure that you know how to operate
it safely and correctly. Keep this manual in an easily accessible location for future reference.
• The warning symbols indicate important safety related information. To protect yourself and others from
personal injury or damage to property, it is essential that you always read the warnings and information
provided.
Getting Started
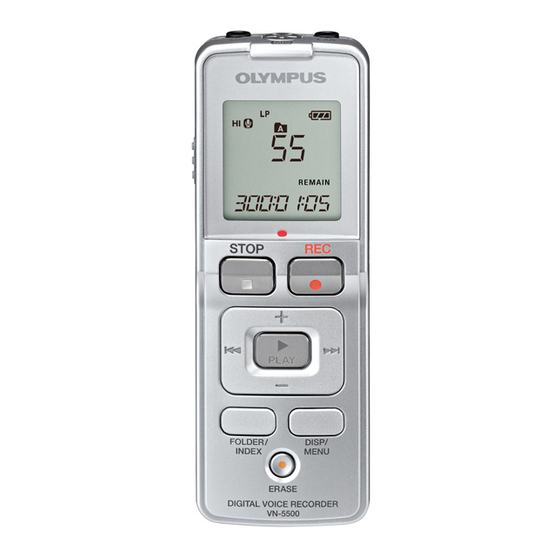
h Identification of Parts
1 Built-in Microphone
1
2 MIC (Microphone) jack
2
3 HOLD switch
4 STOP (4) button
5 PLAY ( `) button
6 0 (Rewind) button
3
7 Battery cover
8 FOLDER/INDEX
4
button
5
6
7
8
9
9 EAR (Earphone) jack
0 Display (LCD panel)
! Record/play indicator
light
@ REC (s) button
0
# + button
$ 9 (Fast Forward)
!
button
@
% – button
#
^ DISP/MENU button
$
& ERASE (s) button
%
^
&
U1-BS0120-02
-
-
1
h Inserting Batteries
Built-in speaker
Replacing Batteries:
When [
] appears on the display, replace the batteries as soon aspossible. Size-AAA alkaline
batteries are recommended. When the batteries are depleted, [
the recorder shuts off. It is recommended to set the HOLD switch to the [HOLD] position before
you replace batteries to maintain the current settings (Time and date, etc.). For your convenience,
the recorder also logs the current settings in nonvolatile memory at hourly intervals.
h Power Supply
The HOLD switch functions as a power button. When you do not use the recorder, set the HOLD
switch to the [HOLD] position while the recorder is stopped. This will power off the recorder and
minimize the battery drain.
hHold
Set the HOLD switch to the [HOLD] position. All opera-
tion buttons are disabled. This feature is useful when the
recorder has to be carried in a handbag or pocket.
Remember to reset the HOLD switch before attempting
to use the recorder.
Notes:
• The alarm will sound at the scheduled time even if the
recorder is set to [HOLD] position. The recorder will
then begin to play the file associated with the alarm
once you press any button.
• The recorder functions as follows with the HOLD switch
set to the [HOLD] position:
– If the recorder is playing, the display goes dark when
playback of the current file has completed.
– If the recorder is recording, the display goes dark
when the recorder stops recording automatically
upon running out of free memory.
h Notes on the Folders
The recorder provides four folders, [ ], [ ], [ ] and [ ]. To change the
folder selection, press the FOLDER/INDEX button while the recorder is
stopped. Each recorded file is stored in a folder.
Note:
• Using folders to classify files makes it convenient to find files you want
to access later. Up to a total of 100 files can be recorded in each folder.
AP0904
1 Press down on the arrow and slide the
battery cover open.
2 Insert two size-AAA alkaline batteries,
observing the correct polarity.
3 Close the battery cover completely.
• Time and date display appears.
• The "Hour" indicator flashes, indicating the start
of the time and date setup process. (See "Setting
Time and Date [TIME]" for details).
An optional Ni-MH Rechargeable Battery (BR401)
from Olympus can be used for the recorder.
] appears on the display, and
Power on: Reset the HOLD switch.
Power off: Set the HOLD switch to the [HOLD]
position.
Standby Mode and Display Shut Off:
If the recorder is stopped or paused for 60 minutes
or longer during recording or play back, it goes into
Standby (power-save) mode, and the display shuts off.
To exit Standby mode and turn on the display, press
any button.
h How to Use the
Strap
Strap hole
• Strap is not supplied.
Current folder
-
-
2
