English
Congratulations on your purchase and
welcome to Philips!
To fully benefit from the support that
Philips offers, register your product at
www.philips.com/welcome.
Supplied Accessories
– AC power cord
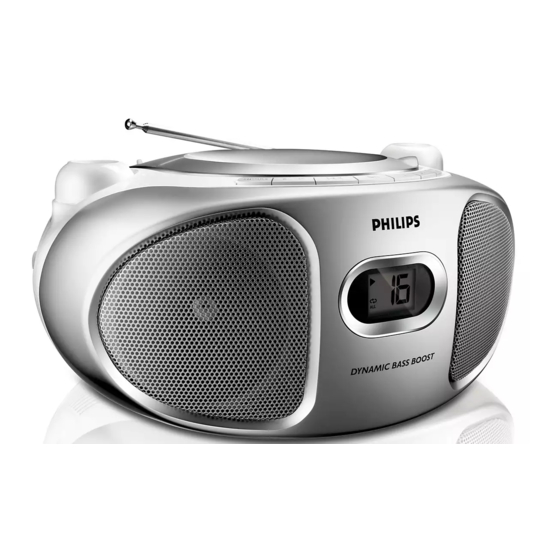
Top/front panels
1 VOLUME – adjusts volume level.
2 SHUFFLE – plays all tracks in random order
3 REPEAT – repeats a track/
CD program/entire CD.
4 2 ; – starts or pause CD playback
§ ∞ – selects the next/previous track
– searches forwards/backwards (press and
hold the button) within the current track
9 – stops CD playback;
– erases a CD program
5 PROG – programs tracks and reviews the
program
6 LIFT TO OPEN
– opens/closes the CD door.
7 TUNING – tunes to radio stations
8 Display – shows the CD functions
Back panel (
9 Source selector: CD, FM, MW, OFF
– selects CD or radio source of sound
– power off switch
0 Telescopic antenna
– improves FM reception.
! AC MAINS~ – inlet for power cord.
@ DBB – turns the bass enhancement on/off.
# LINE-IN – inlet for external audio source.
Bottom panel
$ Battery door – Press on the arrow and
push to insert 6 x 1.5V R-14/ UM-2/
C-cells.
(See 1)
See 1
and
2)
Controls/Power Supply
CAUTION
– Visible and invisible laser radiation. If the
cover is open, do not look at the beam.
– High voltage! Do not open.You run the
risk of getting an electric shock. The
machine does not contain any user-
serviceable parts.
– Modification of the product could result
in hazardous radiation of EMC or other
unsafe operation.
– Use of controls or adjustments or
performance of precedures other than
herein may result in unsafe operation.
This set complies with the radio
interference requirements of the
European Union.
Power Supply
Whenever convenient, use the power supply
cord if you want to conserve battery life.
Make sure you remove the plug from the
set and wall outlet before inserting batteries.
Batteries (not included)
1 Open the battery door and insert 6 batteries,
type R-14, UM-2 or C-cells, (preferably
alkaline) with the correct polarity as indicated
by the "+" and "–" symbols inside the
compartment.
2 Replace the battery door, making sure the
batteries are firmly and correctly in place. The
set is now ready to operate.
Batteries contain chemical substances, so
they should be disposed of properly.
•
Incorrect use of batteries can cause electrolyte
leakage and will corrode the compartment or
cause the batteries to burst:
•
Do not mix battery types: e.g. alkaline with
carbon zinc. Only use batteries of the same type
for the set.
•
When inserting new batteries, do not try to mix
old batteries with the new ones.
•
Remove the batteries if the set is not to be used
for a long time.