CTEK 1045 Manuel - Page 5
Parcourez en ligne ou téléchargez le pdf Manuel pour {nom_de_la_catégorie} CTEK 1045. CTEK 1045 8 pages.
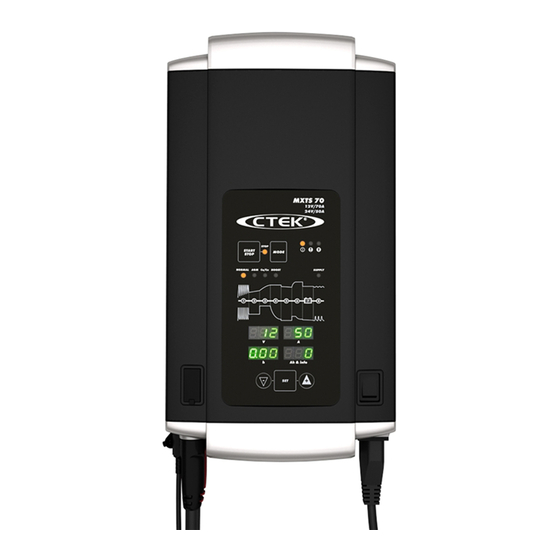
SUPPLY
For best possible float maintenance charging or voltage supply function
for your vehicle the voltage and max current limit are adjustable from the
front panel. See below how to set the voltage supply program and it's
parameters.
1.
Connect the charger cables to the charger
(see "Cable connection")
2.
Connect the charger to the battery
(see "Cable connection")
3.
Connect the charger to the mains supply
The power lamp will indicate that the mains cable is connected to the
mains supply. The error lamp will indicate if the battery clamps are
incorrectly connected. The reverse polarity protection will ensure that
the battery or charger will not be damaged.
4.
Turn on the mains switch
5.
Press the MODE-button to select Supply mode
6.
Press SET-button to set parameters
7.
Select voltage
•Display (h) will indicate that voltage (
U
) is selected
•Display (V) will indicate set voltage
•Press +/- to change
•Press SET-button to confirm
8.
Select Supply voltage
•Display (h) will indicate that Supply voltage (
•Display (V) will indicate Supply voltage level
•Press +/- to change
•Press SET-button to confirm
9.
Select current
•Display (h) will indicate that current (
A
) is selected
•Display (A) will indicate set current
•Press +/- to change
•Press SET-button to confirm
10. Press the START/STOP-button to start Supply mode
11. Supply mode indication
STEP 7 is lit to indicate that Supply mode is running.
12. Stop Supply at any time by pressing the START/
STOP-button
13. Press START/STOP-button to resume Supply mode
MODE-BUTTON
START/STOP-BUTTON
NORMAL PROGRAM
AGM PROGRAM
Ca/Ca PROGRAM
BOOST PROGRAM
Su
) is selected
DISPLAY (V)
DISPLAY (h)
SET-BUTTON
DECREASE BUTTON
MXTS 70
12V/70A
24V/50A
STOP
START
MODE
STOP
NORMAL
AGM
Ca/Ca BOOST
1
2
3
4
5
6
7
V
A
h
Ah & info
SET
POWER LAMP
ERROR LAMP
TEMPERATUR SENSOR LAMP
SUPPLY PROGRAM
SUPPLY
READY TO START
FULLY CHARGED
8
DISPLAY (A)
DISPLAY (Ah & info)
INCREASE BUTTON
EN • 7