Nikon NIKKOR Z 70-200mm f/2.8 VR S Manuel de l'utilisateur - Page 2
Parcourez en ligne ou téléchargez le pdf Manuel de l'utilisateur pour {nom_de_la_catégorie} Nikon NIKKOR Z 70-200mm f/2.8 VR S. Nikon NIKKOR Z 70-200mm f/2.8 VR S 4 pages.
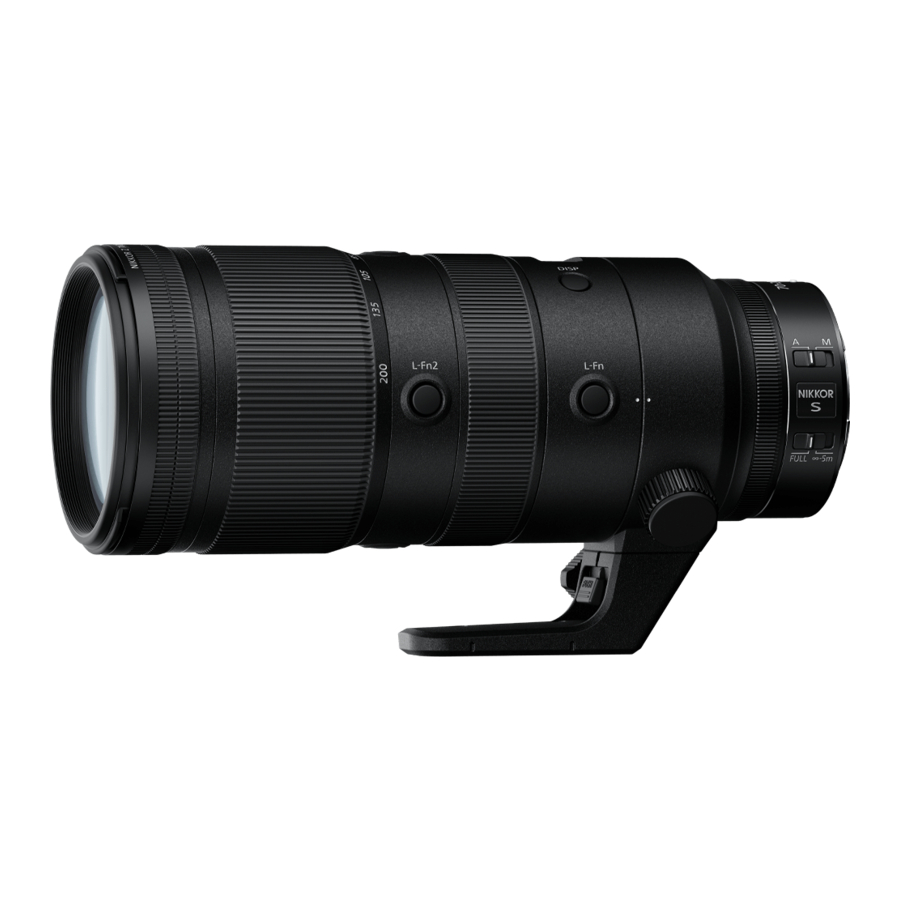
Fig.
I/Fig. I/Fig. I
►
Fig. 2/Fig.
2/Fig.
2
Fig.
3/Fig.
3/Fig.
3
►
Fig. 4/Fig.
4/Fig.
4
User's Manual
Before using this product, please read these instructions carefully. You will also need to
consult the camera manual.
•
This lens is intended exclusively for use with mirrorless cameras featuring a Nikon
Z
mount.
•
Update to the latest version of the camera firmware before using this lens with the Z
7, Z 6, or Z 50, as otherwise the camera may fail to correctly recognize the lens and
features such as vibration reduction may be unavailable.
The latest firmware is available from the Nikon Download Center
For Your Safety
To prevent damage to property or injury to yourself or to others, read "For Your
Safety"
in its entirety
before
using this product.
Keep these safety instructions where all those who use this product will read them.
&
WARNING:
Failure
to observe the precautions marked
with
this icon
cou
ld
result
in
death or severe injury.
Lt.
CAUTION:
Failure
to
observe the precautions
marked with
this
ico
n
co
uld
result
in
injury
or property damage.
&
WARNING
•
Do not disassemble
or
modify
this
product.
Do not touch
internal
parts that become
exposed as the
result
of
a
fall
or
other
accident.
Failure to observe these precautions could result in electric shock or other injury.
• Should
you
notice
any abnormalities such as the
product
producing smoke,
heat
or
unusual
odors,
immediately disconnect the camera power
source.
Continued operation could result in fire, burns or other
injury.
•
Keep
dry,
Do not handle
with wet
hands.
Failure to observe these precautions could result in
fire
or electric shock.
•
Do not
use
this product in the
presen
ce
of
flammable dust or gas
such as
propane, gasoline or
aerosols.
Failure to observe this precaution could result in explosion or fire.
•
Do not directly
view
the
sun or other
bright light
source
through the
lens.
Failure to observe this precaution could result in visual impairment.
•
Keep
this
product out of reach
of
children.
Failure to observe this precaution could result in injury or prcduct malfunction. In
addition,
note
that small parts
constitute
a choking hazard. Should a child swallow
any part of this product, seek immediate medical
attention.
•
Do not handle
with
bare hands in locations
exposed to extremely
high
or
low temperatures.
Failure to observe this precaution could result in burns or
frostbite.
&-
CAUTION
•
Do
not leave the lens pointed
at
the
sun or other strong
light
sources.
Light focused by the lens could cause fire or damage to product's internal parts.
When shooting backlit subjects, keep the sun well out of
the
frame. Sunlight
focused into
the
camera when
the
sun is
close
to the frame could cause fire.
•
Do not leave the product
where
it
will
be
exposed to extremely
high
temperatures,
for an extended
period
such as
in
an enclosed automobile
or
in direct
sunlight.
Failure to observe this precaution could result in fire or prcduct malfunction.
•
Do not transport cameras
or
lenses
with
tripods
or similar accessories
attached.
Failure to observe this precaution could result in injury or product malfunction.
I
Notices for Customers
in
the
U.S.A.
This device complies with part 15 of the FCC
Rules.
Operation is subject to the follow-
ing two conditions:
(1)
this device may not cause harmful interference, and (2) this
device must accept any interference received, including interference that may cause
undesired
operation.
Federal Communications Commission (FCC) Radio Frequency Interference
Statement
This equipment has been tested and found to comply with the limits for a Class B digital
device, pursuant to
Part 15
of the FCC
rules.
These limits are designed to provide reason-
able protection against harmful interference in a residential installation. This equipment
generates, uses, and can radiate radio frequency energy and, if not installed and used in
accordance with
the
instructions, may
cause
harmful interference to radio communica
-
tions. However, there is
no
guarantee that
interference
will not occur in a particular
instal-
lation. If this equipment does cause harmful interference to radio or television reception,
which can
be
determined by turning the equipment off and on, the user is encouraged to
try to correct the
interference
by
one
or more of the following
measures:
•
Reorient or relocate the receiving
antenna.
•
Increase the separation between the equipment and receiver.
•
Connect the equipment into an outlet on a circuit different from that to which the
receiver is
connected.
•
Consult the dealer or an experienced radio/television technician for
help.
CAUTIONS
Modifications
The FCC requires the user to be notified that any changes or modifications made to
this device that are not expressly approved by Nikon Corporation may void the user's
authority to operate the equipment.
Nikon Inc, 1300 Walt Whitman Road,
Melville, New York 11 747-3064, U.S.A.
Tel.:
631 -547-4200
I
Notice for Customers in Canada
CAN ICES-3 B / NMB-3 B
Using the Lens
I
Parts of the Lens: Names and Functions (Fig. 1)
Refer to the diagram on the left edge of this sheet
CD
Lens hood mounting
mark
Use when attaching the lens
hood.
®
Rubber grip
-
@
Zocm ring
Rotate to zoom in or out.
©
Focal length scale
Determine the approximate focal length when
@
Focal length mark
zooming the lens in or out.
Use for manual focus. When focusing using
autofocus, you can adjust focus manually by
®
Focus ring
rotating the ring while the shutter-release but-
ton is pressed halfway; after focusing, press
the shutter-release button the rest of the way
down to shoot.
(J)
Display button
Save
settings or choose the information shown
in the lens info panel.
®
Lens info panel
View focus distance, depth of field, and other
information.
®
Lens rotation index
Use when rotating
the
camera from landscape
@)
Tripod collar rotation
to portrait orientation or vice versa.
index
@
Tripod collar ring
-
Rotate to adjust a setting such as
Aperture
or
Exposure
compensation
assigned using the cam-
@
Control ring
era.
For more information, see
the
description
of
Custom
control assignment
in the camera
manual.
@)
Lens mounting mark
Use when mounting the lens on the
camera.
@
Rubber lens-mount
-
gas~
et
@)
CPU contacts
Used to transfer data to and from the
camera.
@)
L-Fn2
button
Press to perform a function assigned using the
(4 locations)
camera. For more
information,
see the descrip-
@
L -Fn
button
tion of
Custom
control assignment
in the camera
manual.
®
Lens rotation index
(90~
Use when rotating
the
camera from landscape
@)
Tri~
collar rotation
to portrait orientation or vice versa.
index (901
@)
Tripod collar ring at-
tachment screw
Use to fix the tripod collar ring in
place.
@
Tripod collar mount-
-
ingfoot
Change the focus mode
Focus-mode switch
A
: Auto focus
@
1
~
1
M: Manual focus
Note that regardless of the setting chosen, fo-
cus must be adjusted manually when manual
focus mode
is
selected using camera
controls.
Choose the autofocus
range.
Focus limit switch
•
FULL:
If the subject is sometimes 5 m (16.5 ft)
@
IF~Sm
l
or closer, set it to
FULL.
•
=-Sm:
If your subject will always be at dis-
tance of at least 5 m (16.5 ft), select this op-
tion for faster
focusing.
@
Security slot (for anti-
Third-party anti-theft cables can
be attached
to this slot. For more information, see the
doc-
theft cable)
umentation provided with the
cable.
@
Len; hood lock mark
Use when attaching the lens hood.
Lens hoods block stray light that would
other-
@
Lens hood
wise cause flare or
ghosting.
They also serve to
protect the lens.
@
Lem hoed alignment
mark
Use when attaching the lens
hood.
@
Lem hood lock release
button
Use when removing the lens hood.
@
Tripod collar
Use when the camera is mounted on a
tripod.
@
Tripod collar lock
Use to fix the tripod collar to the tripod collar
screw
mounting foot.
®
Tripod collar lock
Use when detaching the tripod collar from the
release lever
tripod collar mounting foot.
@
Len; cap (front cap)
-
@I
Lens cap (rear cap)
-
~ Attachment and Removal
Attaching the Lens
See
@
-
-
-
-
See
Q
,
@
See
O
-
See
(l)
-
-
-
See
(}
-
-
-
See
@
S
eeO
-
-
[I]
Turn
the
camera
off,
remove the
body cap,and
detach the
rear
lens cap.
[[I
Position the
lens
on
th
e
camera
body, keeping the mounting
mark
on
the lens aligned
with
th
e
mounting mark
on
the
camera
body,
and
then rotate
th
e lens cou nterclockwise
until
it clicks
into
place.
Removing
the
Lens
[I]
Turn th
e camera off.
[gJ
Press
and
hold
the
lens release
button
while
turning the
lens clockwise.