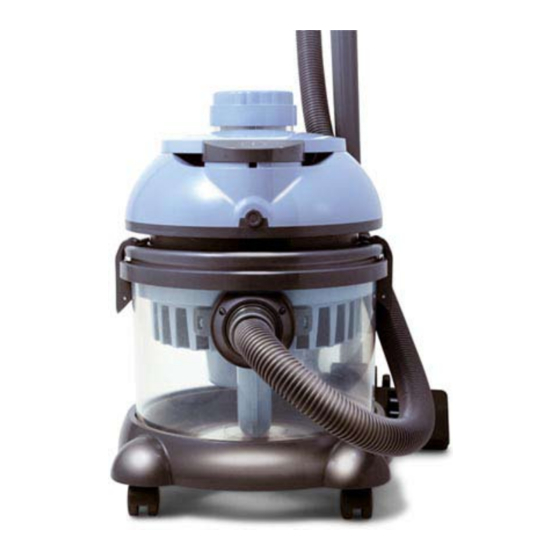
Arnica HEPATECH AQUA Manuel d'instruction - Page 8
Parcourez en ligne ou téléchargez le pdf Manuel d'instruction pour {nom_de_la_catégorie} Arnica HEPATECH AQUA. Arnica HEPATECH AQUA 12 pages. Water filter vacuum cleaner
Également pour Arnica HEPATECH AQUA : Manuel d'instruction (12 pages)

This group contains motor, switch and operating units on. Top of this group, there is
a HEPA FILTER which filters dust and other particles from blowing air. If you remove
the foam filter, you will see a large plastic float in a case. As the container fills, this
plastic float rises up and cuts off the vacuum action to warn you when the container
needs emptying.
A1 - On/Off switch
A2 - Hepa filter housing
A3 - Hepa filter
A4 - Hepa filter housing cover
A5 - Dust level indicator
A6 - Float group
A7 - Foam filter
A8 - Clamp Housing
B. CONTAINER GROUP
Container Group is the middle part of the cleaner for collecting dust and dirty water.
This group is fastened with Motor Unit using clip locks.
B1 - Container
B2 - Water filter body
B3 - Sponge for water filter
B4 - Water filter tube
B5 - Clamps
B6 - Suction inlet
B7 - Wheels
B8 - Sealing Rubber
C.
HOSE GROUP
This group contains suction hose with hand grip and suction tubes. Suction nose
is connected to container group by inserting the suction hose into the suction inlet.
Suction tubes are connected to hand grip if necessary. Handgrip contains a manual
sliding for regulating suction power. Hose group can be placed onto the motor unit
by the help of hanger.
C1 - Suction hose
C2 - Hand grip
C3 - Mechanical suction power control
C4 - Connecting part
C5 - Suction tube
C6 - Hanger
C7 - Nozzle
D.
ACCESSORIES GROUP
There are various accessories for different cleaning purposes.
D1 - Accessories Holder
D2 - Crevice Nozzle
D3 - Round Nozzle
D4 - Small Nozzle
D5 - Perfume
III. TECHNICAL SPECIFICATIONS
Voltage
: 230V~, 50Hz
Power
: 2400 W Max.
Electric Insulation Class
: II
Degree of Protection
: IPX4
Cord Length
: 6m
Used Life
: 10 Year
Max. Noise Level
: Less than 70 dB (A) EN ISO 7779
IV. PREPARING FOR USE
• ATTENTION – Do not insert the mains plug into the wall socket until the appliance
is completely ready for use.
• Lift up the Motor Unit using the handle provided, take the attachments out of
the container.
• When unpacking, please check that all parts are included and undamaged.
• Keep the accessories for further uses.
• Make sure that foam filter is fixed on the float case.
• Install the wheels onto the container bottom.
• Install the water filter tube.
• Locate the water filter body.
• Put the water filter sponges into the nests.
• Put the motor unit back onto the appliance and lock the clamps.
• To connect the hose, insert it into the suction inlet.
IV. OPERATING THE APPLIANCE
• Always be sure that the mains plug is removed from the wall socket.
• Make sure that the container, tubes and hose group are dry and clean.
• Unlock the clamps and lift the motor unit upside down.
• Do not use the appliance without the foam filter.
• Lift up the motor unit
• Remove the water filter body and fill container with clean water (Max. 2 lt).
Replace water filter body.
• Put the motor unit back onto appliance and lock the clamps.
• Fit the cleaning accessories most suited to the type of operation to be performed,
on to the suction tubes or directly in to the handgrip.
• For effective cleaning the following accessory can be used.
» Nozzle (C7) for removing dust from carpets, mats and hard floor surfaces.
» Crevice nozzle (D2) for cleaning narrow corners and hard to reach places
» Directly suction tube (C5) for sucking soil, shavings, crumbs, fluff.
» Small Nozzle (D4) and the suction tube for removing dust from shelves, books,
lamp shades, frames, ornaments, curtains, clothes, electronic equipment's,
surfaces.
• Pull the mains cord out of the appliance and insert the mains plug into the wall socket. Push
the On/Off Button (A1) to switch the appliance on.
BLOWING FUNCTION
The appliance has blowing function. You may have use this function to dry something
or clean the clogged washbasin and bathtub. Connect suction hose to the Hepa Filter
Housing Cover (A4) then switch on appliance. To clean the clog washbasin and bathtup
you may use round nozzle (D3) after detaching its brush.
V.
CLEANING AND MAINTENANCE
• Always switch the appliance off and remove the mains plug from the wall socket
before starting any maintenance or cleaning operations.
• Always empty, clean and dry the container after use.
• To ensure perfect hygiene and length the working life of vacuum cleaner, never
leave wet and dirt inside the container.
• Before emptying dirt and waste liquid remove suction hose and lift motor unit by
pulling the clip locks.
• The foam filter can be washed warm, soapy water or running water. Dry it throughly
before planing on to float case. Don't wash foam filter at washing machine with
hot water.
• Clean and check the float valve inside the float case moves freely in it's housing.
For checking the float, lift up the Motor Unit and shake it.
• The cleanness of hepa filter should be checked periodically. Clean the filter if it
is not clean. This filter loses its characteristics after a certain usage period and
requires replacing.
This appliance is not intended for use by persons (including children) with
reduced physical, sensory or mental capabilities, or lack of experience
and knowledge, unless they have been given supervision or instruction
concerning use of the appliance by a person responsible for their safety.
Children should be supervised to ensure that they do not play with the
appliance.
8
