AstroMedia 227.SPR Manual - Halaman 2
Jelajahi secara online atau unduh pdf Manual untuk Proyektor AstroMedia 227.SPR. AstroMedia 227.SPR 6 halaman. Cardboard kit for a projector that allows for safe observation of the sun

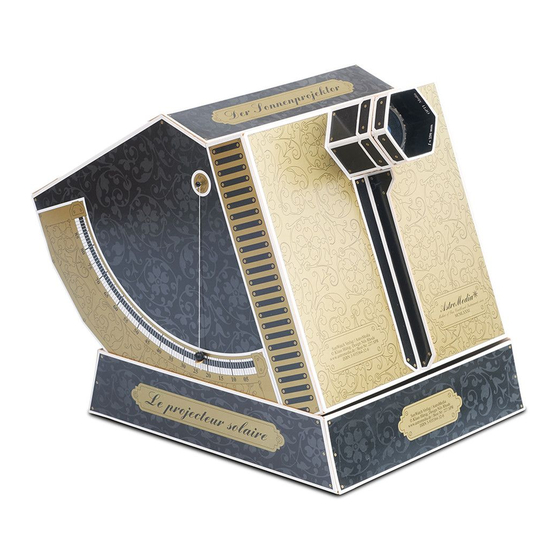
The Solar Projector
The Sun has been observed with a telescope almost since the telescopeʼs invention, but it can be
dangerous. Only by using a strong filter can the Sunʼs light be dimmed enough to prevent eye damage.
Today there are many suitable solar filters, for example the AstroSolar solar filter film from AstroMedia.
The Solar Projector gets round this problem because the Sun is not viewed directly, instead a
projected image is formed by the optical system. This means that the Sun can be observed
safely without a solar filter. The Solar Projector uses the principle of the Camera
Obscura (pin hole camera), with which solar eclipses have been observed since
the 11th century and which is still used today in every camera: Light comes
through a small opening into a dark chamber and creates an upside-down
image of the outside world on the opposite wall. Instead of a simple
opening, the Solar Projector has a lens and a convex mirror, which
together work like a Galilean telescope and produce a strongly magnified
image. A plane mirror reflects the image to a comfortable viewing position.
Nevertheless, the main principle remains that of the Camera Obscura.
Klaus Hünig
Contents:
✴ 8 pre-punched sheets of cardboard
✴ 1 achromatic glass lens OPTI Media
569.OAL, 30 mm diameter, f = 250 mm
✴ 2 convex mirrors 16.5 mm diameter,
f = -10.2 and -14.0 respectively
✴ 1 acrylic glass plane mirror 54 x 90 mm
Tips for successful construction - Please read before commencing!
✴ In order to ensure good results and for straightforward construction, the building instructions have been broken down into Chapters
A to D, which are broken down further into smaller steps. Do not be worried by the long text - it is simpler and faster than it appears
and helps to avoid mistakes. Read each step from the beginning to the end before commencing and allow yourself a few hours for
the construction (depending on experience). The more care you take, the better your Solar Projector will work and look.
✴ Every part has its name and part number printed on the front. The part number consists of a letter and a number: the letter denotes
the chapter it belongs to, the numbers denote the order of construction (apart from parts [A6] and [A7], which are used in Chapter
C). The part number can be recognised by its rectangular frame, e.g. B1 . Only remove the parts as you need them.
✴ Places needing glue are marked in grey. Please keep in mind that the glueing areas are slightly smaller than the parts that will be
glued to them. This ensures that grey areas will be completely covered.
✴ We recommend that you do not tear the parts out of the cardboard sheet, but cut through the thin connecting tabs to make sure
that the edges stay smooth. Frayed edges can be cleaned with a nail file or with our AstroMedia File Set.
✴ All folding lines are prepared by groves or perforations. If they are to be bent "forwards", you have to fold them towards you when
looking at the printed side of the part. If they are to be bent "backwards", you need to fold them away from you. You get a straighter
fold if you position the folding line over a sharp edge.
✴ The mirrors: The surfaces of both convex mirrors made of acrylic glass are coated with aluminium and a protective layer of quartz.
Nevertheless they are very delicate. Do not touch them with your fingers and only clean them, when necessary, with a cotton bud
and some alcohol. The surface of the rectangular acrylic glass plane mirror is covered with a protective film. Only remove this after
mounting the mirror.
You will also need for assembly:
✴ Standard solvent based all purpose glue, e.g. UHU, Evo-Stik Impact, B&Q All
Purpose Glue. Do not use water-based glue: it softens and warps the
cardboard, and doesn't stick properly to the printed surfaces. Solvent based
glues also dry much faster.
✴ Double sided sticky tape for the plane mirror. Some solvent based glues can
damage its reflective coating.
✴ An elastic band for mounting the glass lens.
✴ Two pieces of thin thread and two glass or metal beads for the quadrants.
✴ A sharp knife with a fine point (thin carpet knife, craft knife, scalpel), to cut the
thin holding tabs of the pre-punched parts.
✴ A cutting board or mat, made from hardboard, plastic, or wood. Self healing
cutting mats are ideal as the material re-closes after each cut.
✴ For perfectionists: a black felt tip pen to blacken the white edges of the inner
apertures, lens holder, etc. before construction.
