freecam C310 Panduan Pengguna
Jelajahi secara online atau unduh pdf Panduan Pengguna untuk Kamera Keamanan freecam C310. freecam C310 2 halaman. Solar powered wifi camera
Juga untuk freecam C310: Panduan Pengguna (2 halaman)
C310 Solar Powered WiFi Camera
User Manual V3.0
Shenzhen Leshi Video Technology Co., Ltd.
www.freecamglobal.com
6 Add Device
For Android & IOS Systems
A.1) Enter "go to setup"
A.2) Select "DOG-**-*******"password is "11111111"
A.3) Go back to DOBY APP and put WIFI name and WIFI password. Then
"Next"
WiFi Reconfigure
When the password is wrong, or your network changes,
you can reconfigure WiFi as shown below:
Please turn on the camera and wait for the WiFi status
indicator light on, then press the WiFi reset button for 3-5
Notice
seconds until the WiFi status indicator blue light is
blinking, and add camera by APP again (see Page 4).
7 View Live Video
7.1) On the [Home] page, select the intended device's number
7.2) Press the play button to enter live video feed
4
The C310 is a smart mobile wifi-camera which utilizes a solar power
battery.
● C310 has built-in solar panel and rechargeable battery that make the
camera self sustaining with power. (Varying regions with different
amounts of sunlight will affect the battery life)
● Using solar technology and low power consumption management,
the C310 can operate for an extended time without recharging.
● The C310 is in low power when in sleep mode and recording when in
active mode. It is in sleep mode by default but will switch to active
mode and record when "woken up".
● The C310 can be manually "woken up" with one-click by a mobile
phone anywhere.
● The C310 can be automatically "woken up" if it detects movement
within its field of vision. In this case the camera will start to record
automatically and the user will be alerted.
● Infrared LED lights provide clear visuals at night or low light
situations as well.
1
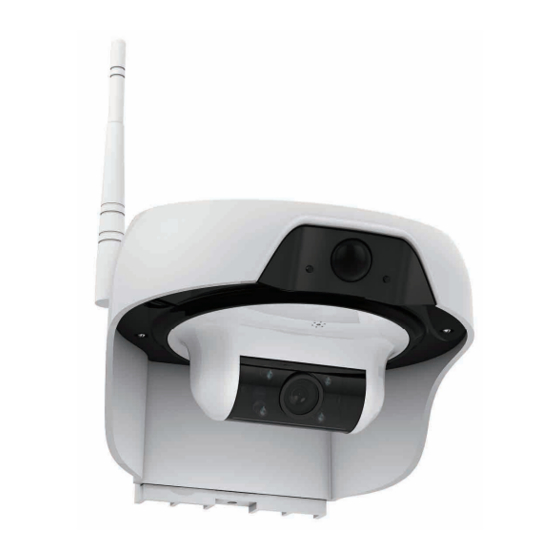
Exterior Diagram
Prior to operation of the camera, please carefully read and follow the
installation and operation instructions.
installation and operation instructions.
⑤
③
⑥
⑦
⑧
①
⑨
④
②
⑩
①
Infrared light
②
Photosensitive device
③
PIR sensor
④
Lens
⑤
Antenna
⑥
Solar charge panel
⑦
WiFi reset button
⑧
Charging socket
⑨
Power supply switch
⑩
Mounting base bracket
WiFi status indicator
Charging indicator
1
7.b Playback video
Click on the time display on the live video
page to select the specific date you are
looking for . The recorded videos are
marked with blue bar in the timeline.
(You may also slide time bar to search)
Click "
" button to playback video.the
play button to enter live video feed
8 Menu Bar
Camera: Capture the current live broadcasting screen and save it to
thesmartphone album.
Audio: Tap on speaker icon to hear sound from the camera's location.
Microphone: C310 model does not support this function (2 way audio).
Full screen: View the live video feed in landscape mode.
Security: turn ON/OFF motion delection
9 Messages
Motion detection alerts
Video saving,
Video sharing
Favorite video, store in【Daily great】
10 Daily great
Favorite video album.
5
2
Indicator Light Status
Indicator light status Status
Solution
Solar charging indicator,
Power,indicator
brightness changs base
green light
on the solar radiant inersity
Power adapter charging
Power,indicator
indicator,it goes off after
yellow light
its fully charged.
WiFi indicator
Waiting for connecting
Blue light blinks
If it blinks over 1 minute
and still can't connect
WiFi Indicator
success, please reset
Red light blinks
Connecting to WiFi
device and check the
router's WiFi signal
Normal working or
WiFi indicator off
power off
3
Mobile Application Operation
1 Power-On
2 Install APP
● App Name: Doby
a)Search "Doby" in the Apple store or Google
Play store and download from the store.
OR
b)Scan the QR code to download the app.
3 Register and Login:
Open the app and press [Register] to register a new account number. Choose
[Login] if you have an existing account.
2
Settings: View device information and adjust settings
●【Device info】: Rename your camera. Check the CID, MAC and the system
version, you can also check the battery capacity and standby time.
●【WiFi】: Select your network WIFI
●【Security】:
[Motion detection]; ON/OFF
[Sensitivity]; Adjust between low,middle,or high
[From]: Select time to starts motion detection settings.
[To]: Select time to stop motion detection settings.
[Repeat weekly]: Repeat day selects from Monday to Sunday.
●【Video settings】:
[Detect alarm video]: Camera will records video for 30 seconds when motion
is detected.
[Never]: select never record videos.
●【Reverse】: Video reverse ON/OFF is optional
●【Delete Device】: Delete the current device.
6
4 Add Camera
4.1) After a successful registration and login, enter [Home]
4.2) Press on the [+] in the up right corner
4.3) Then select [Camera]
6 Startup Camera
5.1) Follow the instruction on the APP, press and hold the WIFI button for 3
seconds till the blue light blinks.
5.2)Tap "Blue light is blinking" to enter the WIFI configuration page.
3
11 Me
●[Friends]: You can add friends from a QR code or add
from your contacts.
●[Share device]: Your videos can be shared with your
friends, maximum 5 persons.
●[Help & Feedback]: Learn how to use your DOBY APP
from here and send us feedback with your any opinions
and suggestions.
●[Settings]: Get notifications ON/OFF. Check APP version#.
12 PIR Motion Detection
● If an object moves within 5 meters in front of the camera, motion detection
will be triggered.
● Alarm message will be sent through push notification on the APP.
● Screenshot / live video feed / playback video will be sent.
13 WiFi re-configuration
Re-configaration is necessary when change router
● Turn on the camera.WiFi indicator flashes.
● Press and hold the reset button for 3-5 sec,till the WiFi indicator flashes blue.
● Repeat the camera adding procedure.(Refer to 4.2;4.3)
7