4M Green Science Potato Clock Manual - Halaman 2
Jelajahi secara online atau unduh pdf Manual untuk Produk Pendidikan Sains 4M Green Science Potato Clock. 4M Green Science Potato Clock 2 halaman.
Juga untuk 4M Green Science Potato Clock: Manual (11 halaman)

C . M A K I N G T H E P O T A T O C L O C K
black wire
red wire
black wire
red wire
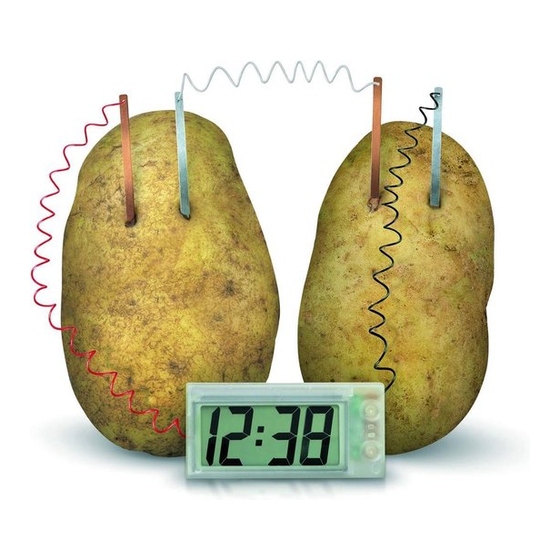
1. Assemble a "connection pair" by
connecting the pair of copper and zinc
plates with a connection wire as shown.
Carefully thread the wire's exposed
metallic end through the hole on the plate.
Gently twist the wire to secure it to the
plate. Cover and secure the connection
with the adhesive tape provided.
wire
2. Afterwards, connect the black wire
from the LCD clock (negative) to one of
the zinc plates. Then connect the red wire
from the LCD clock (positive) to a piece of
copper plate. Now all the components are
connected.
3. Insert the copper and zinc plates into
white wire
the potatoes, as shown in the diagram,
taking care that the metal plates do not
touch each other. The clock should now
start to work.
D . S E T T I N G T H E C L O C K
1. Setting the clock
When all the metal plates are first inserted into the potatoes, the LED
screen will be lighted up and will show a static display of "12:00".
Press A once, the clock will start working. You will see the two dots in the
middle start flashing.
Press B twice to obtain the set month mode, then press A to adjust to the right month. Press B to confirm and the
display will switch to the set day mode.
Press A to adjust to the right day. Press B to confirm and switch to the set hour mode.
Press A to adjust to the right hour. Press B to confirm and switch to the set minute mode.
Press A to adjust to the right minute and press B to confirm.
After the minute is confirmed, press A once. The set time will be displayed.
adhesive
tape
2. Viewing the clock
By default, the clock display shows the current time.
To view the Date: Press A once. The clock display will resume showing the current time after 2 seconds.
To view the Seconds, press A twice. To resume to current time, press A again.
E . T R O u B L E S H O O T I N G
If your potato clock produces a weak display, try one of the following:
1. Give it time, the signal is sometimes weak at the beginning, but gets stronger after a short while.
2. Examine the metal plates for rust (oxidization). Use sand paper to remove any rust.
3. Try putting the metal plates closer together (but not touching each other). Conduction will be better if the distance
between the plates is shorter.
4. If there is no reaction whatsoever, check all the connection points. Make sure that the connection points are
correctly and firmly placed. Also, check if the polarities are correct - make sure that the negative (black wires) and
positive (red wires) terminals are connected properly.
5. Check if the metal plates/wires are touching each other, this causes short circuits.
F . H O W I T W O R K S ?
The metal strips and potatoes make a simple battery that creates the electricity to operate the clock. Each potato
works as a device called a electrochemical cell. It converts the chemical energy stored in the metal strips into
electrical energy. Two potatoes are needed to make electricity strong enough to run the clock.
A cell works because of the chemical properties of the metals inside (in this case the copper and zinc). The different
properties cause tiny particles charged with electricity (called ions) to move between the two strips of metal. This
flow is an electric current. The potato contains the particles that allow the current to flow, but it stops the metals
touching. Electric current also flows along the wires between the zinc and copper strips and the clock. This current
makes the clock work.
A
B
