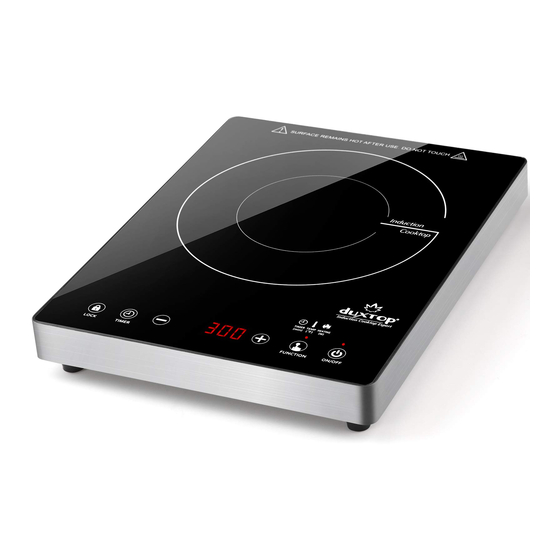
duxtop E200A Panduan Pengguna - Halaman 10
Jelajahi secara online atau unduh pdf Panduan Pengguna untuk Kompor duxtop E200A. duxtop E200A 20 halaman.

CAUTION: ALWAYS USE A DEDICATED OUTLET. This unit is designed to operate using a
120V electrical outlet having a 15 amp capacity. This is a high draw appliance and should not
share an outlet or circuit with any other electrical appliance.
Setup
1. Place the unit on a dry, stable, level and non-combustible, non-metallic surface.
2. Allow at least 4 inches of space around all sides of unit for proper ventilation.
3. Plug the POWER CORD into a 120V/15 amp electrical socket. The unit will "beep" and the
POWER INDICATOR light will illuminate red.
4. Before turning the unit on, make sure the ingredients are in the compatible cookware with the
cookware centered within the COOKWARE ALIGNMENT GUIDE on the COOKTOP SURFACE.
5. Turn on power by touching the ON/OFF button once. The COOL AIR FAN will turn on.
6. Touch the "FUNCTION" button, the cooktop will activate at the default power setting of 5.0. Touch
the "FUNCTION" button again to switch to Temperature Mode.
7. Touch the LOCK button for 3 seconds to lock the control panel. When the control panel is locked,
the only button that functions is the ON/OFF button. Touch and hold the LOCK button again for 3
seconds to unlock the control panel.
8. After cooking is completed, touch the ON/OFF button to turn off the unit. When turned off, the
COOLING FAN will continue to run and "Hot" will show on the LED DISPLAY until the unit has
fully cooled.
9. If the unit doesn't operate as intended, see the Troubleshooting Guide.
Operation Modes
•
This unit offers both Temperature(Temp) and Power(Heating) Modes for convenient and effi cient
cooking, along with a 170-minute automatic TIMER MODE.
•
The POWER and TEMPERATURE MODES work independently.
•
Switch between each mode by touching the FUNCTION button.
•
Both POWER and TEMPERATURE MODES have twenty settings. A description of each with a
chart is shown on the following page.
POWER MODE V.S. TEMPERATURE MODE
If a specifi c cooking temperature is not required, we suggest using Power Mode instead of
Temperature Mode. To quickly bring a pot of water to boil, use a higher power level setting.
For frying or browning food, Temperature Mode is preferred because the built-in micro process
monitors regulates the cookware temperature to the preset temperature. Frying or browning food
using Power Mode may overheat the cookware, and in some cases, extremely high temperatures
may damage your cookware or cooktop. The duxtop(c) induction cooktop has a built-in safety
mechanism to detect such situations and the unit can switch to Temp Mode from Power Mode
automatically when overheating is detected. When this happens it is an indication that Temp Mode
may be more suitable for your current cooking task.
6
Copyright 2018 Secura, Inc. - All rights are reserved.
OPERATING INSTRUCTIONS
www.duxtop.com / www.thesecura.com
