Bendix/King Skymap IIIC Manual - Halaman 4
Jelajahi secara online atau unduh pdf Manual untuk Peralatan Perekaman Bendix/King Skymap IIIC. Bendix/King Skymap IIIC 6 halaman. Global positioning system
Juga untuk Bendix/King Skymap IIIC: Panduan Pilot (14 halaman), Referensi Cepat (6 halaman)
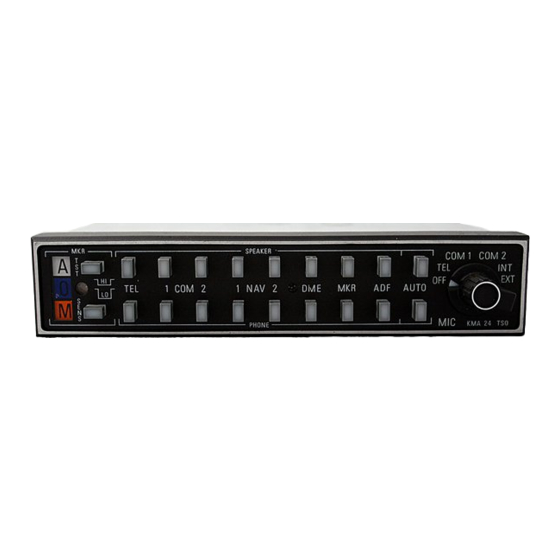
KMA 24 With "Auto" Feature And Radiotelephone
Marker Beacon
Lamp Test Button
Marker
Beacon
Lights
Photocell
For Automatic
Dimming
Marker Beacon
Headphone Audio Select Buttons
Sensitivity
Select Button
Operating the KMA 24/24H
Audio Control Systems
"Auto" Receiver
Audio Select
For KMA 24 models equipped with
the "AUTO" receiver Audio select feature,
the transmitter selected with the microphone
selector switch will be matched automatically
with the appropriate COMM receiver audio on
either headphone or speaker, or both, by simply
pressing the desired headphone and/or speaker
"AUTO" push button. (COMM 1 and COMM 2
push buttons should be disengaged unless it is
desired to additionally listen to a COMM
receiver other than the one selected with the
microphone selector switch.)
Thus, on "AUTO" you may change the
rotary microphone switch back and forth, as
needed, without having to reselect the corre-
sponding COMM, TEL, or HF receiver buttons
in order to hear the receiver.
Both models of the KMA 24H have
"AUTO COMM" capability and always provide
automatic headphone audio selection to match
the transceiver in use. The selection of speaker
audio can either be made automatically
by pulling out the speaker "AUTO" switch
or manually with the row of speaker audio
select push buttons.
Marker Beacon Receiver
(KMA 24)
The complete TSO'd 3-light marker beacon
receiver built into the KMA 24 gives you an
accurate visual and aural signal when you pass
over a 75 MHz beacon. The blue, amber, and
white lights on the faceplate—as well as the
Speaker Audio Select Buttons
Microphone
Selector
Switch
audio tone—identify the beacon type (outer,
middle or airway/inner marker).
Either the speaker or headphone MKR
buttons or both must be "in" for the marker
beacon receiver to provide an audio signal
at beacon passage.
The horizontal push button labeled SENS
on the lower left side of the console gives you
the choice of two receiver sensitivities. When
the button is "in," the sensitivity is on HI.
During an approach, this setting should permit
you to hear the outer marker tone about one
mile out. At this point you may select LO
to dampen the tone. It will start to sound again
when you are closer to the marker, giving you
a more precise indication of its location.
Pressing the top horizontal button marked
"TST" simply applies voltage to all three lamps
to show that they are functioning.
Note: The TST button should not be pressed
to test the lamps when autopilot coupled on
an ILS approach inside the outer marker. This
is due to the fact that some autopilots (including
Bendix/King autopilots) use the marker annunci-
ation to change the sensitivity of the autopilot.
A photocell in the console automatically
dims the lamps for night operation.
The "INT" position on the KMA 24 and
the "PA" position on the KMA 24H permit the
flight crew to address cabin occupants over
the cabin speaker. To do this, select "INT"
or "PA" with the microphone switch. When
the mike is keyed, the receiver audio is muted
and you may talk normally into the microphone
to broadcast over the speaker.
KMA 24 H With Second ADF and Ramp Halker
Intercom
Volume
AUTO
Control
Select
Buttons
Intercom VOX
Sensitivity
Control
The KMA 24H also has an "EMG" position
on the microphone selector. This feature by-
passes the KMA 24H's audio amplifier and
directly connects COMM 1 to the pilot's
microphone and headphones. This provides
a fail-safe method of communication should
the unit fail.
The KMA 24 and KMA 24H also have
an "EXT" position on the microphone selector
switch which connects the microphone to an
external ramp hailer speaker, if installed.
KMA 24H Intercom
The KMA 24H has a built-in five-station
intercom with two dedicated amplifiers.
Intercom operation may be "hot mike," in which
the intercom is active all the time; voice
activated (VOX), in which the intercom
becomes active automatically when a crew
member begins to speak; or keyed activation,
in which a separate microphone switch must
be keyed to activate the intercom. Selection
of the desired method of microphone activation
is accomplished with the intercom VOX
sensitivity control (outer concentric knob
on left side of unit).
Turn it to the fully clockwise detent position
for hot mike operation. Turn the knob all
the way counterclockwise past the detent for
Tear off this section for a convenient pilot's operating manual.
Speaker Audio Select Buttons
Headphone Auto Select Buttons
keyed microphone operation. (Note: a separate
intercom key switch must be included in the
installation in order to use keyed intercom
operation.) In the middle range, the switch
selects VOX, and the rotation of this knob
also adjusts the sensitivity of the voice
activated switch.
In order to set the proper VOX sensitivity,
first turn the VOX sensitivity control clockwise
until a hissing sound is heard in the headphones.
Next turn the control counterclockwise until
the hissing sound stops. The VOX is now
properly set for the present noise environment.
It is normal to have to reset the VOX sensitivity
level whenever the noise in the cockpit/cabin
changes, such as when making large power
setting changes.
The inner concentric knob is the intercom
volume control this adjusts the intercom
volume without affecting the volume of the
selected receiver audio inputs.
When either the pilot or copilot keys
the microphone to transmit, all other intercom
microphone inputs are muted, which ensures
that the keyed microphone is the single source
of transmitted audio. All receiver inputs are also
muted during transmissions.
Speaker
AUTO
Switch
Microphone
Selector Switch
(including emergency,
PA, and ET ramp hailer
positions)