GAO EverFlourish EMT769AET2 Petunjuk Pengoperasian - Halaman 2
Jelajahi secara online atau unduh pdf Petunjuk Pengoperasian untuk Pengatur waktu GAO EverFlourish EMT769AET2. GAO EverFlourish EMT769AET2 2 halaman. Digital dcf daytime clock with light
Getting Started, Use
Follow the safety instructions and the other information in this operation manual.
Plug the daytime timer switch into a regular earthed mains socket (wall socket).
☞
On delivery, the internal NiMH battery, which saves the settings during power failure
(or when reinserting the daytime timer switch to a different outlet), is empty.
Since the power supply for the LC display is buffered via the NiMH battery, this
can cause the display contrast to be less than when display starts. After about 1-2
hours, the NiMH battery should be charged to the extent that the display contrast
has become normal.
The NiMH battery is fully charged after about 4 hours; when unplugging the daytime
timer switch from the mains voltage (e.g. during storage), the settings / programming
is maintained at full charge for about max. 6 hours.
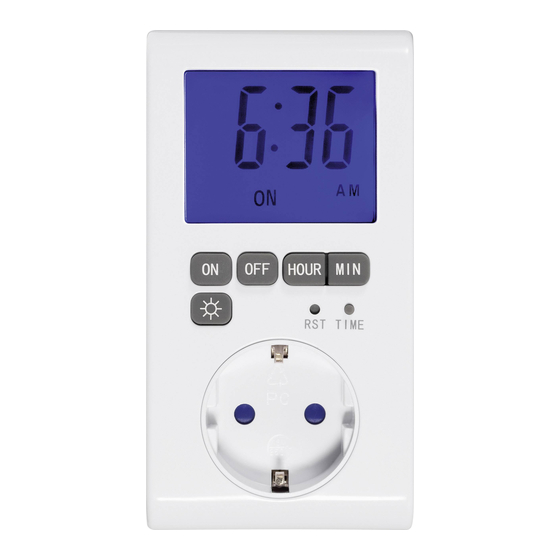
Setting the time
Setting the hours:
H old the small "TIME" button pressed and then set the hours by pressing the "HOUR" button
(press the "HOUR" button longer for quick adjustment).
Release the "TIME" button after setting the hours.
☞
The clock display works always in the 12 h mode. In the morning, "AM" is shown at
the right bottom of the display, whereas "PM" is displayed in the afternoon.
Setting the minutes:
H old the small "TIME" button down and then set the minutes by pressing the "MIN" button
(press the "MIN" button longer for quick adjustment).
R elease the "TIME" button after setting the minutes.
Programming the on/off time
☞
The on/off time display is always in 12 h mode. In the morning, "AM" is shown at the
right bottom of the display, whereas "PM" is displayed in the afternoon.
Therefore, make sure to program the switch on / off time for the correct half of the
day when programming!
Programming the switch-on time:
H old the "ON" button down and then set the hours by pressing the "HOUR" button or the
minutes by pressing the "MIN" button. The "HOUR" or "MIN" button should held pressed
longer for a quick adjustment.
R elease the "ON" button after programming the switch-on time.
Programming the switch-off time:
H old the "OFF" button pressed and then set the hours by pressing the "HOUR" button or
the minutes by pressing the "MIN" button. The "HOUR" or "MIN" button should held pressed
longer for a quick adjustment.
R elease the "OFF" button after programming the switch-off time.
View switch on/off time
View switch on time:
B riefl y press the "ON" button, then the currently programmed switch on time will be shown
(bottom of the display will show "PROG ON").
T o view the time once again, press the "TIME" button briefl y (alternatively, you can also wait
a few seconds, without pressing a button).
View switch off time:
B riefl y press the "OFF" button, then the currently programmed switch off time will be shown
(bottom of the display will show "PROG OFF").
T o view the time once again, press the "TIME" button briefl y (alternatively, you can also wait
a few seconds, without pressing a button).
Display of the current switching state
Bottom of the display indicates the current switching state of the front socket or the connected
device:
"ON"
Front outlet / device switched on
"OFF"
Front outlet / device switched off
Reset
In order to reset the daytime timer, switch to the default settings and delete all programming,
press the countersunk button "RST" briefl y. The display shows all the display segments, then
the daytime timer switch is ready for operation.
☞
Note:
A reset will erase all settings and programming!
Lighting of the LC display / night light feature
With the "
" switch, the lighting of the display can be turned on or off.
This can also be used as a night light due to the spacious and bright lighting.
Maintenance and Cleaning
T he product does not require maintenance. The product contains no parts that require servic-
ing. Therefore, do not open/dismantle it. Maintenance or repairs may only be performed by
qualifi ed personnel or a specialist repair shop.
B efore cleaning, disconnect the switch timer from the power supply. To do this, pull it com-
pletely out of the mains socket (the wall socket). The settings remain unchanged with the help
of the integrated NiMH battery.
Use a clean, dry, soft cloth for cleaning. Do not press too hard on the display; this can lead to
scratches and could also damage the display!
D ust can easily be removed using a clean, soft and long-bristle brush and a vacuum cleaner.
Do not use abrasive cleaning agents, cleaning alcohol or other chemical solutions,
since these could damage the housing or even impair operation.
Disposal
Dispose of the unserviceable product according to the relevant statutory regulations!
Technical Data
Operating voltage ................. 230 V/AC, 50 Hz
Switching capacity ................ max. 3680 W
Protection class .................... I
Model: ................................... Relay; 1-pole disconnection
Child-proof lock: .................... yes, integrated into socket
Switching times per day ........ 1 x On, 1 x Off
Shortest switching time ......... 1 min
Data retention ......................... via internal NiMH battery (max. 6 months with fully charged battery)
Ambient temperature ............ 0 °C to +40 °C
Ambient humidity .................. 0% to 90% relative humidity, not condensing
Dimensions ........................... 70.5 x 132 x 37 mm (W x H x D), without plug)
Weight .................................. 200 g