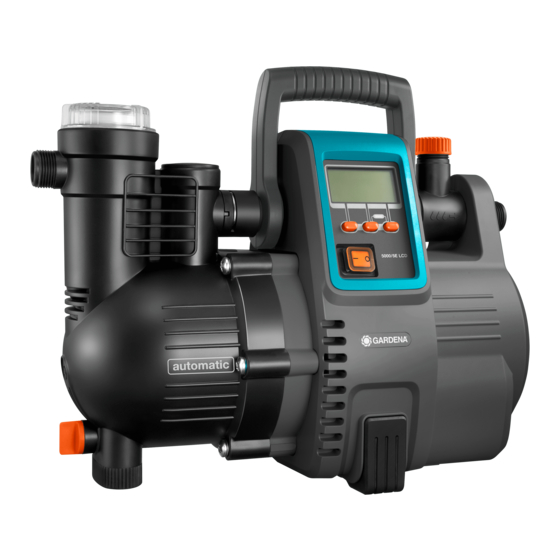
Gardena 1759 Panduan Operator - Halaman 4
Jelajahi secara online atau unduh pdf Panduan Operator untuk Pompa Air Gardena 1759. Gardena 1759 11 halaman. Automatic home & garden pump
Juga untuk Gardena 1759: Panduan Operator (13 halaman)
v For sandy water, you should additionally use the GARDENA Pump
Preliminary Filter, art. 1730 (mesh size 0.1 mm).
The temperature of the pumped liquid must be between 2 °C to 35 °C.
Only stow the product in temperatures between 2 °C to 70 °C.
2. INSTALLATION
DANGER! Electric shock!
Risk of injury due to electric current.
v Disconnect the product from the mains before you install the
product.
Installation location [ Fig. I1 ]:
The pump must be installed in a location with sufficient venti
lation in the area of the ventilation slots. It must be at a distance
of at least 5 cm from the walls. No dirt contamination (e. g. sand
or soil) may be sucked in through the ventilation slots.
Set up the pump so that it is prevented from slipping and that an appro-
priately large collecting vessel for draining the pump or the system can be
(1)
placed under the drain screw
.
Install the pump at a safe distance (min. 2 m) from the pumping medium.
If possible, install the pump higher than the surface of the water to be
pumped. If this is not possible, install a vacuum-resistant shut-off device
between the pump and the suction hose to allow the integrated filter to
be cleaned.
If the system is permanently installed, appropriate shut-off devices must
be installed on the input and output sides. Important for maintenance and
cleaning work on the pump or for shutdown, for example.
Connections:
CAUTION!
The GARDENA connection pieces on the intake and deli
very sides may only be tightened by hand. Check whether the
seal ring is present and undamaged before screwing the suction
hose onto the suction inlet. When using metal connections,
damage could occur on the connection thread due to inapprop
riate assembly. Therefore, screw on the connection fittings
with the upmost care. Use sealing tape only for sealing metallic
connection fittings.
Suction side:
Do not use modular water hose components on the suction side!
A vacuum-tight suction hose must be used e.g.:
– GARDENA Suction Hose Art. 1411 / 1418
– GARDENA Bore Hole Suction Hose Art. 1729
– GARDENA Suction Hose sold by the metre with
GARDENA Hose Clamp Art. 7192 / 7191.
If very fine dirt is present, we recommend the use of a GARDENA pump
preliminary filter Art. 1730 / 1731 in addition to the integrated filter.
To reduce the pump repriming time, we recommend to use a suction
hose with backflow preventer, which prevents the suction hose emptying
automatically when the Pump is switched off.
Important for fixed installation:
For greater suction heads, use a suction hose with a small diameter (3/4").
Pressure side:
A pressure-resistant hose must be used on the pressure side, e. g.:
– GARDENA Garden Hose (3/4") Art. 18113 with
GARDENA Connection Set Art. 1752.
Important for fixed installation:
If the product is permanently installed in an enclosed space, only flexible
hoses (e.g. reinforced hoses) may be used for connecting the service
water supply, rather than rigid piping. Flexible hoses will reduce the noise
level and prevent damage caused by pressure surges. Install fixed
pipes at an upward gradient on the first 2 m only. To avoid damage to
the thread, ensure careful and accurate installation when using metal
connections.
To connect the suction hose [ Fig. I2 ]:
1. Screw the suction hose fitting
it by hand.
(3)
(4)
onto the suction inlet
and tighten
(2)
2. Slide the suction hose
onto the suction hose fitting
it e.g. with a GARDENA Hose Clamp Art. 7192 / 7191.
3. For suction head exceeding 4 m secure the suction hose
(e. g. by fastening it to a wooden post).
The pump and the suction hose are relieved from the weight of the
water.
To connect the pressure hose [ Fig. I3 ]:
The pressure hose can be connected either to the delivery side
33.3 mm (G1)-thread of the 120° swivelling connection
(8)
of the horizontal connection
.
1. Screw the tap connector
(7)
onto the pressure outlet
it by hand.
2. Connect the pressure hose with hose connector
(7)
connector
.
3. OPERATION
DANGER! Electric shock!
Risk of injury due to electric current.
v Disconnect the product from the mains before you fill the
pump.
To start the Automatic Home & Garden Pump [ Fig. O1 / O2 ]:
NOTE: The specified maximum selfpriming level (see 8. TECHNI
CAL DATA) is reached only when the pump is full and the pressu
re hose is held up high directly upstream of the pressure output
during the first selfpriming phase. This ensures that the pumped
medium cannot leak from the pressure hose. When using a full
suction hose with a check valve, it is not necessary to hold up the
pressure hose.
1. Unscrew the lid
(9)
of the filter chamber with the spanner
2. Slowly fill in the liquid to be pumped via the filler connection
the overflow (approx. 2 to 3 l) until the water level no longer drops
under the suction side inlet or the water flows out at the horizontal
connector.
3. With fixed installation: Unscrew the cover
flows towards the horizontal connector.
4. Empty any water remaining in the delivery hose so that the air can
escape during filling and priming.
5. Open any shut-off devices in the delivery line (watering accessories,
tap, etc.) so that air can escape before the priming procedure begins.
6. With fixed installation: If the delivery line cannot be emptied due to
fixed installation, unscrew the cover
may escape. Please keep a sufficiently large receptacle at hand for
collection.
(9)
7. Tighten the lid
of the filter chamber up to the stopper
8. Without fixed installation: Lift up the delivery hose just behind the
pressure outlet.
9. Plug the power plug of the connecting cable into a mains socket.
10. Push the on / off switch
(11)
to position I.
The on / off switch lights up.
During initial operation, the display language must be selected
after the pump is switched on.
11.
12.
(3)
and secure
(5)
and / or
(5)
/
(8)
and tighten
(6)
onto the tap
(A)
provided.
(10)
up to
(14)
and fill with liquid until it
(14)
. Considerable amounts of liquid
(a)
.
Select the desired display language
with the left or right button and
confirm with the centre button
The display shows "Start pump
now?".
Push the left button
.
The pump starts after approx.
2 seconds. The display shows
"Suction in progress" and the
GARDENA sun is rotating in the
display during the suction process.
The suction process can take up
to 6 min. If no water is pumped
afterwards, the Automatic Home &
Garden Pump switches off and
the display shows „ERROR 2"
(see 7. TROUBLESHOOTING").
.
5