3A HEALTH CARE MINIASPEED BATTERY PRO Buku Petunjuk - Halaman 6
Jelajahi secara online atau unduh pdf Buku Petunjuk untuk Peralatan Medis 3A HEALTH CARE MINIASPEED BATTERY PRO. 3A HEALTH CARE MINIASPEED BATTERY PRO 10 halaman. Professional aspirator
Juga untuk 3A HEALTH CARE MINIASPEED BATTERY PRO: Buku Petunjuk (10 halaman), Buku Petunjuk (10 halaman)
replace it immediately.
• The disposable antibacterial filter must be replaced after every use.
• Never use the battery charger with other devices or for uses other than that described in this manual. Never use the MINIASPEED
BATTERY PRO with other power supply units.
• The cigarette lighter plug cord has a safety fuse, which can be inspected in case of malfunction.
• Use of the device in ambient conditions other than those specified in the manual may seriously impair its safety and technical cha-
racteristics.
• In the event of aspiration without vessel and/or antibacterial filter, or if you suspect that solid or liquid substances have entered the
aspiration circuit, send the device to customer service.
• Always place the device in a vertical position on an unobstructed, stable and flat surface before use.
Before each use, ensure that all accessories are perfectly clean according to the instructions in the "CLEANING AND DISINFECTION
OPERATIONS" section.
1. Operation using cigarette lighter plug cord:
1.1 For use on vehicles, connect the power cord (11.) to the socket on the device (1a.).
1.2 Check the charge status of the vehicle's battery before using the device.
1.3 Connect the device as shown in the connection diagram on page 2.
1.4 Use the vacuum regulator (1d.) to set the level of vacuum required (bar/KPa). Turn the knob clockwise, in the "+" direction, to obtain
a stronger vacuum or anticlockwise, in the "-" direction, for a weaker vacuum. These levels may be read on the vacuum gauge (1f).
Important: the vacuum values on the control decal are purely for guidance. Always refer to the vacuum gauge rea-
ding.
1.5 Start the device using the "ON-OFF" switch (1c.) (solid green indicator light on).
1.6 After use, switch off the device, disconnect the cigarette lighter plug cord (11.) and clean the device as described in the "CLEANING
AND DISINFECTION PROCEDURES" section.
1.7 If the cigarette lighter plug fuse blows, replace it with a delayed 6.3 A-250 V fuse, size Ø 6.3 x 30 mm, by unscrewing the tip of the
cigarette lighter plug.
2. Operation using the battery and/or multi-voltage power supply unit:
2.1 The device is supplied with the battery partially charged. We therefore recommend charging it before use.
2.2 Charge the battery, with the device off, by connecting the multi-voltage power supply unit (10.) to the device's socket (1a.) and to
mains power using the power cord (9.). Maximum charging time 6 hours, which provides autonomy of about 45 minutes.
2.3 Operation with internal battery only:
Start the device using the "ON-OFF" switch (1c.) (solid green indicator light on). If the green light goes out during use (1b), and the
yellow light comes on, there will be about 10 minutes of battery charge left (reserve level). Then, terminate use as soon as possible. If
use cannot be stopped, continue until the red indicator light comes on (battery flat). If this occurs, do not use the device for more
than 3 minutes to avoid damaging the battery. To continue using the device with the battery flat (red light on), connect the
multi-voltage power supply unit (10.) (as described in point 2.2). After use, turn the switch (1c.) to "O" (OFF) and leave the power supply
(10.) connected to the device's socket (1a.) to charge the battery. The power supply (10.) should be left connected when the device is
not in use to ensure an optimal battery charge level.
2.4 For aspiration procedures, see points 1.3, 1.4 and 1.5.
N.B.: when the battery power drops below a set level the aspirator shuts down to avoid damage to the battery. If abso-
lutely necessary, the user can restart the aspirator for 1 minute by pressing the ON/OFF button again.
2.5 After use, switch off the device, disconnect the power cord (9.) from the mains socket and disconnect the power supply unit (10.) from
the device. Perform the cleaning operations as described in the "CLEANING AND DISINFECTION PROCEDURES" section.
2.6 Use only genuine 3A accessories.
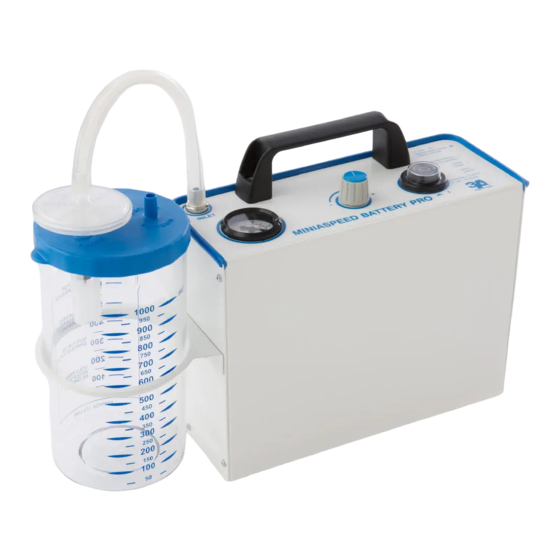
3. Secretion collection vessel – 1000ml
The 1000 ml collection bottle (2.) supplied with the aspirator can be used in two ways: as a collection vessel which can be sterilised as
shown in figure 1 or as a collection vessel with disposable bag (8.) as illustrated in figure 2.
3.1 Sterilisable secretion vessel (2.):
The secretion vessel set consists of an overflow valve, a vessel in clear material (polycarbonate) and a blue plug (2a.). Fit the antibacterial
filter (3.) straight into the plug (2a.); it will only fit into the hole marked VACUUM/VUOTO. The antibacterial filter also protects the
aspiration circuit from any contaminating agents sucked in during use. Do not use the aspirator without the antibacterial filter,
because from a bacteriological point of view, it becomes dangerous for the patient. Keep the device vertical to
allow the overflow to function correctly.
All the components of the vessel can be sterilised using a conventional system in an autoclave at a temperature of 121°C, or by boiling
for 10 minutes. We recommend replacing the complete vessel at every 30 sterilisation cycles. Do not overturn the vessel during use,
in order to prevent the intervention of the non-return valve (2b/2c/2d); should this occur, switch the aspirator off and detach the tube
connected to the antibacterial filter. Never use the aspirator without the secretion collection vessel and/or without the antibacterial filter.
3.1.1 Connection: connect one end of the short, sterilisable silicon tube (4.) to the antibacterial filter connector (3.) and insert this
latter into the "VACUUM" hole of the blue top (2a.); connect the other end to the "INLET" connector (1e.) of the aspirator. Connect one
end of the long sterilisable silicon tube (5.) to the PATIENT/PAZIENTE" connector of the blue top (2a.); to the other end, connect the
disposable, sterile manual regulator (6.) and connect the disposable, sterile cannula (7.) to this latter.
INSTRUCTIONS FOR USE
10