3B Optic Instruments PD-100 Panduan Pengguna - Halaman 15
Jelajahi secara online atau unduh pdf Panduan Pengguna untuk Alat Ukur 3B Optic Instruments PD-100. 3B Optic Instruments PD-100 20 halaman. Digital pupillometer
Selecting light level
This feature will allow the user to select 3 different levels according
to his own visual comfort. In order to enter the light calibration mode
follow this instructions:
Turn on the equipment and keep the PRINT and HOLD buttons pressed
for only two seconds at the same time. The display will read , for exam-
ple: L H 2 (level 2)
That is to say, you will see the light level that had been previously cho-
sen, as follows: Level 1; Level 2 (default); Level 3, being Level 1 the least intense and
Level 3 the most intense. By pressing the PRINT button you will be able to choose the
intensity according to your comfort. To store your choice in the memory press HOLD.
Automatic Shut-Off
The electronic circuits of the PD-150 are designed for conservation of battery power. After
20 seconds of inactivity the Fixation LED shuts off . If the inactivity of the instrument con-
tinues for a total of 1 minute and 20 seconds the unit turns completely off.
Low Voltage Indicator
The PD 150 is provided with a Low Voltage indicator circuit for monitoring the voltage of
the battery. A special icon (
This special feature allows the operator to change the battery in time, thus preventing
incorrect interpupillary distance measurements caused by low voltage conditions.
Instructions for use
Introduction
The Breitfeld & Schliekert PD-150 Digital Pupillometer provides the latest measurement
technology for calculating interpupillary distance and right/left nose-to-pupil distance for
short, middle and long range viewing distances.
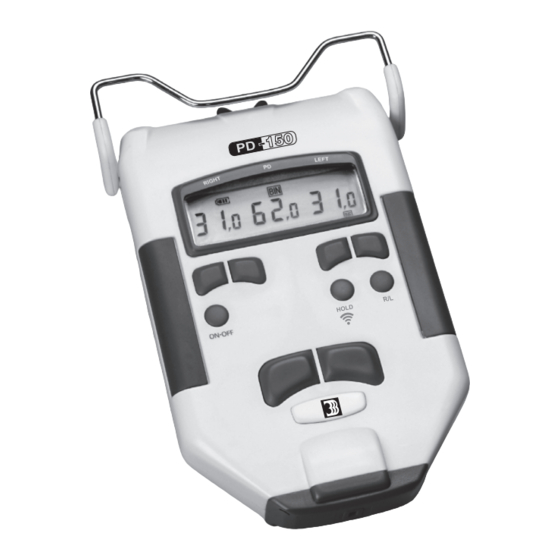
PD-100 Operation
To operate the PD-150 perform the following steps:
1. Press the On/Off Button. The PD-150 starts a self-
test and a full display of the digits appears on the
screen as it checks the operation of the instrument.
Once the self-test has been successfully completed,
the Display will show the following pupillary distances: 31,0 – 62,0 – 31,0
2. Make sure that the Distance is set to infinity (∞).
3. Place the Forehead Rest gently against the patient's forehead and set the Nose Support
onto the patient's nose.
4. Set the Eye Selector to either right or left position and tell the patient to look at the
circular fixation light with that eye.
5. Look through the Operator's Window and observe the corneal reflected light on the cen-
ter of the patient's cornea. Then, press the Measurement Slide Buttons until the index
line is directly over the center of the corneal reflected light.
6. Set the Eye Selector to the opposite position and repeat the above procedure.
7. Observe the Digital Display and check the measurements. The right and left measure-
ments should be approximately equal, and the middle measurement should be the sum
of both measurements.
Adjustable Viewing Distance
After the right and left measurements are taken, the measurements for
medium and short ranges for the viewing distances can be obtained by
pressing the Distance Selecting Buttons.
Note: If the Hold Button is pressed before the medium and short
viewing distances are obtained, the measurement data on the Digital
Display will not change to reflect the shorter viewing distances.
Hold Measurement Data
Once the measurement data is obtained, the Hold Button may be pressed to prevent the
data on the Digital Display from changing if the Measurement Slide Button or the Distan-
ce Selecting Buttons are pressed accidentally. To suppress the hold measurement data
mode, press the Hold Button a second time.
REV: 02
Last Rev: 04-07-2016
) appears on the LCD display indicating the voltage level.
- 13 -