Disaster Area Designs SMARTClock Gen3 Panduan Pengguna - Halaman 6
Jelajahi secara online atau unduh pdf Panduan Pengguna untuk Pengontrol Disaster Area Designs SMARTClock Gen3. Disaster Area Designs SMARTClock Gen3 9 halaman.
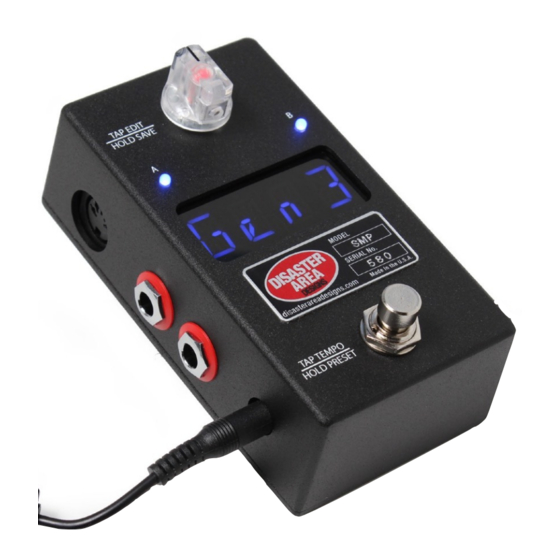
Controls and Connections
ROTATE TO CHANGE SETTING
TAP TO EDIT NEXT ITEM
HOLD TO SAVE PRESET
A & B LED show status of A & B outputs
TAP TEMPO normally open
TAP TEMPO normally closed
HOLD FOR NEXT PRESET
USB MIDI:
The SMARTClock firmware allows the USB port to function as a MIDI interface for your compatible PC, Mac, or iPad
(using the Apple Camera Connection Kit). The SMARTClock will receive and send MIDI messages over USB for device control.
Status Indicator: This is just a little LED that blinks to let you know the pedal is working. It also blinks at a slower rate to indicate that
the pedal is in boot loader mode during a firmware update.
EDIT KNOB:
The large clear knob at the top of the SMARTClock is the main control interface. Rotate this to change the current
setting, tap to move to the next setting. During normal operation, turning the Edit Knob will increase or decrease the current tempo by 1
or 0.5 BPM. Tap the Edit Knob to change the subdivision or status of each of the outputs, or hold to save the current settings to a
preset.
MIDI Input:
Standard 5-pin MIDI input, connects to your MIDI controller. The MIDI input allows the SMARTClock Gen3 to accept
incoming MIDI messages and merge them in with its own data stream. Any messages received by the SMARTClock will be passed to
devices "downstream" unless the MIDI Thru option is set to one of the Filter modes.
MIDI Output:
Standard 5-pin MIDI output, connects to your first MIDI pedal input.
DC 9V:
Standard DC power supply input, 9V center negative. The SMARTClock Gen3 requires approximately 80mA.
Main Outputs A & B: The red connectors on the left side are the main outputs of the SMARTClock Gen3. These two outputs connect
to your tap tempo devices and keep them all in sync. These outputs are electrically isolated to prevent noise or other problems, and
have an optional pull-up function that allows them to work with almost any device capable of receiving tap tempo. The main outputs
may also be set as toggle switch outputs, and can control amplifier or pedal footswitch functions on supported devices.
MultiJacks C & D:
sending taps or toggle switch signals, sending MIDI to supported devices (Chase Bliss, Empress, or Meris pedals), or connecting to
footswitches for additional input options.
Footswitch:
Yup, it's a footswitch! Tap two or more times to change the tempo, hold to scroll to the next preset. If you tap the
footswitch only once, the SMARTClock Gen3 will leave the tempo alone but will re-send taps to your devices. This is useful if your
pedals are susceptible to "drift" and you want to lock them all in without changing the clock speed.
Disaster Area Designs
EDIT KNOB
MIDI OUTPUT
RED OUTPUTS A & B
OR TOGGLE SWTCH
DC 9V 80mA
FOOTSWITCH
TAP TEMPO
The white connectors are our astounding MultiJacks! The MultiJacks can do all kinds of cool stuff, including
STATUS LED
USB MIDI
MIDI INPUT
LED Display shows BPM or preset name
WHITE MultiJacks C & D
TAP TEMPO normally open
TAP TEMPO normally closed
TOGGLE SWTCH
MIDI OUTPUT
FOOTSWITCH start / stop clock
FOOTSWITCH next / prev. preset
SMARTClock
6
of
9
Gen3