Cypress Semiconductor EZ-USB FX2LP Panduan Memulai Cepat
Jelajahi secara online atau unduh pdf Panduan Memulai Cepat untuk Mikrokontroler Cypress Semiconductor EZ-USB FX2LP. Cypress Semiconductor EZ-USB FX2LP 2 halaman.

CY3674 EZ-USB FX1/ CY3684 EZ-USB FX2LP
Step 1: Software Installation
• Download and Install the latest EZ-USB DVK setup
(CY3684Setup.exe) from
?rID=14321
Note: For rst time users, Cypress recommends accepting
the default options at each stage of the setup
Step 3: Driver Installation
• Drivers are installed automatically. In the Windows
Device Manager, under Universal Serial Bus
Controllers, the CY3684 board appears as Cypress
FX2LP No EEPROM Device and CY3674 board
appears as Cypress FX1 No EEPROM Device
• If automatic driver binding does not happen,
follow the note below to manually bind the driver
Note: Open Windows Device Manger, locate the unknown
device under other devices, and right-click on the device to
select Update Driver. The drivers are located in <Installed
Directory>\Drivers\Win7\x64. Select a driver based on the
operating system. For example, for Win 7 (64-bit), select
win7\x64
DEVELOPMENT KIT QUICK START GUIDE
1
http://www.cypress.com/
3
SW2
Step 2: Hardware Connection
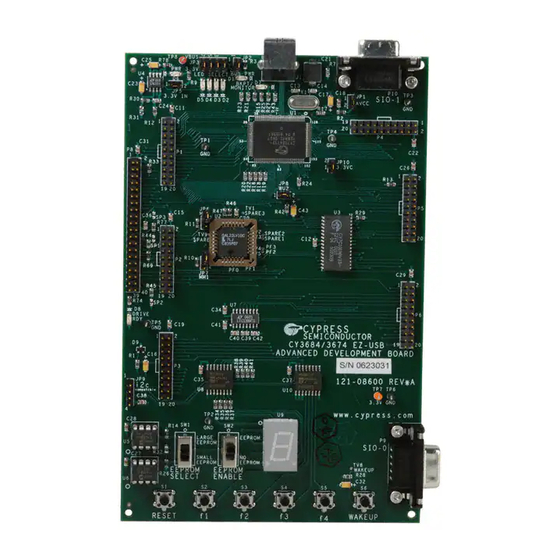
• Ensure that JP2 (BUS PWR), JP5 (3.3V IN) and JP10
(3.3V) jumpers are installed, and the EEPROM
ENABLE switch (SW2) is in the NO EEPROM
position as shown above
• Connect the B end of the USB cable to the board
and connect the other end to the USB 2.0 receptacle
on a PC / laptop
• LEDs D1 and D6 glow to indicate that the board
is powered
Step 4: Start the Cypress USB Control Center
• Run the Cypress USB Control Center by
double-clicking the CyControl.exe located at
<Installed Directory>\Windows Applications\
Application Source les\c_sharp\controlcenter\bin\
Release. The CY3684 board appears as Cypress
FX2LP No EEPROM Device and CY3674 board
appears as Cypress FX1 No EEPROM Device in the
left panel of the USB Control Center. Now you can
load rmware images into the board and you can
schedule Data Transfers to FX2LP/FX1using the USB
Control Center. Refer the instructions described in the
User Guide (located at <Installed Directory>\
Documentation) to try examples on the DVK
TM
D6
D1
2
4
