FloatPac RainPac Manuale di installazione - Pagina 5
Sfoglia online o scarica il pdf Manuale di installazione per Scaldabagno FloatPac RainPac. FloatPac RainPac 16. Under house and decking flexible rainwater harvesting bladder tanks
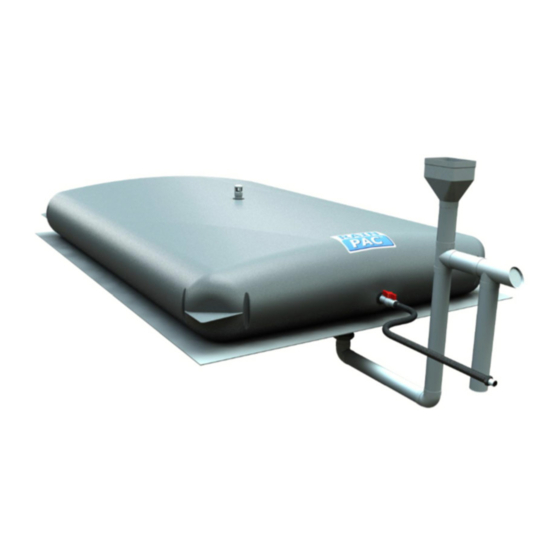
SITE PREPARATON FOR INSTALLATION:
We recommend that the chosen installation area is flat – clear the area of bricks, tiles glass, and anything else that maybe present before levelling out.
Each RainPac
TM
bladder has its own height clearance requirements based on the width of the bladder. Details of the required clearances are as follows:
(made to order tanks will have the height clearance written on the label of the bladder box)
BLADDERS WIDTH (METRES/MM)
1 metre – 1000mm
1.3 metres – 1300mm
1.6 metres – 1600mm
2 metres – 2000mm
2.3 metres – 2300mm
2.6 metres – 2600mm
Installation of the overflow system above these height restrictions will mean the RainPac
enough height as per the guide above, the overflow can be dropped to the height you have available without voiding the warranty.
RainPac
TM
must be installed on flat ground.
Some general rules to follow when selecting the site:
1. Make sure the corresponding bladder and clearance requirement listed above suits the selected area;
2. The area should be relatively close to the downpipe/s from where the RainPac
should be the closest to the downpipe/s(where possible); and,
3. The chosen site should be dedicated to the RainPac
TM
TM
will fill. Additionally, as all fittings are situated at one end, this end
TM
with nothing else being stored near the bladders that could damage them.
REQUIRED HEIGHT CLEARANCE ( MINIMUM)
400mm
500mm
650mm
715mm
715mm
715mm
will overfill, and this will void the warranty. If you do not have
P a g e
5 | 15