3onedata IES206G-2GS Manuale di installazione rapida
Sfoglia online o scarica il pdf Manuale di installazione rapida per Interruttore 3onedata IES206G-2GS. 3onedata IES206G-2GS 2. Unmanaged industrial ethernet switch
Anche per 3onedata IES206G-2GS: Manuale di installazione rapida (2 pagine)
IES206G-2GS
Unmanaged Industrial Ethernet
Switch Quick Installation Guide
3onedata Co., Ltd.
Address:
3/B, Zone 1, Baiwangxin High Technology
Industrial
Park,
Xili,
Shenzhen
Website:
www.3onedata.com
Tel:
+86 0755-26702688
Fax:
+86 0755-26703485
【Package Checklist】
Please check whether the package and accessories are intact
while using the switch for the first time.
1.
Industrial Ethernet switch
3.
Quick installation guide
5.
DIN-Rail mounting attachment
If any of these items are damaged or lost, please contact our
company or dealers, we will solve it ASAP.
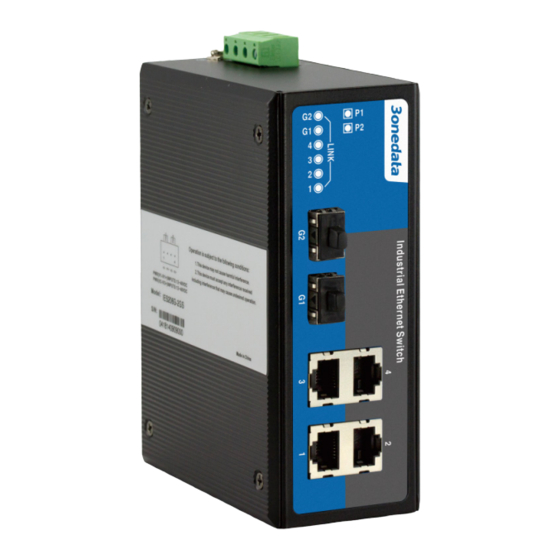
【Product Overview】
The product is full Gigabit unmanaged DIN-Rail industrial
Ethernet switch. Model as follows: IES206G-2GS (2 Gigabit
SFP + 4 Gigabit copper ports).
【Panel Design】
Rear view, Top view and Bottom view
Front view and Side view
Nanshan
District,
1.
DIN-Rail mounting kit
2.
Certification
2.
Grounding screw
4.
Warranty card
3.
Power input terminal block
4.
Gigabit SFP connection indicator
5.
Gigabit copper port speed indicator
6.
1000 Base-X gigabit Ethernet SFP slot
7.
10/100/1000Base-T(X) gigabit Ethernet interface
8.
Power input status indicator P1/P2
【Mounting Dimension】
Unit: mm
Attention before mounting:
Don't place or install the device in area near water or
moist, keep the relative humidity of the device
surrounding between 5%~95% without condensation.
Before power on, first confirm the supported power
supply specification to avoid over-voltage damaging the
device.
The device surface temperature is high after running;
please don't directly contact to avoid scalding.
【DIN-Rail Mounting】
For convenient usage in industrial environments, the product
adopts 35mm DIN-Rail mounting, mounting steps as below:
Step 1
Check whether the DIN-Rail mounting kit that