4ms Company Matthias Puech Ensemble Oscillator Manuale d'uso - Pagina 9
Sfoglia online o scarica il pdf Manuale d'uso per Apparecchiature di registrazione 4ms Company Matthias Puech Ensemble Oscillator. 4ms Company Matthias Puech Ensemble Oscillator 19.

Tutorials and Patches
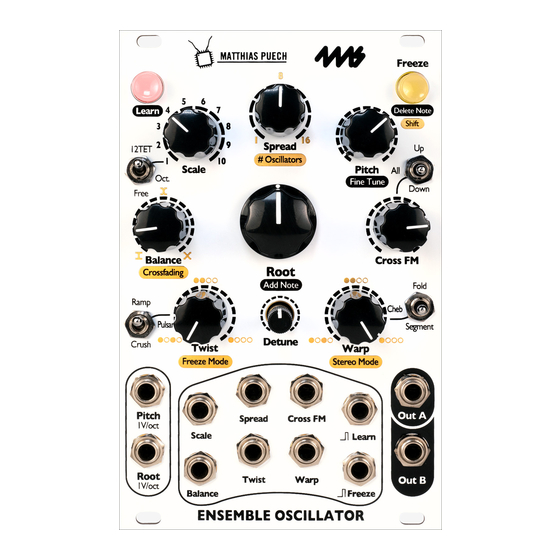
Tutorial I: Create your own Scale in Learn Mode using the knobs
Creating your own scale is easy. With the Ensemble Oscillator, the process of creating a new scale is called "Learning".
There are two ways to do it: with the knobs, or with an external CV and gate source. This tutorial covers the former.
Tap to enter Learn Mode
Learn
Hold and turn to add a note
+
Learn
Root
Add Note
Hold and turn to tune the
last note
+
Learn
Pitch
Fine Tune
Tap to delete the last note
Freeze
Delete Note
Tap to save and exit
Learn
Why is the Freeze button flashing?
When you exit Learn mode, the Freeze button will often be flashing. This is telling
you that one or more of the knobs have their values "frozen" until you turn the knob
back to where it was when you first entered Learn mode (it also could mean you
adjusted a Shift feature). To "unfreeze" a knob, turn it up and down until the Freeze
button flashes green. The sound won't change until it's back in its original position. If
more knobs still need unfreezing, Freeze will keep flashing. When exiting Learn
mode, you usually want to unfreeze Root and Pitch. This feature keeps the pitch
from jumping drastically when you exit Learn mode, and means you don't have to
retune to external equipment.
1. Start by unpatching all cables except the Out jack(s), and turning down Twist, Warp,
Detune, and Cross FM.
2. Turn down Balance so that you're just hearing the root oscillator. Turn up Pitch and/or Root
so that it's playing a low frequency. This is your root note.
3. Flip the Scale switch to Free and turn the Scale knob to a scale you don't mind overwriting
(you can restore it later).
4. Tap the Learn button. It'll turn red to show you're in Learn mode.
5. Hold down the Learn button and turn the
note plus a new note whose pitch you're controlling. The new note will be higher or lower in
pitch depending on which way you turn the knob. Keep turning the
like how the two notes sound together. Release the Learn button.
6. Repeat the last step to add another note. You should be hearing three notes now.
7. Let's try adjusting the pitch of the last note you added. Hold down Learn and turn the
Tune
(Pitch) knob. The pitch of the last note will change by a small amount.
8. Repeat the Learn +
obnoxiously high.
9. Oops! That last note is a mistake, let's get rid of it. Tap the
it'll go away.
10. Add some more notes if you wish (maximum of 16).
11. When you're done, tap the Learn button. It'll flash green to indicate your scale saved.
12. That's it! You've programmed a scale. It's saved in the group and slot the Scale knob and
switch point to. You can recall it even after you power down.
13. Let's listen to the notes of the scale. Notice that the Freeze button is flashing (see inset
below). Turn the Root knob up and/or down until the Freeze button flashes green. Now you
can slowly turn Root to play the notes of the scale in order.
14. Listen to how the notes sound together as a chord or waveform by turning Balance up
towards center, and adjusting Spread and Detune until you hear a full sound.
15. Feel free to play with Twist, Warp, and Cross FM to find a timbre you like.
16. If you want to restore the original factory scale into the slot, make sure the Scale knob is
pointing to the slot you want to restore and the Scale switch is selecting the correct group.
Then hold down the Learn button for about four seconds. The button will flash blue and the
sound will change when the original factory scale is restored. There is no undo for this.
Add Note
Add Note
step again to add a fourth note. This time, make the pitch
Page
9
of
19
(Root) knob. You'll hear the original root
Add Note
Delete Note
(Freeze) button and
knob until you
Fine
